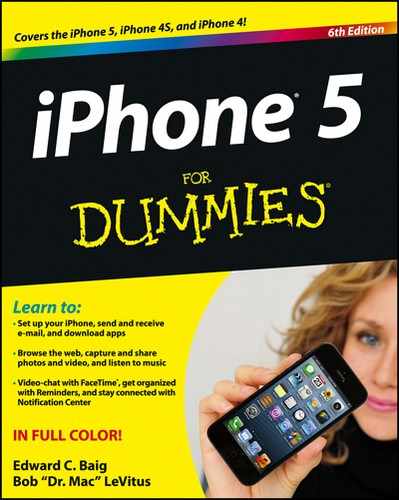
Figure 12-6: The Mailboxes screen is divided by inboxes and accounts.
See Me, Read Me, File Me, Delete Me: Working with Messages
Now that your e-mail accounts are all set up, it’s time to find out how to receive and read the stuff. Fortunately, you already did most of the heavy lifting when you set up your e-mail accounts. Getting and reading your mail is a piece of cake.
You can tell when you have unread mail by looking at the Mail icon at the bottom of your Home screen. The cumulative number of unread messages across all your e-mail inboxes appears in a little red circle in the upper-right area of the icon.
Reading messages
Tap the Mail icon now to summon the Mailboxes screen shown in Figure 12-6. At the top of the Inboxes section is the All Inboxes inbox, which as its name suggests is a repository for all the messages across all your accounts. The number to the right of All Inboxes should match the number in the Mail icon on your Home page. (If it doesn’t, some fuzzy math is going on.) Again, it’s the cumulative tally of unread messages across all your accounts.
Below the All Inboxes listing are the inboxes for your individual e-mail accounts. The tally this time is only for the unread messages in each account.
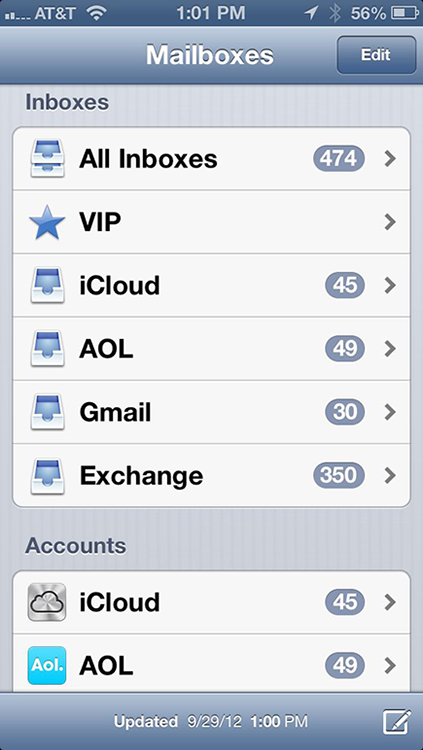
Scroll down toward the bottom of the Mailboxes screen and you’ll find an Accounts section with a similar listing of e-mail accounts. But if you tap on the listings here, you’ll see any subfolders for each individual account (Drafts, Sent Mail, Trash, and so on), as shown in Figure 12-7.
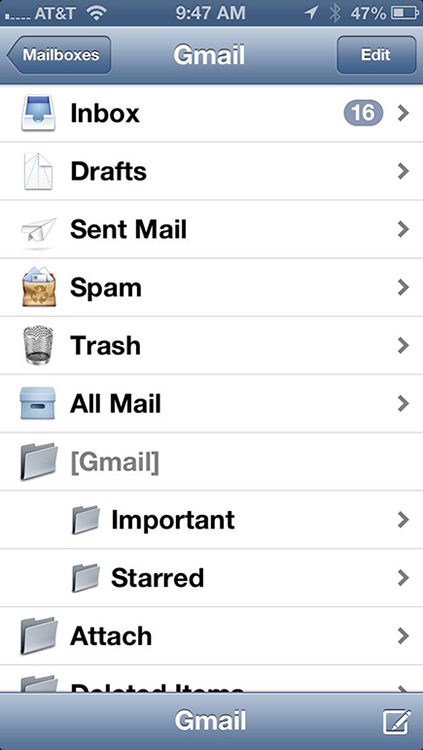
Figure 12-7: Tap one of your e-mail accounts to reveal its subfolders.
You can add new mailboxes by tapping Mailboxes⇒Edit⇒New Mailbox — if your e-mail provider allows you to add (and for that matter, delete) mailboxes. Not all do. Choose a name and location for the new mailbox. Or tap an existing mailbox, and then tap Delete Mailbox to get rid of it (and all its contents).
To read your mail, tap an inbox: either All Inboxes to examine all your messages in one unified view or an individual account to check out messages from just that account.
 If you have just a single mail account configured on your iPhone, you’ll see only that one inbox on the Mailboxes screen.
When you tap a mailbox to open it, Mail fetches the most recent messages and displays the total number of unread messages at the top of the screen.
Now tap a message to read it. When a message is on the screen, buttons for managing incoming messages appear below it. These controls are addressed in the next section.
Managing messages
When a message is on your screen, you can do many tasks in addition to reading it. Check out Figure 12-8 for the location of the controls mentioned in this section.
You can perform the following actions:
![]() View the next message by tapping the next message arrow at the upper-right corner of the screen (it’s the downward-pointing arrow).
View the next message by tapping the next message arrow at the upper-right corner of the screen (it’s the downward-pointing arrow).
![]() View the preceding message by tapping the previous message arrow (the one pointing upward).
View the preceding message by tapping the previous message arrow (the one pointing upward).
![]() Flag the message to denote its importance or mark it as unread.
Flag the message to denote its importance or mark it as unread.
Figure 12-8: Reading and managing an e-mail message.
![]() File this message in another folder by tapping the file message icon. When the list of folders appears, tap the folder where you want to file the message.
File this message in another folder by tapping the file message icon. When the list of folders appears, tap the folder where you want to file the message.
![]() Delete this message by tapping the delete message icon. You have to dig in the trash to retrieve the message if you tap the delete message icon by mistake. Go to Mail Settings if you want the iPhone to ask you before deleting a message. As noted later in this chapter, in some instances you can archive mail instead of deleting it.
Delete this message by tapping the delete message icon. You have to dig in the trash to retrieve the message if you tap the delete message icon by mistake. Go to Mail Settings if you want the iPhone to ask you before deleting a message. As noted later in this chapter, in some instances you can archive mail instead of deleting it.
![]() Reply, reply to all, forward, or print this message by tapping the reply/reply all/forward/print icon.
Reply, reply to all, forward, or print this message by tapping the reply/reply all/forward/print icon.
![]() Create a new e-mail message by tapping the new message icon.
Create a new e-mail message by tapping the new message icon.
You can delete e-mail messages without opening them (see Figure 12-9).
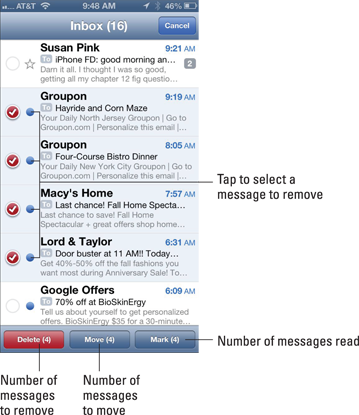
Figure 12-9: Wiping out or moving messages, en masse.
Delete your messages in two ways:
![]() Swipe left or right across the message, and then tap the red Delete button that appears to the right of the message. In some e-mail accounts, notably Google’s Gmail, an Archive button may appear instead of Delete, depending on whether you turned on Archive Messages in Settings. In that case, tap the button to archive the message; it is not deleted.
Swipe left or right across the message, and then tap the red Delete button that appears to the right of the message. In some e-mail accounts, notably Google’s Gmail, an Archive button may appear instead of Delete, depending on whether you turned on Archive Messages in Settings. In that case, tap the button to archive the message; it is not deleted.
![]() Tap the Edit button (in the upper-right corner of the Inboxes screen or a mail subfolder screen), and then tap the little circle to the left of each message you want to remove. Tapping that circle puts a check mark in it and brightens the red Delete button at the bottom of the screen. Tap that Delete button to erase all messages you selected. Deleted messages are moved to the Trash folder.
Tap the Edit button (in the upper-right corner of the Inboxes screen or a mail subfolder screen), and then tap the little circle to the left of each message you want to remove. Tapping that circle puts a check mark in it and brightens the red Delete button at the bottom of the screen. Tap that Delete button to erase all messages you selected. Deleted messages are moved to the Trash folder.
Threading messages
Apple lets you thread messages, or have Mail automatically group related missives. The beauty of this arrangement is that you can easily trace back an e-mail conversation. When you organize messages by a thread, the related messages show up as a single entry in the mailbox, with a number next to the right-pointing arrow in the entry indicating how many underlying messages are represented by the thread. So the number 6 next to Robert’s message in Figure 12-10 (left) shows that six messages constitute this particular thread; when you tap that listing, the six threaded messages appear, as shown in Figure 12-10, right.
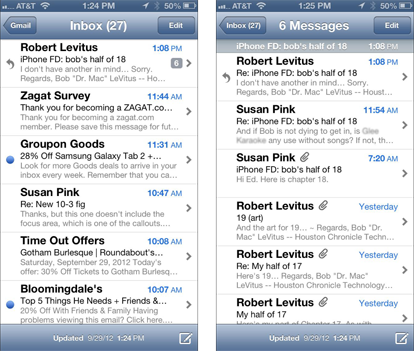
Figure 12-10: Your e-mails are hanging together by a thread.
You have to turn on threading in Settings. From the Home screen, tap Settings⇒Mail, Contacts, Calendars⇒Organize by Thread. Finally, tap the button so that it reads On, as shown in Figure 12-11. You may have to scroll down to see the Organize by Thread setting.
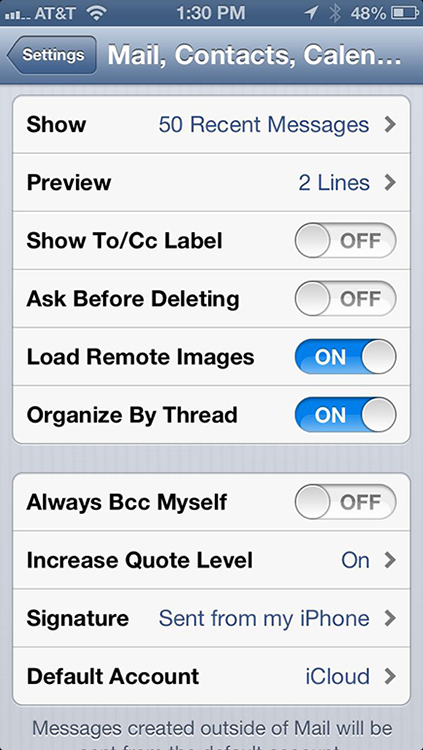
Figure 12-11: Organize by Thread keeps related messages together.
When you look at a message that’s part of a thread, the numbers at the top of the screen tell you your location in the conversation. For example, in Figure 12-12, the message is number 1 of 6 in this thread.
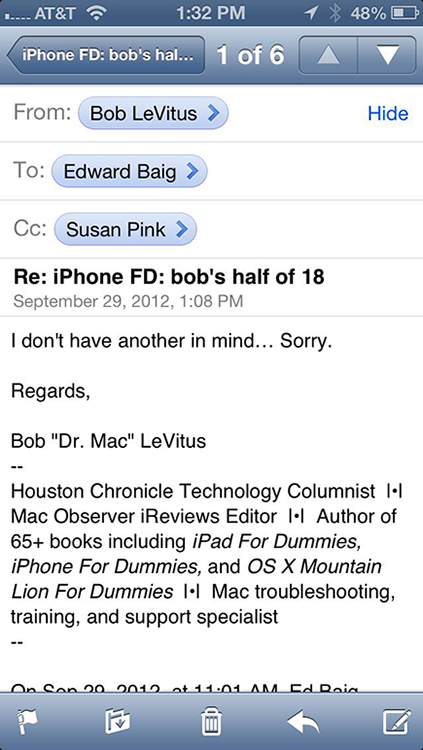
Figure 12-12: Reading a threaded message.
Searching e-mails
As part of Spotlight search, you can easily search through a bunch of messages to find the one you want to read right away — such as that can’t-miss stock tip from your broker. Tap the status bar to scroll through the top of the inbox. You can type stock or whichever search term seems relevant. All matching e-mails that have already been downloaded appear. Or, by tapping in the search box itself, you can display tabs that let you narrow the search to the From, To, or Subject fields. You can also run a search to find words in the body of an e-mail message.
If you’re using Exchange, iCloud, or certain IMAP-type e-mail accounts, you may even be able to search messages stored on the e-mail provider’s servers or out in the Internet cloud. When available, tap Continue Search on Server, as shown in Figure 12-13.
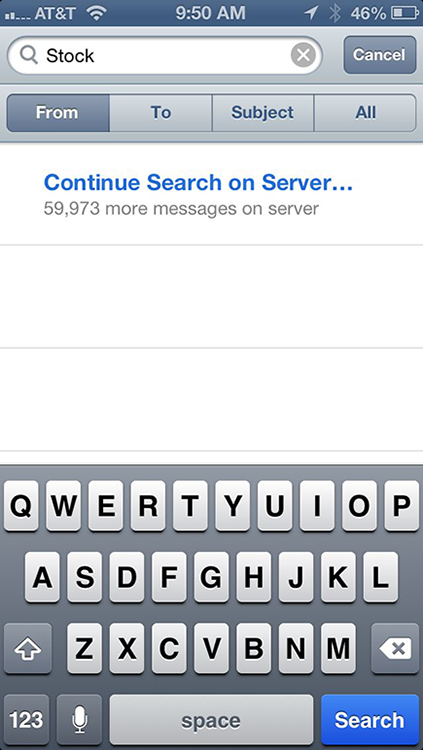
Figure 12-13: Your search doesn’t end here.
 The capability to search e-mails may vary by e-mail account. In some instances, you can search only whole words; in other cases, partial words may work.
 You can delete messages in bulk. In much the same way, you can move them to another folder in bulk. Tap Edit and then tap the circle to the left of each message you want to move so that a check mark appears. Tap the Move button at the bottom of the screen (refer to Figure 12-9), and tap the new folder where you want those messages to hang out.
Don’t grow too attached to attachments
Your iPhone can even receive e-mail messages with attachments in a wide variety of file formats. Here are some of the most common:
![]() Apple Keynote: .key
Apple Keynote: .key
![]() Apple Numbers: .numbers
Apple Numbers: .numbers
![]() Apple Pages: .pages
Apple Pages: .pages
![]() Contact information: .vcf
Contact information: .vcf
![]() Images: .jpg, .tiff, .gif, .png
Images: .jpg, .tiff, .gif, .png
![]() Microsoft Excel: .xls, .xlsx
Microsoft Excel: .xls, .xlsx
![]() Microsoft PowerPoint: .ppt, .pptx
Microsoft PowerPoint: .ppt, .pptx
![]() Microsoft Word: .doc, .docx
Microsoft Word: .doc, .docx
![]() Preview and Adobe Acrobat: .pdf
Preview and Adobe Acrobat: .pdf
![]() Rich Text: .rtf
Rich Text: .rtf
![]() Text: .txt
Text: .txt
![]() Web pages: .htm, .html
Web pages: .htm, .html
The iPhone can also play many types of audio attachments that turn up in an e-mail, including MP3, AAC, WAV, and AIFF.
If the attachment is a file format not supported by the iPhone (for example, a Photoshop .psd file), you see the name of the file but you can’t open it on your iPhone. In some other instances, you may see an Open In button if one of your apps can handle the file type.
Here’s how to read an attachment:
1. Open the mail message containing the attachment.
2. Tap the attachment.
You probably need to scroll down to see the attachment, which appears at the bottom of the message. The attachment, like the one shown in Figure 12-14, downloads to your iPhone and opens automatically.

Figure 12-14: Text from a Microsoft Word file attached to an incoming e-mail message.
3. Read the attachment.
4. Tap the Message button in the upper-left corner of the screen to return to the message text.
More things you can do with messages
Wait! You can do even more with your incoming e-mail messages:
![]() To see all recipients of a message, tap Details (displayed in blue) to the right of the sender’s name.
To see all recipients of a message, tap Details (displayed in blue) to the right of the sender’s name.
If all recipients are displayed, you see Hide in blue rather than Details. Tap Hide to hide all names except the sender’s.
![]() To add an e-mail recipient or sender to your Contacts, tap the name or e-mail address at the top of the message and then tap either Create New Contact or Add to Existing Contact.
To add an e-mail recipient or sender to your Contacts, tap the name or e-mail address at the top of the message and then tap either Create New Contact or Add to Existing Contact.
![]() To mark a message as unread or to flag it to call attention to it later, tap the icon that looks like a flag, at the lower-left corner of the screen. Tap either Mark As Unread or Flag, depending on your preference. If you choose the former, the message is again included in the unread message count on the Mail icon on your Home screen, and its mailbox again has a blue dot next to it in the message list for that mailbox. If you choose Flag, a flag will appear instead of the blue dot next to the message in the message list.
To mark a message as unread or to flag it to call attention to it later, tap the icon that looks like a flag, at the lower-left corner of the screen. Tap either Mark As Unread or Flag, depending on your preference. If you choose the former, the message is again included in the unread message count on the Mail icon on your Home screen, and its mailbox again has a blue dot next to it in the message list for that mailbox. If you choose Flag, a flag will appear instead of the blue dot next to the message in the message list.
You can mark messages in bulk as unread by tapping the Edit button and then tapping the little circle next to each message you want to mark as unread. The Mark button (at the bottom right) brightens. You can then tap Mark As Unread. You’re also presented with the option to Flag a message.

![]() To make a sender a VIP, tap the name or e-mail address at the top of the message and then tap Add to VIP. This tool is especially valuable considering that most of us deal with lots of unimportant e-mail, which tends to bury the important messages from the spouse, the kids, the boss, and key clients. A star appears next to any incoming messages from a VIP or threads in which the designated VIP is part of. You can summon mail from all your VIPs by tapping the VIP folder in the list of mailboxes (refer to Figure 12-6). To demote a VIP to what we jokingly refer to as an NVIP (translation: not very important person), tap the name or e-mail at the top of the message and then tap Remove from VIP. Don’t worry; he or she will never know.
To make a sender a VIP, tap the name or e-mail address at the top of the message and then tap Add to VIP. This tool is especially valuable considering that most of us deal with lots of unimportant e-mail, which tends to bury the important messages from the spouse, the kids, the boss, and key clients. A star appears next to any incoming messages from a VIP or threads in which the designated VIP is part of. You can summon mail from all your VIPs by tapping the VIP folder in the list of mailboxes (refer to Figure 12-6). To demote a VIP to what we jokingly refer to as an NVIP (translation: not very important person), tap the name or e-mail at the top of the message and then tap Remove from VIP. Don’t worry; he or she will never know.
![]() To zoom in and out of a message, employ the pinch and unpinch gestures, which we suspect you excel at now.
To zoom in and out of a message, employ the pinch and unpinch gestures, which we suspect you excel at now.
![]() To follow a link in a message, tap the link. (Links are typically displayed in blue and may be underlined, but sometimes they appear in other colors.) If the link is a URL, Safari opens and displays the web page. If the link is a phone number, the Phone app opens and offers to dial the number. If the link is a map, Maps opens and displays the location. If the link is a day, date, or time, you can tap the item to create a calendar event. If the link is a shipper’s tracking number, you may be able to get the status of a package. And last but not least, if the link is an e-mail address, a pre-addressed blank e-mail message is created.
To follow a link in a message, tap the link. (Links are typically displayed in blue and may be underlined, but sometimes they appear in other colors.) If the link is a URL, Safari opens and displays the web page. If the link is a phone number, the Phone app opens and offers to dial the number. If the link is a map, Maps opens and displays the location. If the link is a day, date, or time, you can tap the item to create a calendar event. If the link is a shipper’s tracking number, you may be able to get the status of a package. And last but not least, if the link is an e-mail address, a pre-addressed blank e-mail message is created.
If the link opens Safari, Phone, or Maps and you want to return to your e-mail, press the Home button on the front of your iPhone and then tap the Mail icon. You can also double-tap the Home button, tap Mail in the multitasking bar, or gesture your way back to the previous app, using a three-finger swipe.
..................Content has been hidden....................
You can't read the all page of ebook, please click here login for view all page.