
Creating Data-Driven Unit Tests
Let’s build on our knowledge of both basic unit testing concepts and the unit testing framework attribute classes and examine how to create a unit test that feeds off of a data source.
Looking back at Listing 8.1, you recall we had to manually define a few invoice objects in the “arrange” section of the test. This works out fine for the limited data we are dealing with here but would quickly become unmanageable if we wanted or needed a more expansive data set. In other words, instead of just testing with a scenario of adding two invoice lines, what if we wanted to add hundreds? And what if we wanted to dynamically populate those line items instead of hard-coding them in the test method? In these cases, you want to author the unit test in such a way that it derives its values from an actual data source.
The basic process for authoring the unit test remains the same, with the following tweaks:
1. Create the data source that will store the values to inject into the unit test.
2. Add a TestContext property (public) to the unit test class.
3. Add a reference to System.Data from the unit test project.
4. Add a DataSource attribute to the method to wire the data to the unit test method.
Let’s put the data-driven scenario into action by adding another unit test method. This one tests whether the InvoiceLineItem object is successfully producing line item totals (that is, the product of the price and the quantity of each line). The test will be executed for each line item we add to the invoice via the data source.
Adding a Data Source
Any .NET accessible data source will work: a table in SQL Server, an object collection, an Excel file, a CSV file, an XML file, and so on. Because it is quick and easy to implement, let’s store our invoice test data in a CSV file.
First we add a text file to the test project (right-click the project, select Add New Item, and then select the Text File item template); we name the file InvoiceTestData.csv.
Next, we enter the following values and save the file. Each line in the file represents an invoice line item. Fields are separated by commas, as in name, description, quantity, and price. Remember, you can download the code for this chapter from the website associated with this book: informit.com/title/9780672337369.
"Prod 1","line 1",2,2.50
"Prod 2","line 2",0,100
"Prod 3","line 3",10,1.25
"Prod 4","line 4",3,3.33
"Prod 5","line 5",1000,10
"Prod 6","line 6",2,5
"Prod 7","line 7",1,9.10
"Prod 8","line 8",5,5
"Prod 9","line 9",8,9.75
"Prod 10","line 10",20,2000
Because we have chosen to use a file to store our test data, we want to make sure that the file is deployed along with the unit test binaries as part of any build. The CSV file needs to be marked as content, and it needs its build action set to Copy Always or Copy if newer. To do this, right-click the file in the Solution Explorer window, and use the property window to change the Build Action and Copy to Output Directory values to the mentioned values.
With the file setup complete, let’s write the data source attribute. The DataSource attribute class has three overloads. The first simply takes a single parameter: dataSource-SettingName. In this case, you are expected to pass the name of the data source settings as defined inside a configuration file. The second overload takes both a connectionString and a tableName. In this case, you pass a valid connection string to the DataSource and indicate the name of the table you intend to bind to the unit test. The final overload takes providerInvariantName, connectionString, tableName, and dataAccessMethod. The provider name is used to indicate the type of provider, such as a CSV provider, SQL Server, or similar. The connection string is based on your chosen provider and indicates how you access the data. The table name is the name of the table (or file) that contains your data. Finally, the data access method determines how your data is bound to the unit test: sequentially or randomly. The following shows an example for our CSV file.
[DataSource("Microsoft.VisualStudio.TestTools.DataSource.CSV",
"InvoiceTestData.csv", "InvoiceTestData#csv",
DataAccessMethod.Sequential)]
Note
The first parameter is using the built-in CSV data source parser that exists in the unit testing framework. The way you configure this data source for other sources, such as SQL tables or even Excel files, will vary. You should consult the Microsoft Developer Network (MSDN) documentation to determine exactly how to construct this attribute for your data source.
Notice that in the preceding code example, the first parameter of the DataSource attribute constructor defines the CSV provider. The next parameter is a connection string to the actual data file. The third parameter (InvoiceTestData#csv) simply indicates that the table name does not exist; it is the filename. The last parameter, the enumeration DataAccessMethod.Sequential, indicates that each row should be bound to the unit test in sequential order.
Because we are deploying a file as a data source here, we need one additional attribute, DeploymentItem, to tell the unit testing framework what specific deployed file it should seek. That brings us to three attributes for this test method, as follows.
[TestMethod]
[DataSource("Microsoft.VisualStudio.TestTools.DataSource.CSV",
"InvoiceTestData.csv", "InvoiceTestData#csv",
DataAccessMethod.Sequential)]
[DeploymentItem("InvoiceTestData.csv")]
With the attributes in place, we can write our test method. See Listing 8.2 for our final product. Each row within our data source is accessed via the TestContext property, which we added to our unit test class. Because we have attributed our method correctly, it will be called once for every row in our data source.
We extract the values from the row (item number, description, quantity, and price) within the “arrange” section, and then we create a new InvoiceLine object using those values. Within the “act” section, we create the LineItem instance and store off the line item total that it produced. Finally, in the “assert” section, we compare the total from the LineItem object with the total that we manually computed. If they are equal, our code has passed the unit test. Note, you might also put the expected value directly in your test data.
LISTING 8.2 Driving a Unit Test Using a CSV File
[TestMethod]
[DataSource("Microsoft.VisualStudio.TestTools.DataSource.CSV",
"InvoiceTestData.csv", "InvoiceTestData#csv",
DataAccessMethod.Sequential)]
[DeploymentItem("InvoiceTestData.csv")]
public void ComputeLineItemsTest()
{
//arrange --------------------------
string name = Convert.ToString(TestContext.DataRow[0]);
string desc = Convert.ToString(TestContext.DataRow[1]);
short qty = Convert.ToInt16(TestContext.DataRow[2]);
double price = Convert.ToDouble(TestContext.DataRow[3]);
double expected = qty * price;
//act
InvoiceLineItem line = new InvoiceLineItem(name, price, desc, qty);
double actual = line.Total;
//assert --------------------------
Assert.AreEqual(expected, actual, "Line total is incorrect.");
}
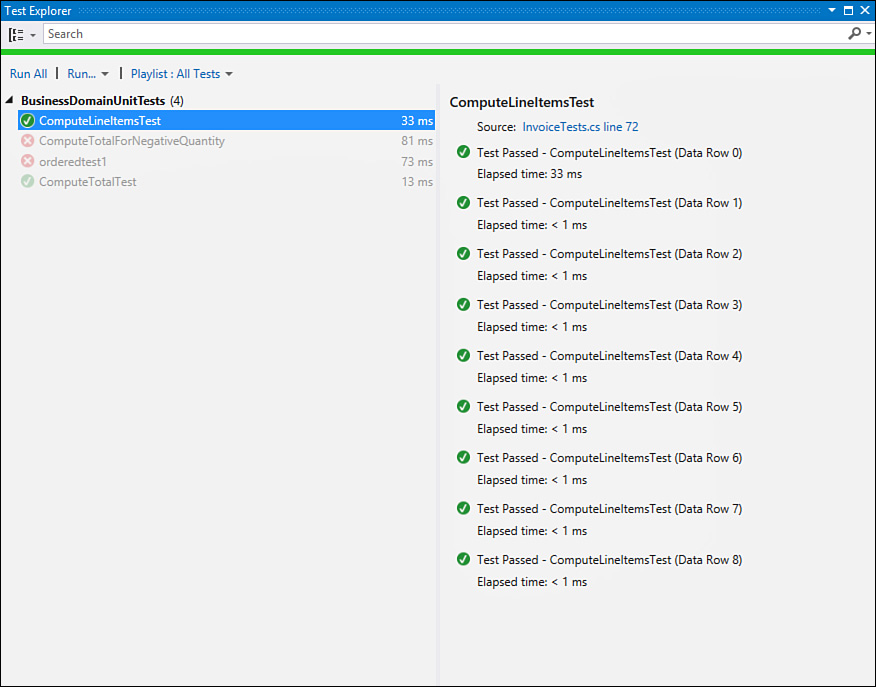
Figure 8.9 shows the results of newly minted unit tests. Notice the data-driven unit tests are executed once for every row in the data source CSV file.
You may want to store your data source connection in a configuration file (App.config). The unit test framework supports this scenario. For a walkthrough, see “Using a Configuration File to Define a Data Source” inside MSDN.