
Gathering Requirements by Using Visio Premium
Creating, Editing, and Managing Custom Workflows by Using SharePoint Designer
Working with Workflows and Visual Studio
MICROSOFT SharePoint Foundation 2010 introduced a considerable array of new functionality concerning the creation, maintainability, reusability, and deployment of workflows. One of the first improvements to note is that the out-of-the-box workflows can be modified in SharePoint Designer 2010. Another improvement, again related to SharePoint Designer 2010, is the ability to create reusable workflows. In previous versions of SharePoint Designer and SharePoint, a workflow created in SharePoint Designer could only be associated with one list. Now, you can create a reusable workflow that can be associated with multiple lists. Once the workflow has been published to a SharePoint Site, you can then save the workflow as a workflow template in the form of a Windows SharePoint solution file (.wsp). This workflow template can then be imported to another site to be used to create the same workflow on the new site or imported into Microsoft Visual Studio 2010 where it can be further enhanced.
In the previous version of SharePoint, you could use the browser and SharePoint Designer to attach workflows to a list or library, and although SharePoint 2010 has introduced site workflows, attaching workflows to lists or libraries will probably still be the most popular type of SharePoint workflow.
This chapter details how to use the out-of-the-box workflows in the browser. It will then look at extending them by using SharePoint Designer, and then it will detail how Visual Studio can help your organization to use SharePoint Foundation 2010 with its business processes. Also in this chapter, you will use a holiday request business process to explore the use of the out-of-the-box Three-State workflow, Microsoft Visio Premium and SharePoint Designer.
For several years now, there has been a push across both government and commercial sectors to do more work in less time, to minimize the number of files attached to emails, and to reduce the amount of information that needs to be printed. Many large organizations, especially in the civilian government, finance, and healthcare industries have been clogging their email systems with duplicate data and choking on paperwork and processes. Of course, forms and processes are required, and SharePoint Foundation can address many of these issues by using the Microsoft Windows Workflow Foundation (WF) components of Microsoft .NET 3.5 to provide user-driven process automation. WF offers all the functionality required for building enterprise-level workflows, such as built-in support for transactions, tracking, and notifications. WF does not act as a standalone application but always works with a program, which in this instance is SharePoint Foundation. And because SharePoint Server 2010 is built on top of Windows Foundation, it too has workflow capabilities.
Using the browser, SharePoint can help with business processes by using one of the following methods:
Really Simple Syndication (RSS) feeds, for finding information from a variety of sources on an ad hoc basis. Use this method when the information is not needed on a day-to-day basis. RSS feeds use a pull mechanism to find information; that is, you only find information exposed by RSS feeds when you open an RSS reader, such as Internet Explorer or Microsoft Outlook 2007 or 2010.
Alerts, for regular notifications of new, modified, or deleted content. Use this method to send you an email when information is found. Alerts can be configured to send emails immediately when SharePoint finds information in which you have registered an interest, or a daily or weekly digest of that information.
You can use content approval, which along with versioning to manage content and control who can see content that is classified as draft. When you enable content approval on a list or library, a column named Approved Status is added to the library, together with a number of views. In addition, enabling content approval activates the Approval/Reject command on the list item menu and on the ribbon. The Approval Status column can contain the choices Approved, Rejected, or Pending. Users who are assigned the Manage Lists permission can approve or reject items. No email is sent to the user with the Manage List permissions. They would need to visit the list to see if any items are in a pending state.
However, with none of these three methods can you automate business processes beyond a one-step method. You can combine these methods together with other SharePoint functionality, such as using content approval with alerts to provide a lightweight workflow that sends you emails when your team members publish documents as a major version so that you can approve documents according to a specific timescale. However, such a solution can help solve only a small number of your business processes. You might want to route a document or a webpage to a number of people before publishing it.
Note
Microsoft’s TechNet website contains an article on versioning, content approval, and check out planning. You can view this at http://technet.microsoft.com/en-us/library/ff607917.aspx.
SharePoint provides two other methods to help automate processes:
Workflows This is used to automate and track processes that require human intervention such as notifying users when their action is required to move the process forward. Such processes can take days, weeks, or months to complete and might need to wait for an event or another process to complete. Workflows can be created by using the browser, SharePoint Designer, and Visual Studio.
Event receivers Used to automate processes that require no human intervention such as moving job applications from one document library to a series of other document libraries for some purpose. Event receivers can only be created by using Visual Studio.
Workflows and event receivers cannot automate a task unless time is taken to understand it at a very detailed level. A workflow cannot track the status of information stored on paper documents; nor can you force users to perform a particular task by using the workflow you created. You must have a clear understanding of how the business process operates. If you do not understand how to complete a business process manually, you will not be able to describe the business process in sufficient detail to automate it. You also need the reassurance of the business process owners that upon the introduction of this workflow, it will be used by the process users. Using workflows to automate parts of a business process in reality means that you are involved in business process re-engineering. Managing the change of the new process and understanding the people, their fears, and worries is the most important part of automating process into the business workspace.
Therefore, there is more to creating a successful workflow than using the browser or SharePoint Designer to configure one. You need to plan how you intend to automate a process, taking into account people, processes, and technology. You need to choose the process that you are going to automate carefully—do not automate every little process in your organization. Look for processes that are predictable and for which the startup cost of creating a workflow and ensuring that your team is happy with the new process will be offset by the productivity improvement that the automated process will provide. Understand the technology that you are going to use to automate the processes, which in this case is SharePoint Foundation and the Windows Workflow Foundation.
Note
Microsoft’s TechNet website contains an article on planning SharePoint Foundation 2010 workflows. You can view this at http://technet.microsoft.com/en-us/library/cc288553.aspx.
In the same way that you base a new site, list, or library on a template, you base a new workflow process on a workflow template. These templates are implemented as features that can be activated or deactivated at the site or Site Collection level by using the browser or by using a custom program or Windows PowerShell. A workflow template is available only when a workflow feature is activated.
Tip
INSIDE OUT Out-of-the-box workflow templates
SharePoint Foundation ships with only one workflow template, the Three-State workflow, whereas SharePoint Server contains a number of document-centric workflow templates and one site workflow template, Web Analytics workflows.
Workflows are a series of tasks that produce an outcome. To create a workflow you configure and add (also known as associating) the workflow template to a list, library, or site. An instance of the workflow can then be initiated by using the configured workflow template, which defines the conditions that should be tested to decide what tasks to complete to produce the outcome. You can also associate a workflow template with a content type, and then associate the content type with a list or library to define a workflow.
At the top-level site of a Site Collection, you can use the Workflows page to see which workflow templates are available and active, the number of SharePoint objects (lists, libraries, content types, and sites) with which the workflow template is associated, and the number of workflow instances that are running in those workflows. Use the following steps to navigate to the Workflows page:
Click Site Actions, and then click Site Settings.
Under Site Administration, click Workflows.
If you do not see the Workflows link under Site Administration, you are probably at a child site within the Site Collection, in which case, under Site Collection Administration, click Go To Top Level Site Settings to navigate to the top of the Site Collections.
Unfortunately, this Workflow page does not provide any links that you can use to identify which SharePoint objects the workflow template is associated with or which sites, list items, or documents are progressing through the workflow.
The workflow always has a start and an end. An instance of the workflow is created when a workflow event is triggered for a specific list item or file; the workflow instance then enters the workflow at its start point and progresses through the workflow process as defined by the configured workflow template until it reaches the end point, at which time the workflow instance is set to Completed, as shown in Figure 10-1. The workflow does no other work until a new workflow instance is created. A workflow can contain one or more workflow instances. A list item or file can be related to more than one workflow instance, as long as each workflow instance is related to different workflows.

Figure 10-1. A holiday request workflow with workflow instances progressing through the workflow. One workflow instance is completed.
Depending on the workflow template and its configuration, the start of a workflow instance can be triggered by using one of the following options:
Manually, when you want to test a newly added workflow or when the list or library to which you have added a workflow has a list item or document that needs to progress through the workflow. This option can be limited so that only users who have the Manage List permission can manually start a workflow instance.
Automatically, when you create a list item or document.
Automatically, when you change a list item or document.
Tip
INSIDE OUT Workflow start methods
Custom workflow templates might support other workflow start methods not listed previously. For example, when using SharePoint Server 2010, a fourth option is available for initiating a workflow instance by using information management policies on content types at the site, list, or library levels.
Although it is not strictly required, most workflows use the following two lists:
Task list Use this to create task items to remind users of the work that needs to be completed or to collect information for the next step of the workflow. Workflows can also send emails to a user with a link to the task item that is assigned to them.
Workflow History list This keeps track of the workflow instances that are running or have been completed for a given list item or document. The workflow writes key information to this list, such as the date, status, participant, and description. Based on the contents of the history list, you can create Activity Duration reports that you can use to analyze the duration of workflow instances and the activities within the workflow process. You can also create Cancellation and Error reports that show which workflow processes are being cancelled, or which workflow instances have encountered errors during execution. The default workflow history list is a hidden library and is not shown on the All Site Content webpage. The default workflow inherits permissions from the site; therefore, any user who is mapped to the contribute permission level can update items in this list. You can display this list in the browser by appending
/lists/workflow%20history/to your site’s URL; for example,http://wideworldimporters/lists/workflow%20history/. By default workflows cannot write to the description field of a workflow history item larger than 255 characters.
If you use the same Tasks list and Workflow History list for all workflows in a site, they can become large and compromise site performance. As a result, Microsoft has created a daily Workflow Auto Cleanup timer job to purge items in the task list that exist 60 days after the related workflow instance completes or is cancelled and removes the links to those workflow instances on the workflow status pages. The workflow history items are not deleted. Because of the default security settings on these lists and the 60-day purge of list items, you should not use these lists as an audit of what the workflow is doing.
You can use an existing Task and Workflow History list when you first create a workflow. By default, these lists are indexed, but as they grow, performance will always decrease. If you believe you will have many workflow instances, then create a Task and Workflow History list for your specific workflow. Microsoft states that you should periodically change these lists in the workflow association settings as the number of list items within a list becomes large.
Tip
INSIDE OUT Tracking workflows information for auditing purposes
When you create your own custom workflows—that is, those that are not provided by default with SharePoint Foundation—and you want to keep audit information concerning the workflow, then you should write such information to another list and apply appropriate permissions for the list to secure the items written to it, or use Visual Studio to create a custom audit report by using the SPAuditEntry class. You can find more information at http://msdn.microsoft.com/en-us/library/microsoft.sharepoint.spauditentry.aspx.
SharePoint lists and libraries allow content managers to provide users with a web-based user interface (UI) for linking to, downloading, and uploading information and files, and to provide workflows when information or documents are added to the list or library, or changed.
The person who has Manage List permissions on a list or library can use the Workflow Settings page to associate a workflow template with that list or library, and thereby create a workflow for that list or library. List and library workflow templates can be specific to one content type or they can be used for any content type. From the Workflow Settings page, you pick where the workflow tasks and history information are stored, and set the conditions that trigger a workflow instance for a list item or file. You can also modify and remove an existing workflow process on this page.
Note
To use the Three-State workflow template, you need a choice column on the list or library where you are associating it. The choice column is used to store the three statuses of the workflow; for example, Holiday Request Submitted, Holiday Request Approved, and Holiday Taken. The default value for the column should be set as the first status in the workflow, in this case, Holiday Request Submitted.
To add a workflow template to a list or library, you need to provide a workflow name, choose how you want workflow instances to start, and complete an association form to provide values that are needed by the workflow, especially if the workflow is configured to start automatically. Perform the following steps to add a workflow template to a list or library:
On the Quick Launch, click the document library or list with which you want to associate a workflow template.
On the ribbon, click the List or Library tab.
This tab could also be named Calendar if the list was created from a Calendar list template.
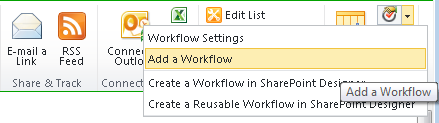
In the Settings group, click the arrow to the right of Workflow Settings, and then click Add A Workflow.
In the Content Type section, select Any or click the name of the content type for which the workflow template will be created.
Ensure that you have associated that content type with this list or library before configuring the workflow.
In the Name section, type a new name for this workflow, such as Holiday Request Approval.
This name will be used to create a column in the list or library, and therefore, it must be unique in the list or library. You must not use the name of an existing column or any of the reserved column names, such as Title, Created By, Modified By, Checked Out To, or Approval Status.
In the Task List section, select an existing tasks list or New Task List.
If you select New Task List, the name of the new task list will take the format of <workflow name> Tasks, such as Holiday Request Approval Tasks.
In the History List section, select an existing workflow history list or New History List.
The name of a new workflow history list will take the format of <workflow name> History.
In the Start Options section, select one of the options that will initiate a workflow instance.
When you first create a workflow, to quickly test it, select the Allow This Workflow To Be Manually Started By An Authenticated User With Edit Item Permissions check box.
Click Next to go to the association page named Customize The Three-State Workflow.
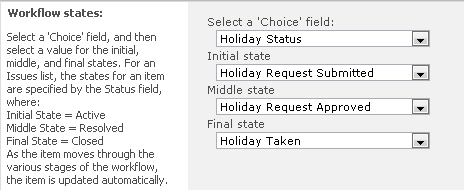
The Workflow States section displays a choice column of the list or library if one exists, for example, if you are adding the workflow template to a list created from the Calendar list template, the Select A ‘Choice’ Field drop-down list will display Category.
In the Select A ‘Choice’ Field drop-down list, select the choice column you created for this workflow, such as Holiday Status and it’s three states: Holiday Request Submitted, Holiday Request Approved, and Holiday Taken.
In the Specify What You Want To Happen When A Workflow Is Initiated section, in the Tasks Details area, make changes as needed.
For example, under Task Title, in the Custom Message text box, type Holiday Request Workflow Started, and under Task Description, in the Custom Message text box, type A Workflow Has Been Started To Process Your Holiday Request. The new task item can be assigned to the person specified in the Assigned To column, or you can specify another person in the Custom text box. You also have the choice to send an email to the person you selected in the Task Assigned To section or to a different person, or to not send an email.
Repeat step 11 for the Specify What You Want To Happen When A Workflow Changes To Its Middle State section.
Click OK to be returned to the default view for the list or library.


Once a workflow template is added to a list or library, you might need to make changes to its configuration. To modify a workflow, complete the following procedure:
On the Quick Launch, click the document library or list to which you added the workflow template.
On the ribbon, click the List or Library tab. In the Settings group, click the Workflow Settings command to display the Workflow Settings page.
This page displays all workflows that were added to the list or library, together with the number of workflow instances that are progressing through each workflow.
Under Workflow Name, click the workflow that you want to modify (such as Holiday Request Approval) to display the Change A Workflow page.
Use this page to change the content type, Task list, and Workflow History list with which this workflow is associated, the name of the workflow, and the start options.
Click Next to open the Customize The Three-State Workflow page, in which you can select a different choice field and modify what you want to happen when a workflow instance is initiated or when a workflow instance changes to its middle state.
Click OK to confirm your changes.

When a workflow is no longer needed, you should remove it from the list or library to prevent confusing users who use that list or library. To remove a workflow from a list or library, perform the following steps:
On the Quick Launch, click the document library or list to which you added the workflow template.
On the ribbon, click the List or Library tab. In the Settings group, click the Workflow Settings command to display the Workflow Settings page.
Click Remove A Workflow to display the Remove Workflow page.
This page displays each workflow that was added to this list or library, together with the number of workflow instances that are currently progressing through the workflow. The three options allow workflow instances to start in the workflow, prevent any workflow instances from starting, or remove the workflow from the list or library. If you feel that you might need the workflow in the future, select the No New Instances option.

When you remove a workflow from a list, it removes the column that the workflow uses to indicate the status of a workflow instance in the workflow process. This column was created when a workflow template is associated with a list or library and contains such values as In Progress, Cancelled, and Completed. Removing columns on lists and libraries causes a database operation proportional to the number of items or files in the list or library. When the list or library contains more than a million items, do not remove the workflow from the list or library; instead, set the workflow to No New Instances.
Once a workflow is added to a list or library, a list item or file can progress through that workflow. The trigger that SharePoint uses to initiate a workflow instance for a list item or file is dependent on the following:
The content type with which the workflow is linked and whether the list item or file is of the same type.
The Start options that you configured on the association forms. You can start a workflow instance by manually starting the workflow, uploading or creating a new file, or modifying an existing list item or file.
To manually start a workflow instance for a list item or file, complete the procedure that follows. You might be provided with an initiation form that allows you to define values that the workflow requires. These might be similar to the values provided on the association form. When a workflow instance is automatically started, the initiation form is not displayed and the default values or the values provided on the association form are used:
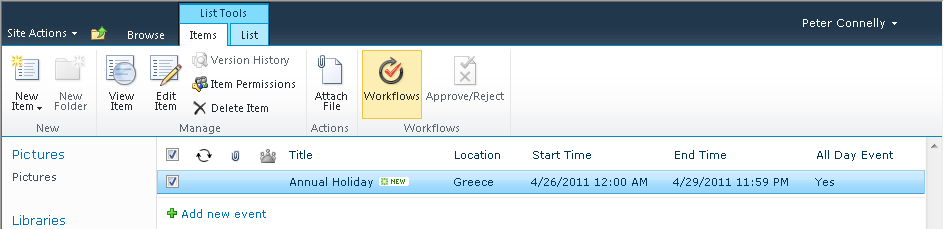
Hover your mouse over the list item or file for which you want to start a workflow, and then select the check box that appears to the left of the list item or file.
On the Items tab (if this is a list) or the Document tab (if this is a library), click Workflows in the Workflows group.
The <list or library name>: Workflows: <file or item name> page is displayed.
Under Start A New Workflow, click the name of the workflow that you want to start; for example, Holiday Request Approval.
You are returned to the default view of the list and library, where a new column might appear. This new column is named with the workflow name and has a status of In Progress. This new column is not added to the default view when the default view is a Calendar view.

To review the workflow progress of the list item or file, perform the following steps:
Browse to the list or library where the item or file is stored.
In the workflow column, click In Progress. If the workflow column is not shown, select the check box to the left of the item, and then on the items tab, click Workflows. Under Running Workflows, click In Progress for the workflow that you want to review.

The workflow status page summarizes workflow instance information in three sections:
Workflow Information This section details workflow instance information, such as who initiated the workflow instance, the start time, the name of the item that the workflow instance is linked to, and the status. You can also use the line at the bottom of this section to terminate the workflow for the list item or file. When you terminate a workflow instance, the status of the workflow changes from In Progress to Cancelled, and any task items created by the workflow are deleted.
Tasks This section displays task items that are associated with this workflow instance. It provides a link to the list item or file and a link to the Task list associated with the workflow. When you click on the title of a task item, if you have Silverlight installed, a modal dialog opens and displays the details of the task item.
Workflow History This section details messages that the workflow instance wrote to the Workflow History list.
To complete tasks assigned to you as a list item or file progresses through a workflow, complete the following procedure:
Browse to the Workflow Status page as described in the previous procedure, or alternatively, display the workflow task list by using the All Site Contents page if a link to the workflow task list is not displayed on the Quick Launch.
Hover over the title of the task item assigned to you, and then click Edit Item to display the task input form.
From the Status list, select Completed, and then on the Edit tab, in the Commit group, click Save.
If the workflow instance has completed all tasks, then the status of the workflow will change from In Progress to Completed.
Tip
INSIDE OUT Permissions and the use of workflows
By default, when you first create a list or library, it inherits its permissions from the site. This is also true for the workflow task and history lists. By specifying a person to assign a task to, you have not modified the permissions of the task list. You have only configured the workflow to store the user name in the Assign To column of the task list. Any user in the site’s members SharePoint Group can edit and therefore complete the workflow task item.
New with SharePoint Foundation is the introduction of site workflows, which are not associated with a list or library. However, site workflows can work with any SharePoint object within the site. By default, SharePoint Foundation 2010 does not provide any site templates to use with any sites; therefore, you would need to develop a site workflow template by using Visual Studio or you can publish a workflow to a site by using SharePoint Designer.
To manually start a site workflow instance or to monitor a site workflow by using the browser, perform the following steps:
On the Quick Launch, click All Site Content, or on the Site Actions menu, click View All Site Content to display the All Site Content page. To the right of Create, click Site Workflows.
Under Start A New Workflow, click the site workflow that you want to start, or under My Running Workflows or under My Completed Workflows, click the workflow that you want to monitor.
If you cannot see the workflow that you want to monitor, under Workflows, click Show All Workflows.
To manage the site workflows associated with a site, complete the following procedure:
Browse to the Site Settings page.
Under Site Administration, click Workflow Settings.
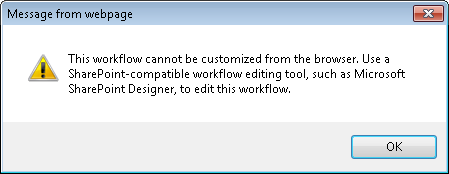
If the site workflow was developed by using Visual Studio, you might be able to change association parameters by clicking the workflow name. If the site workflow was created by using SharePoint Designer, you can only change the site workflow via SharePoint Designer, and therefore, clicking the workflow name displays a message box, stating that you need to use a SharePoint-compatible workflow editing tool.
Click Remove A Workflow to display the Remove Workflow page. This page displays each workflow that was added to the site, together with the number of workflow instances that are currently progressing through the workflow. You can use this page to prevent the start of any new workflow instances or to remove site workflows.
To create a site workflow by using SharePoint Designer, perform the following steps:
You can then create an initiation form, use actions and conditions, and publish the workflow, as described later in this chapter.