
SharePoint uses the concept of a Feature to deploy a set of components and functionalities into the SharePoint environment. Features can be activated and applied at the website, web application, or the farm Level. A Feature in previous versions of SharePoint typically contained a Feature.xml and Elements.xml file that were used to determine what elements to include in the Feature or solution.
Figure 16-8 illustrates a new node in Solution Explorer called Features. This is a new structural component that is automatically created for SharePoint solutions in Visual Studio when a project is created. This Features node is also updated automatically as certain items are added to the project that are required to be deployed through the use of a Feature. This structure also allows multiple Features to be applied under this Features directory and multiple Features to be packaged into one solution package.
Visual Studio also provides additional interfaces with which you can add, update, or remove existing items in a solution or project that are part of a Feature. To access this interface, double-click the Feature file in your solution. A dialog box similar to that depicted in Figure 16-9 opens.
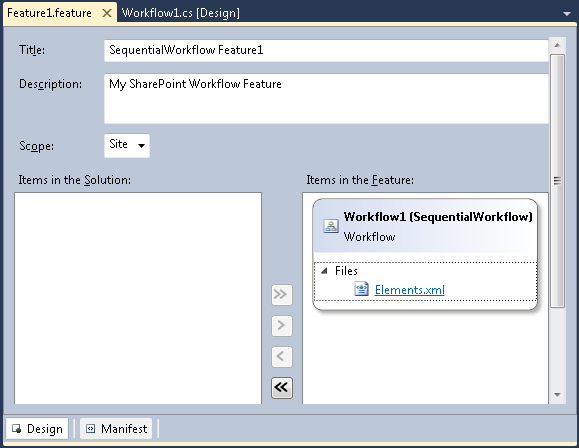
Figure 16-9. Visual Studio provides additional interfaces that allow existing items in a solution or project to be added, updated, or removed from the feature.
Notice that you have the option to edit the title, description, and the scope of the Feature from this interface. Also notice that the Feature contains a directory called Files. This contains all the Elements.xml files that are needed for this solution.
The contents of an elements file will be different depending on the SPI type. An example of the Elements.xml file for a sequential workflow is listed in the following example:
<?xml version="1.0" encoding="utf-8"?>
<Elements xmlns="http://schemas.microsoft.com/sharepoint/">
<Workflow Name="SequentialWorkflow - Workflow1"
Description="My SharePoint Workflow" Id="8b4529c1-d057-4e9a-4c36f9f8111"
CodeBesideClass="SequentialWorkflow.Workflow1.Workflow1"
CodeBesideAssembly="$assemblyname$">
<Categories/>
<MetaData>
<AssoicationCategories>List</AssociationCategories>
<StatusPageUrl>_layouts/WrkStat.aspx</StatusPageUrl>
</Metadata>
</Workflow>
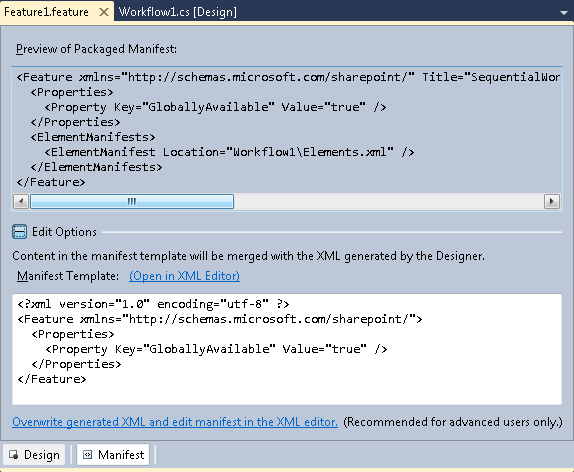
</Elements>You also have the ability to preview or edit the manifest.xml file from this location by clicking the Manifest button at the bottom of the Feature1.feature window. Figure 16-10 shows an example features.xml manifest file. The preview area is read-only; however, you can edit the file if you expand Edit Options. Any modifications you make here are merged with the generated XML by the Feature designer.
Visual Studio also has another new node that’s automatically included when you create a SharePoint 2010 project. This new node is called the Package. The Package contains Features and other components that are used when building and deploying a SharePoint 2010 solution. One of the other important components that the Package contains is the assembly deployment information. This is used to determine where the assemblies for the solution are to be deployed.
To make the process standard for managing and viewing Packages, Visual Studio 2010 now includes a Packaging Designer. The designer makes it’s easier for you to add or remove Features to the Deployment Package for your SharePoint solution. To access the Package Designer, double-click the .package node in Solution Explorer. Figure 16-11 shows an example of the SharePoint Packaging Designer.
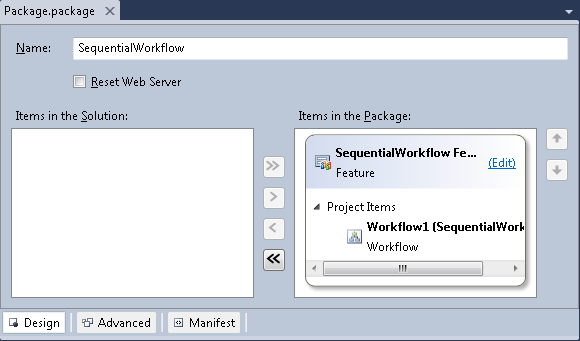
To automatically restart IIS once a Package is deployed, select the Reset Web Server option.
At the bottom of the Package Designer window are three buttons: Design, Advanced, and Manifest. Click the Design button to display a view of the packaging information (see Figure 16-11); click Advanced to perform advanced tasks such as adding additional assemblies to the deployment; click Manifest to display the Package manifest file. As with the Feature manifest file, you can preview the contents or use the Edit Options button to type additional packaging information.
The Package Designer also has one additional window called the Packaging Explorer (see Figure 16-12) with which you can view the hierarchy of the configuration files and items included in your package. The Packaging Explorer opens automatically when you have the Package Designer window open.

The Packaging Explorer behaves similar to Windows Explorer in as much as you can drag and drop components. It shows all Packages and Features in a solution as well as the associated SPIs, such as Workflow1 and its associated project items (for example, Elements.xml).
When you create a Feature, you will commonly need to create code to either set up the SharePoint environment when a Feature is installed or activated, or clean up the environment when the Feature is deactivated or uninstalled. This is when you would use Feature event receivers, which can respond to the following events:
FeatureActivated
FeatureDeactivated
FeatureInstalled
FeatureUninstalling
FeatureUpgrading
There are also a number of other events raised by SharePoint that in certain scenarios will be more applicable to use than the Feature event receivers. For example, in Chapter 14, you created a Visual Studio project that deployed a custom master page and custom Cascading Style Sheets (CSS) files. This was developed as a Site Collection Feature. Therefore, when new Subsites are created in the Site Collection, where the Feature is activated, you need to associate the master page and CSS files to the newly provisioned child sites. In this scenario, the event WebProvisioned, which is a new event introduced with SharePoint 2010 and is called each time a new child site is created, should be used.
Using the project developed in Chapter 14, perform the following steps:
Open the SPFIOBranding project in Visual Studio.
Right-click SPFIOBranding, select Add, and then click New Item.
In the Add New Item dialog box, click Event Receiver and in the Name text box, type SiteProvision. Click Add. The SharePoint Customization Wizard opens.
In this section What Type Of Event Receiver Do You Want, select Web Events, and then under Handle The Following Events, select A Site Was Provisioned.
Click Finish. The SiteProvision.cs file opens in the workspace and a new SPI named SiteProvision is presented in Solution Explorer that contains an Elements.xml file together with the SiteProvision.cs code file.
Replace the code of SiteProvison.cs with the following code:
using System;
using Microsoft.SharePoint;

namespace SharePointCustomMasterPage1.SiteProvision
{
  public class SiteProvision : SPWebEventReceiver
  {
    public override void WebProvisioned(SPWebEventProperties properties)
    {
      SPWeb spWeb = properties.Web;
      SPWeb topSite = spWeb.Site.RootWeb;
      spWeb.MasterUrl = topSite.MasterUrl;
      spWeb.AlternateCssUrl = topSite.AlternateCssUrl;
      spWeb.Update();
    }
  }
}

The content of the elements file is shown in the following code:
<?xml version="1.0" encoding="utf-8"?>
<Elements xmlns="http://schemas.microsoft.com/sharepoint/">
  <Receivers >
      <Receiver>
        <Name>SiteProvisionWebProvisioned</Name>
        <Type>WebProvisioned</Type>
        <Assembly>$SharePoint.Project.AssemblyFullName$</Assembly>
        <Class>SharePointCustomMasterPage1.SiteProvision.SiteProvision</Class>
        <SequenceNumber>10000</SequenceNumber>
      </Receiver>
  </Receivers>
</Elements>
The value of the <Sequence Number> tag is used if there is more than one event receiver for the same event, where the event receiver associated with the smaller number is executed first. The replaceable token in the <Assembly> tag, $SharePoint.Project.AssemblyFullName$, will be resolved when Visual Studio packages the solution.
Looking at the Packaging Designer, the SPFIOBranding Feature now references three SPIs: two modules, SPFIOMaster and SPFIOCSS, and the event receiver SiteProvision.