
Now that you have created a basic site with the Team Site template, you will create a new site and explore some of the other options that are provided via the browser. The additional options are centered on navigation and permissions as well as giving you an option for adding a description. All of these options can be changed later, but if you know what you want, then it makes sense to choose them when you make the site. Let’s take a look at each of these options.
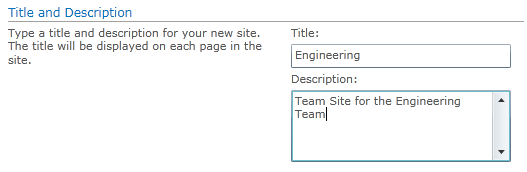
The Title is available without using the additional options. The Description allows for a short description to appear under the Title. The description text can actually be quite long, but it is plain text and not HTML. You can press the Enter key while in the text box (for line breaks), so you can type in a few sentences and still have it appear in a readable fashion. If you wanted to add a description for the Engineering site under the More Options section, it would appear as shown in Figure 4-1.
Once you have created the site, the description displays right below the title. Since the text in the box is word wrapped and no line breaks were entered (pressing the Enter key), the text should appear in a single line, as shown in Figure 4-2.

The description will only show up on the home page, which will be at http://<site>/SitePages/Home.aspx by default, with <site> being the complete URL of the site.
The Web Site Address is the same as the spot for the URL name that you entered earlier when you created the new site. The key in determining the URL to put in this section is to come up with something that is short (to make it easy for users who type it manually) and that makes sense. For example, you could shorten Engineering to Eng.
Tip
INSIDE OUT Forbidden characters
Website addresses cannot contain any of the following characters:
# % & . * : < > ? / { | } -->
If you enter a space in the URL, it will be converted to %20, which is rather difficult for most users to type on a regular basis (errors are bound to occur). With the use of breadcrumbs and menu navigation, it isn’t as important as it used to be, but it is still considered good form to keep the URL easy to read and type.
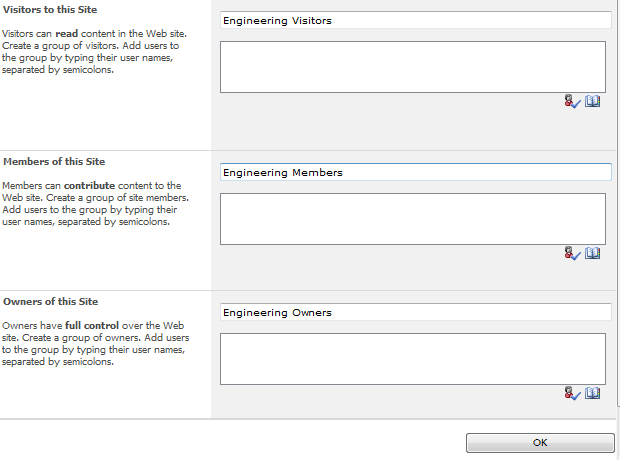
Permissions determine who has access to your site, whether it is just the ability to read (and see search results), contribute, or have complete control over your site. The default is to use the same permissions as the parent site. This is referred to as permissions inheritance. It is the easiest way to handle permissions for the site, but also the least flexible. You can always break permissions inheritance on individual libraries or lists without using unique permissions for the site. You can even break inheritance for individual items. To change this setting, click More Options, and then go to the Permissions section, as shown in Figure 4-3.

The two choices are Use Unique Permissions and Use Same Permissions As Parent Site. Both of these options are reversible, but care should be taken in choosing Use Unique Permissions. When you choose this option, a dialog box opens, (see Figure 4-4), in which you create three new security groups.
Tip
INSIDE OUT Security group considerations
Although SharePoint 2010 Foundation supports up to 10,000 security groups, there is an inherent supportability issue if you have too many security groups. The more security groups you define, the more resources that are needed to support them.
The three new security groups are arranged into the following sets of users, each with their own distinct needs.
Visitors Individuals of this group have read-only access by default. If you want to give everyone in your organization permissions to read the content in this site then you can add the special security group NT AUTHORITYAuthenticated Users. This will only work for any users that are authenticated by using Windows, but not with other methods of authentication such as Forms-Based Authentication (FBA).
Members This is for people who will be contributing and using this site on a regular basis. They can add, modify, and delete documents and list items. You will want to add the day-to-day users to this group.
Owners These users have complete control over the site. Owners can perform such tasks as add users, change the home page, and even delete the site. Use caution with this group; “accidents” are not uncommon when too many people have Owner permissions.
SharePoint provides some default names for the security groups. For example, if your site is named Engineering, then the three groups would be named Engineering Visitors, Engineering Members, and Engineering Owners, respectively. You can change the names of these groups at any time.
The navigation section contains a pair of options, as shown in Figure 4-5. The first option determines whether to display this site on the Quick Launch of the parent. The default setting is No. Choosing Yes places a link to the site on the parent under the heading of Sites. The second option determines if a tab is added to the Top Link Bar that links to the site being created. If you are going to have a large number of sites, you might want to rethink adding a tab every time because they will begin to wrap such that you end up with two lines of tabs (and then three, and so on). It is not a very user-friendly interface after a certain point.

If you choose Yes on either of these, you will need to go to the parent site and manually remove the entries if you change your mind. It will also be necessary to go to the parent site to change the wording if it needs to be changed. Changing the Title of the site will not change it on the Top Link Bar or the Quick Launch.
The last option available in the More Options dialog box determines whether the Top Link Bar is inherited. The default is No (see Figure 4-6), which means that the Top Link Bar will be unique for this site. It means that clicking the Home tab takes you to the current site and not to the top-level Site Collection. This can be confusing to some users because there is no obvious way to navigate to the top-level Site Collection. You can navigate using the Navigate Up button to any site directly above the current one.

Navigation inheritance can be turned on and off by navigating to the Top Link Bar page under Look And Feel in Site Actions. You will lose any links that have been manually entered if you click Use Links From Parent, as shown in Figure 4-7.

Tip
INSIDE OUT Consistent navigation
Choosing to use links from the parent site is a personal choice, but having a consistent navigation has some benefits. Users who are presented with familiar navigation will find it easier to get around a Site Collection. The down side of using links from the parent site is that it limits flexibility.