
The Group Work Site template is great for groups that come together to work on projects. It is similar to a basic Team Site template but with some additional items that focus on a larger task. One example that ties into the Engineering theme is designing a new widget. Designing a new widget can involve members from a variety of teams or a subset of engineering. Either way, the site would work. One of the most notable additions that facilitate this collaboration is the Group Calendar. This can be used to keep track of resources and show availability in a similar fashion to Microsoft Project (but on a much smaller scale). The template doesn’t have a list for members because the members of the site will be normally listed as resources. Before you look at the site in more detail, let’s go through the steps for creating one:

Now that a site has been created, you should notice the Group Calendar at the top of the site, as shown in Figure 4-13.
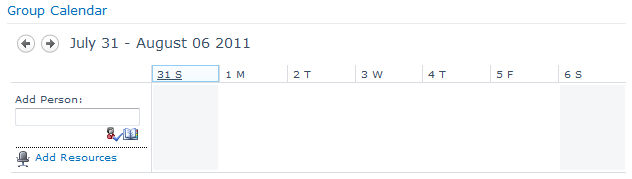
It looks like a normal calendar is some ways with a navigation element that moves through the calendar a week at a time. What stands out is the Add Resources link and the Add Person input box. The group calendar can be used to keep track of people as well as resources. This helps utilize people effectively without overbooking them and helps to prevent resources from being double booked (as well as alerting people about what resources are available). At the moment your calendar has neither resources nor people, so you need to add them before you can assign them to the calendar. People are added by typing their name in the Add Person dialog box and then clicking the check person icon, as illustrated in Figure 4-14.

It is also possible to use the directory by clicking the Browse icon (the one that looks like a book). Adding resources is a little more complicated. Clicking the Add Resources link opens an empty dialog box along with an error indicating that there are no resources, as demonstrated in Figure 4-15.
Figure 4-15. Because there are no links in the Resources list, you see an error when you click Add Resources.
The error occurs because there are no links to the Resources list. There are a couple of ways to populate the list of resources: click either the Lists link or the All Site Content link. Each brings you to a page that shows the Resources list, as shown in Figure 4-16.

Clicking the Resources link will take you to the list where any sort of resource can be added. A resource is generally defined as something that has to be shared and/or reserved. It could be a room, a vehicle, a computer, or any sort of equipment with limited quantities. For this example, you will add a round table video camera that can be checked out by performing the following steps:
Click the Resources link.
Click Add new item, as shown in the following illustration:
Add Round Table Video Camera #1 for the name, and then type a description of the item such as Used for panorama view.
Click Save to add the resource.


There is now a resource to choose when you click Add Resources on the Group Calendar. It is important to use resource names that distinguish them in a manner that is clearly discernable by the end user. This will help to avoid confusion and ensure maximum usage.
Tip
INSIDE OUT Adding resources
If you need resources that are used by more than the people in this group you can use workflows to either notify the person responsible for scheduling the resources or actually put it on other lists to let other users know that it is in use.
Now that a resource has been added, you need to add it to the calendar by following these instructions:
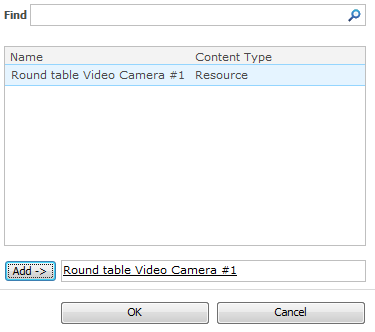
When the Select Resources And Resource Groups dialog box opens, select Round Table Video Camera #1 (or whatever the resource was named), and then click the Add button, as shown in the following screenshot:
Click OK to add the resource.
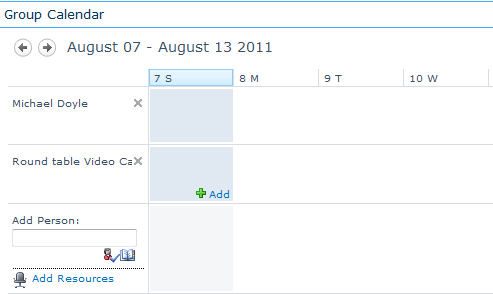
The resource should now appear on the calendar where it can be assigned dates and times.

Notice that the name of the resource is cut off. The width of the title field is fixed, and you would need a tool like SharePoint Designer 2010 to modify it. Keep that in mind when naming the resources. You don’t want users to be forced to guess which resources are in use. And changing the view will not change the width of the Title field. Now that a resource has been added, it can be scheduled via the Add Person input box. A resource can be scheduled by following these steps:
Hover over the bottom area in the column of the day for which you want to schedule the resource. It must be on the last resource or person in the Title column, as shown in the illustration that follows.
Click the Add link.
The New Item dialog box opens.
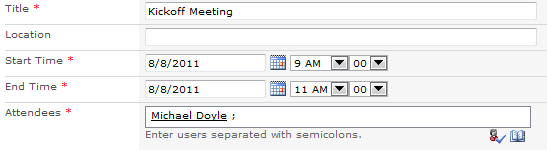
Type in a Title (for example, Kickoff Meeting), and then select a Start Time and End Time. You must also add at least one person in Attendees.
For this example, you will add the round table video camera, which is in the resources column. It will show up in the left column unless the Add link was clicked in a resource row, in which case it will appear in the right column by default.
Click Add after the resource has been selected.
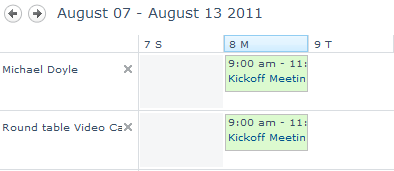
Click Save.
The people and the resources will be booked on the calendar. As shown in the following screenshot, the meeting appears in both the row for Michael Doyle and the row for the resource.

There are some options that we did not address when creating the meeting. There is the Free/Busy section that checks to see if the resources and/or people are already busy during the time that the meeting is to occur (or other activity). The Free/Busy might not update until you click the Check button in the Check Double Booking section. Once you click the Check button, it should update. For example, if a meeting is scheduled on top of the one that was scheduled above and the Check button is clicked, it would appear as in Figure 4-17.
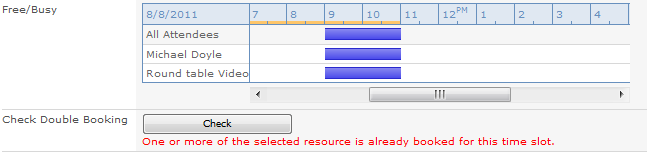
Figure 4-17. Free/Busy checks whether resources are available for the designated time of the meeting.
Notice that it shows that Michael Doyle and the round table video camera are marked as booked during the hours of 9 a.m. and 11 a.m. This will help prevent double booking, but remember that this calendar is not tied to any other calendar. End user training and education will be required to properly use the group calendar effectively.
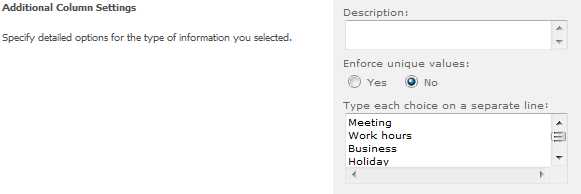
The Category field can be used, but it will only show up if you open the item or if you create a new view of the calendar. New fields can be added, but if a new drop-down item is desired, then the calendar itself will need to be modified. This is done by going to the List Settings of the calendar and then clicking the Category field link. A list of categories appears in the Additional Column Settings section, as illustrated in Figure 4-18.
The reason that categories might be important becomes apparent if they are used for reporting. Specific time codes could be used to keep track of people and resources time. A good example would be if this was a contract job and the account manager needed to keep track of specific hours spent in meetings and on projects.
The next two options available are All Day Event and Recurrence. The All Day Event option will block off all resources and people for the entire day, for each day that the item covers. This can be a real time saver if the item covers a large period of time. Instead of creating several eight-hour events, you can use just one event that uses the Add Day Event. Of course, if time needs to be specified exactly, then this option will not work. The Recurrence option is used to create meetings that occur on a regular basis, such as every day, week, or month. Again, if you are keeping track of specific hours for accounting purposes, creating an individual meeting or item will be more accurate.
The final option is the Workspace option. This creates a workspace for the meeting. If this option is checked, then it will bring up a new page in which options can be selected. Unlike using the New Site option, there are very few options that can be chosen. The options you can select are Title, Description, URL name, User Permissions, and Language. There is no option to select a template until a user clicks OK. Then the user can choose from the available templates, as shown in Figure 4-19.
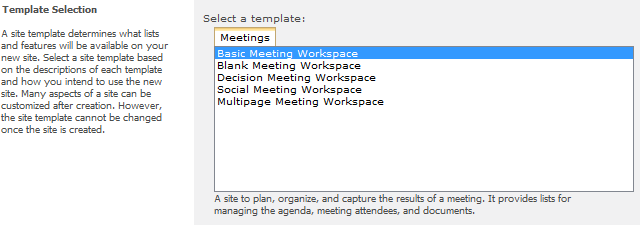
Once you select a template and click OK, a workspace will be created for the meeting under the group site. There is no option to place the workspace in a different location.
Tip
INSIDE OUT Using customized templates
You can select a customized site template if it is uploaded to the solution gallery and then activated. Usually, this is only an option in larger organizations, but it does allow for a large degree of customization.
Now that the calendar has been set up, the group work site is ready to use. There are some other options to explore. These are mainly the Whereabouts, Circulations, and Phone Call Memo. These options can help round out the functionality of the site. The Whereabouts option can help you find where people are located; Circulations can help ensure that notifications are received by specified individuals; and the Phone Call Memo can be used to share information about phone calls that have been received. Other lists and documents can be added as needed but the Group Work Site template should provide a great start to any group that needs a SharePoint Foundations website for any group-related project.