
In the past, SharePoint development caused considerable confusion among developers regarding the right set of tools to use when creating and deploying a custom solution for SharePoint. Developers used so many documented methods and tools that there ended up being no true standards for SharePoint development. This has changed with the release of Visual Studio 2010 and SharePoint Foundation. Visual Studio provides many tools out of the box that allow easy and efficient integration with your SharePoint Foundation environment.
To create a SharePoint solution by using Visual Studio, open Visual Studio with administrative privileges. On the Start Page tab, click New | Project, or on the toolbar, click File | New, and then click Project to open the New Project dialog box (see Figure 16-3). Under Installed Templates, under the appropriate language (such as Visual C#), expand SharePoint, if not already expanded, and then click 2010. In the middle pane, select the appropriate project template for the new project.

Visual Studio offers several templates for creating SharePoint solutions. This not only includes project templates, but also project item templates that are used to create different types of features and solutions for your SharePoint environment. Visual Studio includes the following 12 project templates for SharePoint 2010:
The Empty SharePoint Project template is a basic template in which you can add any project items including any SPIs. The other project templates are similar to the empty project template, but they include one SPI; for example, the Sequential Workflow template includes a Workflow SPI. Similar to the empty project, you can add other project items including SPIs to the other SharePoint projects. A number of these project templates have been used in other chapters of this book. The Sequential Workflow template was used in Chapter 10.
Tip
INSIDE OUT SharePoint 2010 workflows use .NET Framework 3.5
Once you have created a SharePoint project, if you right-click the project name in Solution Explorer and then click properties, you will notice that the target framework for the project is .NET Framework 3.5. This is because SharePoint 2010 is built on the .NET Framework 3.5 and not .NET Framework 4.0.
Visual Studio includes the following SPI templates, which you can access by right-clicking the project title in Solution Explorer, clicking Add, and then clicking New Item:
Visual Web Part
Visual Web Part (Sandboxed)
Web Part
Sequential Workflow
State Machine Workflow
Business Data Connectivity Model
Application Page
Event Receiver
Module
Content Type
List Definition From Content Type
List Definition
List Instance
Empty Element
User Control
Depending on the SPI you select, if you then select to add a new item, the following additional four SPI templates are available:
Workflow Association Form
Workflow Initiation Form
Business Data Connectivity Resource Item
Global Resource File
Once you have chosen your project type, typed your project name, and selected whether to add your project to source control, the SharePoint Customization Wizard opens. This is one of the most useful tools included with Visual Studio 2010, and it helps you to specify Share-Point settings that determine how the solution should be configured and deployed in your environment. It also helps to provide the necessary components to debug your solution.
One of the new configurations offered by the SharePoint Customization Wizard is the ability to set is the trust level of the solution that you are deploying, as shown in Figure 16-4.
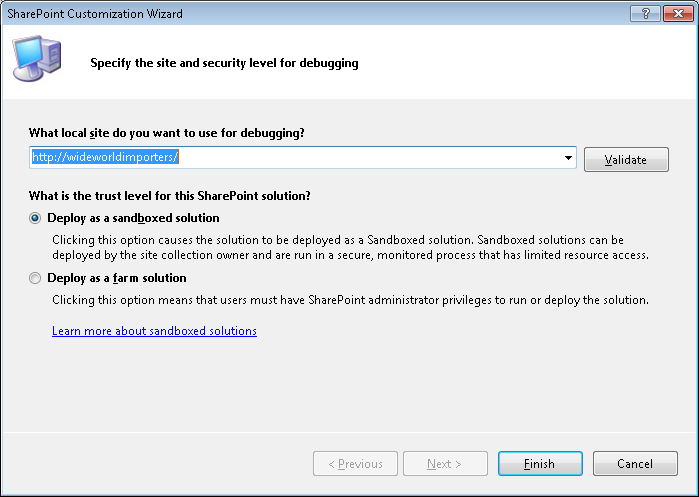
In the previous versions of SharePoint, deploying a solution with the appropriate trust level that would not damage or impair the SharePoint farm was a challenge. SharePoint 2010 introduced a new concept of a sandboxed solution that provides Site Collection owners with a new way to deploy a solution such that the solution is developed in a secure, monitored process that has limited resource access. This stability is achieved through the use of code access security (CAS) policies and by restricting access to portions of the SharePoint server-side object model. Solutions can still be deployed as farm solutions, however Share-Point farm solutions require you to be a SharePoint administrator in order to run or deploy the solution. In general, you should try to develop your solution as a sandboxed solution, and then if you run into limitations, develop it as a full-trust farm solution.
Note
For more information, read the MSDN magazine article “Developing, Deploying, and Monitoring Sandboxed Solutions in SharePoint 2010,” which is available at http://msdn.microsoft.com/en-us/magazine/ee335711.aspx.
Tip
INSIDE OUT Creating sandboxed solutions
If you are creating sandboxed solutions, you must ensure that the Microsoft SharePoint Foundation Sandboxed Code Service is started. You can use either the SharePoint 2010 Central Administration website to do this (click Manage Services On Server) or by using the following PowerShell command:
Get-SPServiceInstance | where { $_.TypeName -match "sandbox" } |
Start-SPServiceInstance
Depending on the chosen project type, you can use the SharePoint Customization Wizard to set other configurations, as well. For example, Figure 16-5 demonstrates that you can specify the settings for event receivers deployed in SharePoint Foundation 2010.
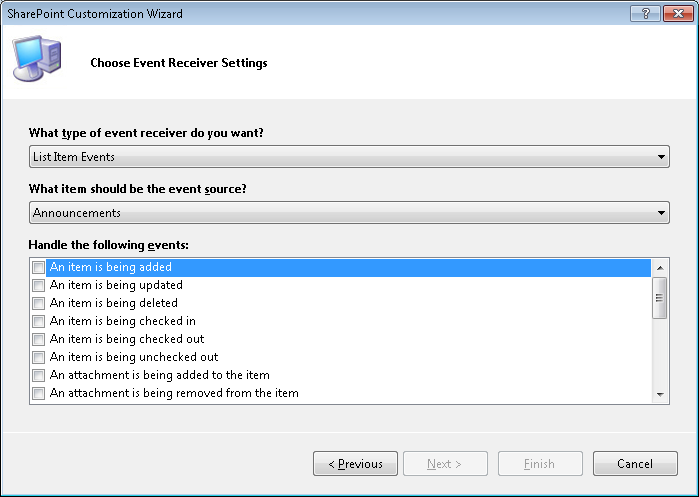
Figure 16-5. You can use the SharePoint Configuration Wizard to specify the settings for event receivers deployed in SharePoint Foundation 2010.
Tip
INSIDE OUT Personalizing your Visual Studio environment
The Visual Studio environment remembers some settings from project to project. When you first open Visual Studio, you should configure these one-off settings; for example, using the Server Explorer, you should connect to the site that you are using for your development work. If the Server Explorer window is not open, on the menu, click View, and then click Server Explorer. Right-click SharePoint Connections to open the Add SharePoint Connection dialog box, as shown in Figure 16-6, type the URL of your web application, and then click OK.
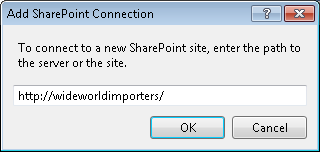
Figure 16-6. Use the Add SharePoint Connection dialog box to add your development web application to the Server Explorer window.
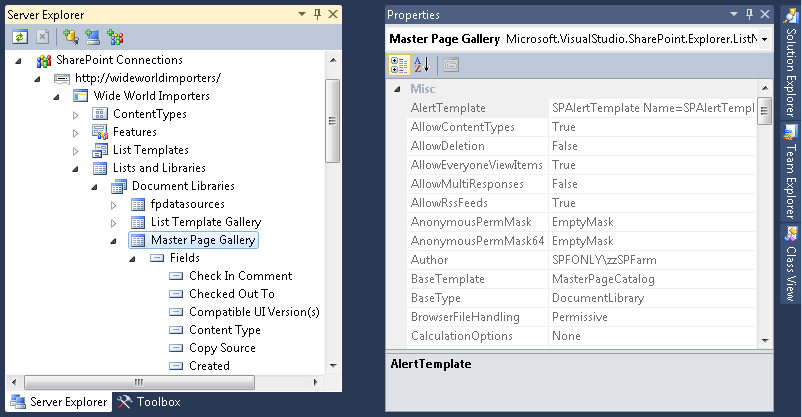
You can now explore the structure of your development site and the sites below it from within Visual Studio. When you click on a SharePoint artifact in Server Explorer, the Properties window (if open) displays more information concerning that artifact, as shown in Figure 16-7.
In previous versions of Visual Studio, custom tools, extensions, and custom scripts had to be used to create SharePoint Projects and the required file structures. Several of the files used for SharePoint Projects, such as the manifest.xml, feature.xml, and the elements.xml you had to create manually or through custom extensions for Visual Studio. Having to validate the creation of these files created more overhead in the development of SharePoint solutions, both simple and complex. With a new set of tools and project templates, Visual Studio 2010 provides a great starting block for creating projects to deploy solutions for SharePoint Foundation 2010. Visual Studio also creates the appropriate files and structure needed to create a SharePoint Project to build a deployable solution.
After you create a project, Visual Studio creates a number of default files and nodes that can be viewed in Solution Explorer (see Figure 16-8). These make up the sequential workflow of the project and the new structure that was automatically created for the SharePoint 2010 project.
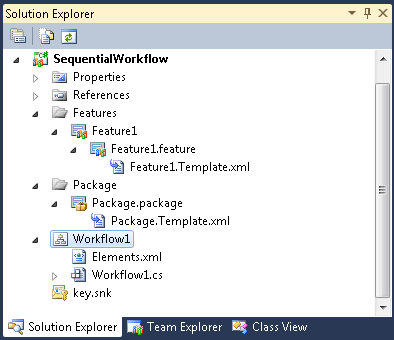
Figure 16-8. A sequential workflow project that illustrates the structure of a newly created project.
The SPI consists of two components: an elements XML file and a code file. The elements XML file, also known as the elements manifest file, refers to the code file. The elements manifest file is targeted by the Features file, which in turn is targeted by the package. When Visual Studio deploys a SharePoint project, it deploys the package to the SharePoint server. Share-Point reads each Feature file contained in the package, and then from each Feature file, reads the elements file, which in turn points to the assembly. An assembly can contain the code for one or more Features. When you want to create more than one assembly for your solution, you should divide your solution into multiple projects.
In early 2011, the first Service Pack for Visual Studio 2010 was released. Like many other Service Packs, it contained an accumulation of hotfixes that improved the stability and performance of the product, plus it contained some new features. This Service Pack enabled IntelliTrace debugging technology for 64-bit and SharePoint solutions.
Note
You can read a description of Visual Studio 2010 Service Pack 1 at http://support.microsoft.com/kb/983509 and http://msdn.microsoft.com/en-us/vstudio/aa718359.aspx. For information on how to use IntelliTrace, go to http://msdn.microsoft.com/en-us/vstudio/gg542173, http://msdn.microsoft.com/en-gb/magazine/ee336126.aspx, and http://channel9.msdn.com/shows/10-4/10-4-Episode-28-An-Introduction-to-the-Historical-Debugger.