
In SharePoint Foundation 2010, five links are available under the Permissions and Management header in a library, which you can use to change the permissions and management settings for the library. These links are: Delete This Document Library; Save Document Library As Template; Permissions For This Document Library; Manage Files Which Have No Checked In Version; and Workflow Settings. To change any of these items, click the corresponding link.
For lists, there are four links available under Permissions And Management, which you can use to change the permissions and management settings for the list. These links are as follows: Delete This List, Save List As Template, Permissions For This List, and Workflow Settings.
To delete a list or library, browse to its Settings page, and then under the Permissions And Management category, click Delete This List or Delete This (Library Type) Library on the customization page of the list or library.
For the list, a dialog box appears, asking Are You Sure You Want To Send This List To The Site Recycle Bin or Are You Sure You Want To Delete This List.
For the library, a dialog box opens, asking either, This Document Library Will Be Removed and All Its Files Will Be Deleted; Are You Sure You Want To Send This Document Library To The Recycle Bin, or This (Library Type) Will Be Removed And All Its Files Will Be Deleted; Are You Sure You Want To Delete This (Library Type) Library.
On sites that have the Recycle Bin enabled, you see the message about sending the list or library to the Recycle Bin; for those sites with a disabled Recycle Bin, you see the dialog box that does not mention the Recycle Bin.
Note
The Recycle Bin is enabled within a Site Collection by default and can be configured in Central Administration at the Site Collection web application level. Recycle Bin functionality is covered in Chapter 3.
With SharePoint Foundation 2010, you can save an existing list or library as a template so that new lists can be created from ones that are already proven to work within the organization or contain customizations that it requires. List or library templates can also be imported and exported to different Site Collections. When you save a list or library as a template, you can specify whether to include the existing content in the template. Lists saved as templates are then made available in the List Template Gallery.
You can easily save a list or library as a template by performing the following steps:
Click All Site Content, and then click the link for the list or library that you would like to save as a new template.
From the List or Library Tools Header within the list or library, click List or Library, and then click List Settings or (Library Type) Library Settings to display the Customize page for the list or library.
Click Save List As Template for a list or Save (Library Type) Library As Template for a library.
In the File Name box, type in a file name for the new list or library template, as shown in Figure 5-14. This file name will be displayed in the appropriate Template Gallery.
In the Template Name box, type a name for the new template. The template name field will be displayed on the site’s Create page.
In the Description box, type a description for the new template. This description of the template will be displayed on the site’s Create page.
If you would like the content of the list or library to be saved in the template so that new lists and libraries will automatically have the content available to them when they are created, select the Include Content check box. If you would like the template to be created without including the content, leave this check box clear.

If you have a list template file available to you and would like to add it to the Template List gallery, perform the following steps:
On the Site Actions menu, click Site Settings.
On the Site Settings page, in the Galleries section, click List Templates.
It is possible that you might need to click Go To Top Level Site Settings in the Site Collection Administration column to see this link.
On the List Template Gallery page, under the Library Tools heading, click Documents, and then select Upload Document.
In the Name box, type the path to the template. Alternatively, click Browse.
Click OK to add an existing list template file to the List Template gallery.
Users with the appropriate permissions can delete a template within the List Template gallery. To delete an existing list template, perform the following steps:
On the Site Actions menu, click Site Settings.
In the Galleries column, click List Templates.
The List Template Gallery page appears.
In the Edit column, click the Edit Document Properties icon for the list template that you want to delete.
Click Delete Item, and then click OK to confirm the list template deletion.
SharePoint Foundation 2010 offers robust and granular management of the permissions for list and libraries. List and libraries can either inherit permissions from a parent site or object, or have their inheritance broken so that they can have unique SharePoint groups or permissions levels assigned to them.
Note
If a list or library’s permissions are customized so that they no longer inherit permissions from a parent site or object, you can still reinherit permissions from the parent site or object at a later time.
It is a best practice to use Active Directory Security Groups or SharePoint groups to manage list permissions whenever possible. In some cases, you might need to break the parent’s inheritance to manage a list. Within the SharePoint environment, it is good practice to track all lists, libraries, or items that have been assigned unique permissions so that future permission updates to SharePoint can be appropriately applied.
To change the permissions for a list or library, perform the following:
Open the list or library.
On the List Tools heading, click List, and then click List Settings or (Library Type) Settings.
On the Customize page, in the Permissions And Management column, click Permissions For This List/(Library Type) Library.
The Permissions page displays all of the users and SharePoint groups associated with this list or library, along with their assigned permission levels.
If the list or library is inheriting permissions, you must first break the inheritance of the permissions before you edit permission levels on this list. To do this, on the Permission Tools menu, click Stop Inheriting Permissions, and then click OK, as shown in Figure 5-15.
If you would like to edit the permissions of the parent, on the Permission Tool menu, click Manage Parent, and then click Manage Permissions Of Parent, which will take you to the parent’s permission area.
Select the check boxes for the users and SharePoint groups whose permissions you want to edit.
On the Permission Tools menu, select Edit User Permissions.
In the Choose Permissions section, select the permission levels that you would like to apply, and then click OK.

To add users to a list or library, perform the following steps:
Open the list or library.
On the List or Library Tools menu, click List or Library, and then select List Settings or (Library Type) Settings.
In the Permissions And Management column, click Permissions For This List/(Library Type) Library.
The Permissions page displays all of the users and SharePoint groups associated with this list, along with their assigned permission levels. If the list or library is inheriting permissions, you must first break the inheritance of the permissions before you can edit permission levels for this list or library. To do this, on the Permission Tools menu, click Stop Inheriting Permissions, and then click OK. If you would like to edit the permissions from the parent, on the Permission Tools menu, click Manage Parent, and then Manage Permissions Of Parent, which will take you to the parent’s permission area to edit permissions.
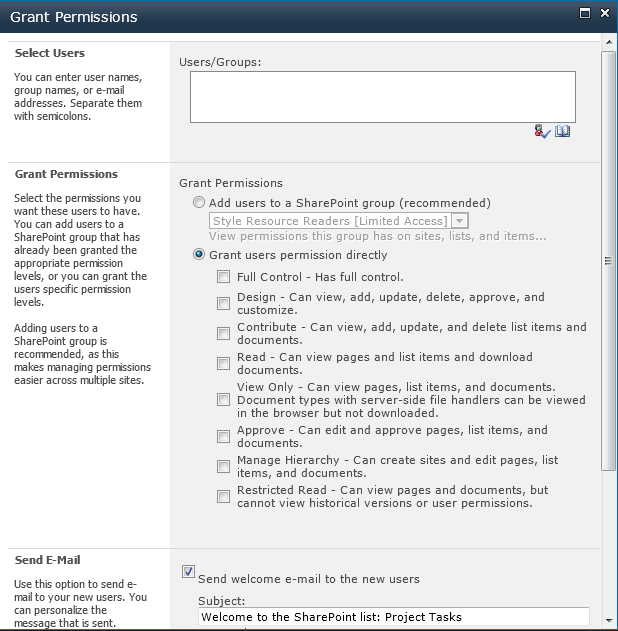
On the New menu, click Grant Permissions, as shown in Figure 5-16.
In the Select Users section, specify the users and SharePoint groups that you want to add to the list or library.
It is best to add users into a SharePoint Group, but note that SharePoint Groups can’t be added into other SharePoint Groups. Their permissions must be assigned directly.
In the Grant Permission section, you can add users to an existing SharePoint group or give them permissions directly, as shown in Figure 5-17. Select one or more of the check boxes to give these users the permissions that you want to apply. SharePoint Groups will need their permissions assigned directly.
Choose the permissions you want for the selected team members or groups.
In the Send E-Mail section, select the check box if you want an email notification to go out to the users to whom you are granting permissions, or clear it if you do not want an alert email to be sent, and then click OK.

To remove users from a list or library, perform the following steps:
Open the list or library.
On the List or Library Tools menu, click List or Library, and then select List Settings or (Library Type) Settings.
On the Settings page, in the Permissions And Management column, click Permissions For This List/(Library Type) Library.
The Permissions page displays all users and SharePoint groups associated with this list or library and their assigned permission levels.
If the list or library is inheriting permissions, you must first break the inheritance of the permissions before you can edit permission levels. To do this, on the Permission Tools menu, click Stop Inheriting Permissions, and then click OK. If you would like to edit the permissions from the parent, on the Permission Tools menu, click Manage Parent, and then Manage Permissions Of Parent, which will take you to the parent’s permission area to perform permission editing.
Select the check boxes for the users and SharePoint groups that you want to remove from this list or library.
On the Permission Tools menu, click Remove User Permissions, and then click OK to remove the selected users and groups.
This option is in place to assist the site administrator with cleaning up files that might not have a checked-in version. This scenario applies in cases where a document might have been created and uploaded to a library that requires documents to be checked out prior to editing. In this scenario, someone could upload a document but forget to check it in. As such, this newly uploaded document is not visible to other members of the team. This option is used to manage these types of documents.
To manage files that have never been checked in, perform the following steps:
Open the list or library.
On the List or Library Tools menu, click List or Library, and then select List Settings or (Library Type) Settings.
On the Settings page, in the Permissions And Management column, click Manage Files Which Have No Checked In Version.
Select the check box of any files that you want to manage, and then click Take Ownership Of Selection.
Workflows can be applied to lists and libraries similar to how you apply templates or permissions. SharePoint Foundation 2010 includes one predefined workflow by default. The Three-State workflow, which is designed for the Issue Tracking list, can be applied to a list or library. Additional workflows that are developed or purchased by an organization in the future can be made available and applied by using the methods described in the following section.
To add a new workflow to a list or library, perform the following steps:
Open the list or library.
On the List or Library Tools menu, click List or Library, and then select List Settings or (Library Type) Settings.
On the Settings page, in the Permissions And Management column, click Workflow Settings:
On the Change Workflow Settings page, click Add A Workflow or click the name of a workflow to change the settings.
If you are adding a workflow, on the Add A Workflow page, in the Workflow section, click the name of the workflow template that you want to use.
If you are changing the settings for a workflow, on the Change A Workflow page, change the settings according to the following steps:
In the Name section, in the text box, type in a unique name for the workflow you’re adding, as shown in Figure 5-18.
In the Task List section, specify a task list to use with this workflow.
You can use the out-of-the-box tasks list or create a new one.
In the History List section, select a history list to use for this workflow.
This history list contains and displays all of the workflow events that occur during each instance of the workflow.
In the Start Options section, specify how, when, or by whom the workflow can be started, and then click next.
This might be limited if the workflow template does not support certain options. Major and minor versioning must be enabled to support some features.
The Customize The Workflow page opens, in which you can specify and configure the additional options that are available to that particular workflow.
Fill in the fields to customize the workflow as needed, and then click OK.

You can use Information Rights Management (IRM) in SharePoint Foundation 2010 to protect and control content within a list or library. IRM can limit how list and library content is distributed and block specific content from being shared with others. IRM can restrict access to list content for a specific interval and can require users to confirm their logon credentials to access or download specific content.
IRM is applied at a list or library level and uses an application called a protector, which is installed on the front-end web servers to encrypt and decrypt content within the list or library. You can restrict the use of a file based on a user’s security credentials.
To apply IRM to a list or library, perform the following steps:
Open a list or library.
On the List or Library Tools Menu, select List or Library, and then click List Settings or (Library Type) Settings.
Under Permissions And Management, click Information Rights Management.
Note that if you do not have this link available, it is possible that IRM is not enabled. IRM can be enabled in Operation page in Windows Central Administration.
On the Information Rights Management Settings page, select the check box adjacent to Restrict Permission To Documents In This Library On Download to apply restricted permission to documents that are downloaded from the list.
Under Permission Policy Title, enter a unique descriptive name for the policy.
Under Permission Policy Description, type a description that people who use this list or library will see. This description should help explain how they are to handle the documents or items.
You can now apply any additional restrictions to the documents in this list or library by specifying available IRM restriction criteria.
After you finish specifying the criteria and specific IRM options for the list or library, click OK.
As discussed in Chapter 3, RSS feeds can enable users to receive periodic updates about specific lists in the organization without having to browse to a specific list to find this content. To change RSS settings for a list or library, browse to its Settings page and click the RSS Settings link. Once the RSS Settings page is on display, make any desired changes to the following fields:
List RSS Select Yes if you want to enable RSS for the list or library; No if you do not wish to enable it.
RSS Channel Information Specify the channel elements that define the RSS feed. You have the options to truncate multiple line fields to 256 characters as well as to specify a title, description, and image URL.
Document Options Configure Link and Enclosure settings for RSS Items. Specify whether or not to include file enclosures for items in the feed. Select Yes to include file enclosures for items in the feed. Also, specify whether to link RSS items directly to their files. Select Yes to Link RSS Items directly to their files.
Columns Specify which columns to display in the RSS description.
Item Limit Specify an item limit for the most recent changes for the RSS feed as well as the maximum number of days to include an item in the RSS feed.
To subscribe to an RSS Feed for a specific list or library, perform the following steps:
Open the list or library.
On the List Tools or Library Tools menu, select List or Library, and then click RSS Feed
On the page that appears, follow the instructions for how to subscribe to the feed. You might see a link called Subscribe To This Feed, which you can click to subscribe.
Closely follow any instructions you receive in the RSS reader, browser, or email program that you plan to use to view the list’s RSS feed.
With SharePoint Foundation 2010, you can easily add columns to lists or libraries to capture additional information about content. Doing so speeds up the information retrieval process. Out-of-the-box list templates contain certain default columns, but adding organizationally tailored columns can greatly improve the user experience in both browsing and searching.
You can add a custom column at almost any time, allowing users to choose from several column types, such as a single line of text, a calculated column, a drop-down list, or even a column that acts as a lookup for displaying data from other lists.
To create a custom column, perform the following steps:
Open the list or library
On the Library Tools menu, click Library, and then click Create Column.
In the Name And Type section, type the name that you want in the Column Name text box, as shown in Figure 5-19.
Under The Type Of Information In This Column Is, select the type of information that you want to appear in the column.
In the Additional Column Settings section, type a description in the Description box to help users within the organization to understand the purpose of the column and what data it should contain. This description is optional but recommended.
Depending on the type of column that you selected, more options might appear in the Additional Column Settings section. Select any additional settings that you want.
To add the column to the default view that visitors to your site automatically see when they access the default view of the list or library, select Add To Default View, and then click OK.

To create a site column for your organization that you can use later within a list or library, perform the following steps:
On the Site Settings page, under Galleries, click Site Columns.
On the Site Column Gallery page, click Create.
In the Name And Type section, type the name that you want in the Column Name text box.
Select one of the choices under the heading The Type Of Information In This Column Is.
Table 5-2 lists the available choices and the type of control each choice will display on input forms.
Table 5-2. SharePoint List Column Types
Select this
To display this
Columns that collect and display small amounts of text in a single line, including text only, combinations of text and numbers, and numbers that are not used in calculations (such as phone numbers).
Columns that collect and display one or more sentences of text or formatted text.
Columns that display a list of options.
Columns that provide a box in which you can type a numerical value.
Columns that provide a box in which you can type a monetary value.
Columns that store calendar or time-of-day information.
Columns that make it easy for you to select information that’s already stored on a site. These columns utilize information located in other lists or libraries in the site.
Columns that store true/false information.
Columns that display the name of Active Directory users or SharePoint groups.
Columns that display a hyperlink to a webpage or display an image from the Web.
Columns that display information that is based on the result of a formula. The formula can use information from other lists and columns, dates, or numbers. You can use standard mathematical operators.
In the Group section, select the existing group in which to store the new site column, or create a new group.
In the Additional Column Settings section, select any additional column settings that you want. The options available in this section can differ depending on the type of column that you selected in the name and type sections. When you’ve completed the configuration, click OK.
SharePoint Foundation 2010 can perform calculations to determine the value of a column in a given row. You can invoke such calculations in two situations:
When initializing New Item Form that will add a new list item.
Each time you retrieve the list item. SharePoint Foundation 2010 calculates the value every time you request data from the column.
Calculations use formulas very much like those in Excel. The input for calculations generally comes from system functions or from the columns in the list.
If there’s any ambiguity as to the name of a function or column, or if the name contains any special characters, enclose the column name in square brackets. For example, the expressions FirstName and [FirstName] both refer to a column named FirstName because there’s no function named FirstName. Most of the functions and operators from Excel are available to SharePoint. Thus, to add the Number Present and Number Absent columns, you would code:
=[Number Present] + [Number Absent]
To combine text from two columns, use the ampersand operator, as in the following example:
=[Last Name] & ", " & [First Name]
You can also use functions in formulas. The following example returns the weekday for the date in the Date Due column:
=TEXT(WEEKDAY([Date Due]), "dddd")
To change or delete a column, click its name in the Columns section of the Settings page. This displays the Change Column page.
To change any other aspect of the column, correct the setting, and then click OK. To delete the column and the data it contains, click the Delete button at the bottom of the page.
It’s easy to reorder list columns in SharePoint Foundation 2010. To change the order of columns within a list or library, go to the list’s Settings page, and then under Columns, click Column Ordering. After you have reordered the columns, click OK.
The content-type functionality of SharePoint Foundation 2010 provides organizations with a powerful content-management feature for capturing metadata and categorizing content in a way that is both configurable and reusable.
You might have a list, for example, that contains items that contain multiple types of items (for example, contacts and inventory items); in which case, depending on the type of information that is entered, you might need to handle it differently. You might need your contact information to contain certain required information as opposed to inventory items that will require different required information. In a situation such as this, you can employ the use of content types to the list, thereby ensuring that the appropriate required information is captured for the item.
The New command in a list displays all the content types that were added to the list, which means that users can create new items of those types.
To add a content type to a list or library, it must first be configured to allow multiple content types. To ensure that the list or library you are configuring is configured properly, browse to the Settings page for the list or library, in the General Settings section, click Advanced Settings, and then in the Content Types section, select Yes for Allow Management Of Content Types.
Once this setting is properly configured, you can add a content type by performing the following steps:
Open the list or library
On the Library Tools menu, click List or Library, and then select List Settings or (Library Type) Settings.
Under Content Types, click Add From Existing Site Content Types.
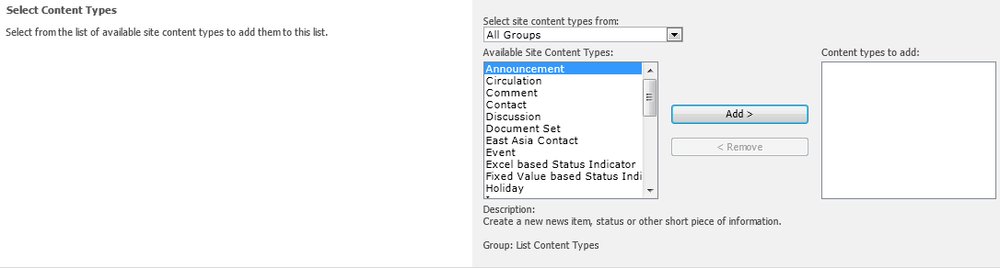
In the Select Content Types section, open the Select Site Content Types from the drop-down list to select the group of site content types from which you want choose a type, as illustrated in Figure 5-20.
In the Available Site Content Types list, click the content type that you want, and then click Add to move the selected content type to the Content Types To Add List.
To add additional content types, you can repeat steps 4 and 5.
When you finish selecting all of the content types, click OK.
In SharePoint Foundation 2010, it is possible to change the order in which content types are displayed on the New button for a list or library. When a list or library is first created, the first content type that is displayed on the New button will become the default content type. To change the default content type, you must simply change the content type that is displayed first on the New button. There is also the option to either show or hide the content types that have been added on the New button.
To modify these settings, perform the following steps:
Open the list or library that you want to modify.
On the Settings menu, click List Settings or (Library Type) Settings.
Under Content Types, click Change New Button Order And Default Content Type.
In the Content Type Order section (see Figure 5-21), perform either of the following:
To remove a content type from the New button for the list, clear the Visible check box.
To change the order in which a content type appears on the New button, click the arrow next to that content type in the Position From Top column, and then select the ranking that you want.
