
SharePoint Designer can be used to add server controls without the need for a developer or the involvement of the IT department. In SharePoint Designer, the addition of ribbon server controls is known as adding custom actions. These custom actions can only be added to the ribbon of list views, list forms; and to the LIM. List forms are pages that display and edit a single list item, whereas views are pages that display a number of list items. In lists, the list and form pages are stored in the root of the list; for libraries they are stored in the Forms folder, which by default is hidden when a library is displayed in the browser, but is visible in Explorer view and in SharePoint Designer. There are three types of list forms:
Display This is used to display the properties (also known as the metadata) of a single list item. When a list or library is first created this form is named DispForm.aspx.
Edit You use this to edit the metadata of a single list item. When a list or library is first created this form is named EditFrom.aspx.
New This is used to create a new list item. When a list is first created, this form is named NewForm.aspx, whereas in libraries, the name is Upload.aspx.
Tip
INSIDE OUT Custom Actions: two meanings
The term “Custom Actions” is used twice within SharePoint Designer: first to add new actions on the LIM and the server ribbon and second, to describe the ability to extend SharePoint Designer workflows. To read more about creating workflow custom actions, refer to Chapter 10.
You can use SharePoint Designer to add custom actions to:
Show an existing page that displays a list form.
Run a workflow.
Browse to another page, including form pages for other lists and libraries.
For each custom action you can specify:
An image For a custom action on the LIM, you can only specify a 16x16-pixel image, whereas for a custom action on the server ribbon, you can provide two images: 16x16 or 32x32 pixels. The smaller image is used when the browser window is reduced in size and the amount of space for the custom action is limited. A good place to upload your images for custom actions is in the Site Assets library. If you plan to create a site template from your site, then do not use absolute URL addresses for your images, but make use of the ~sitecollection or ~site token to point to libraries within your Site Collection or site. For example, replace http://wideworldimporters/subsite/SiteAssets/SPFIcon16x16 with ~site/SiteAssets/SPFIcon16x16.gif.
A sequence order This is the order in which the custom action appears on the ribbon or LIM.
A Rights Mask This specifies which users can see the custom action. When you want the custom action to appear for any user of the list, leave the Rights Mask empty or type EmptyMask.
Note
The Rights Mask uses SPBasePermission member names, which you can find at http://msdn.microsoft.com/en-us/library/microsoft.sharepoint.spbasepermissions.aspx
SharePoint Designer cannot be used to:
Add tabs or tab sets.
Add groups.
Add controls, such as check boxes, drop-down menus, text boxes, fly-out anchors or the color picker.
Add controls to groups that do not exist.
Remove the actions/controls that were not added by SharePoint Designer.
Also, you cannot take a copy of your custom actions from one list to another. To duplicate a custom action that you created on a previous list, you need to add a new custom action and then configure it the same as the previous action.
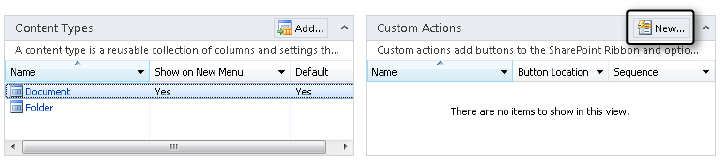
Custom actions, including Quick Steps, are displayed in the Custom Actions area, which is the last area displayed in the right column of the List Settings page within SharePoint Designer. There are two methods for adding custom actions within SharePoint Designer: use the Custom Action command in the New group on the List Settings tab, or use the New button in the title of the Custom Actions area within the List Settings page.
To add a custom action to the Server ribbon for a list view, form, or LIM, perform the following steps:
Using the Navigation pane in SharePoint Designer, click Lists And Libraries, and then in the workspace, click the list or library to which you want to add the custom action.
The List Settings page opens in the workspace.
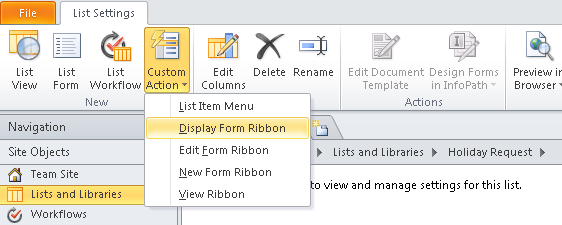
On the List Settings tab, in the New group, click Custom Action, and then select where you would like the custom action to appear.
The Create Custom Action dialog box opens.
In the Create Custom Action dialog box, in the Name text box, type the name of the action and in the Description text box, type a description, and then select and enter details of the action you wish to create.
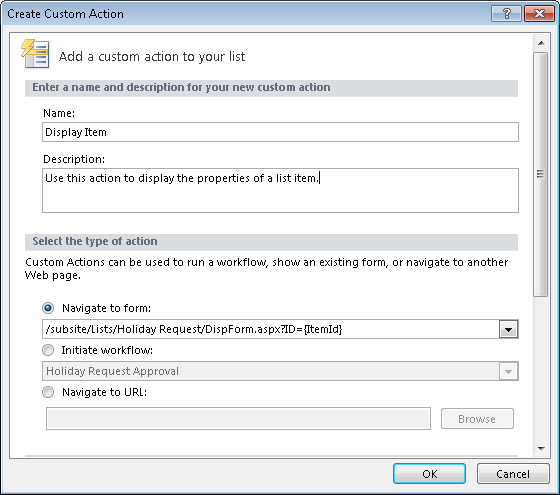
The Create Custom Action dialog box is very similar to the Add A Button dialog box, which opens when you add a Quick Step to the ribbon (described in the previous section). However, the Create Custom Action dialog box allows you to select the type of action to navigate to a form or a URL as well as initiate a workflow, plus when you scroll down you can specify a 16x16-pixel icon; the Rights Mask and sequence number, as shown in Figure 15-12.

The Create Custom Action dialog box for a LIM custom action restricts you to entering a URL for a 16x16 button image only. You also cannot specify the ribbon location of the custom action. By default, the ribbon location for each custom action type is:
Display Form ribbon Ribbon.ListForm.Display.Actions.Controls._children.
Edit Form ribbon Ribbon.ListForm.Edit.Actions.Controls._children for lists, and Ribbon.DocLibListForm.Edit.Actions.Controls._children for libraries.
New Form ribbon Ribbon.ListForm.Edit.Actions.Controls._children for lists, and Ribbon.DocLibListForm.New.Actions.Controls._children for libraries.
View ribbon Ribbon.ListItem.Actions.Controls._children for lists, and Ribbon.Documents.Manage.Controls._children for libraries.
If you add a custom action as a quick step, then the ribbon location is set as Ribbon.ListItem.QuickSteps.Controls._children. The Controls._children tells SharePoint to add a new button to the Control collection for the group.
You do not have to place your custom action at the default ribbon locations. You can place them in any group that is currently defined for the tab that is active when the form or view is displayed. For example, you can add custom actions to any of the following groups of a library view: New, EditCheckout (which on the Documents tab is labeled Save & Check Out), Manage, Share (which is labeled Share & Track), Copies, Workflow and QuickSteps. SharePoint Designer will display error messages if you misspell or specify a nonexistent ribbon location.
Tip
INSIDE OUT Custom actions on the document library’s New forms
When adding a custom action for a New form for document libraries, the custom action is added to the Upload.aspx page. This page does not contain a tab and therefore does not display a ribbon when you create a new document or upload a document, but it does contain a tab when you create a new folder; therefore, the default location for this custom action is incorrect. You should change it to one of the groups on the edit tab, for example, Ribbon.DocLibListForm.Edit.Actions.Controls._children. When you want a custom action to appear when a document is uploaded into a library, you need to add the custom action to the Edit form. The valid groups for DocLibListForm.Edit tab are Commit, Clipboard, or Action. You can add your custom action to any of these groups.
By default, all custom actions have a sequence number of 0, which means that your custom actions are the first control in the group. You can place your custom action elsewhere in the group. The out-of-the-box controls in a group have a sequence order that increments by 10, as presented in Table 15-1. Therefore, by changing the sequence order of your custom action to, for instance 15, you can place your custom action between two of the existing controls.
Table 15-1. Out-of-the-Box Controls and Their Sequence Number for the Default Ribbon Locations for Custom Actions
Action control | Sequence order | |
|---|---|---|
ListFormDisplay | CheckIn | 10 |
CheckOut | 20 | |
Alert | 30 | |
ApproveReject | 40 | |
ManageCopies | 50 | |
Workflows | 60 | |
EnterFolder | 70 | |
ClaimReleaseTask | 80 | |
DistributionListsApproval | 90 | |
DeleteItemVersion | 100 | |
RestoreItemVersion | 110 | |
ListForm.Edit | DeleteItem | 10 |
EditSeries | 20 | |
ClaimReleaseTask | 30 | |
AttachFile | 40 | |
DistributionListsApproval | 50 | |
DocLibListForm.Edit | DeleteItem | 10 |
CheckIn | 20 | |
CheckOut | 30 | |
VersionHistory | 40 | |
ExportWebPart | 50 | |
ViewWePartXML | 60 | |
ManagePermissions | 70 | |
ListItem | AttachFile | 10 |
ChangeItemOrder | 20 | |
Documents.Manage | ViewProperties | 10 |
EditProperties | 20 | |
ViewVersions | 30 | |
ManagePermissions | 40 | |
Delete |
Note
To find the core out-of-the-box groups, their relevant ribbon location URL, together with the defined controls for each group and sequence numbers, review the contents of the XML file CMDUI.XML, which you can find in the TEMPLATEGLOBALXML subfolder in the SharePoint root %Program Files%Common FilesMicrosoft SharedWeb Server Extensions14.
Using SharePoint Designer, you can extend the LIM by adding custom actions and by placing the LIM on a column other than the Title column of a list.
You can add a custom action to the LIM by using the method described previously; in addition, there is an alternative method of adding a custom action to the LIM by using the New button in the Custom Action. To do so, perform the following steps:
Using the Navigation pane in SharePoint Designer, click Lists And Libraries, and then in the workspace, click the list or library to which you want to add the custom action.
The List Settings page opens in the workspace.
Click New in the title of the Custom Actions area. (You might need to scroll down to see this area.)
Using the browser, you can configure a view to display the LIM on the Title column of a list. Views are pages that contain the XSLT List View (XLV) Web Part; therefore, you can also configure whether to display the LIM on other pages that contain the XLV Web Part. Using SharePoint Designer, you can place the LIM on another column in a list. This could prove very useful if you create a view for which you do not want to display the Title column for lists or the Name column for documents. However, if you do change the location of the LIM from the default location, you need to inform the users of the page, for example, on a Web Part page, by placing a Content Editor Web Part above the XLV Web Part and entering appropriate text, or in the case of a wiki page, by adding appropriate static text above the XLV Web Part.
Caution
As of the writing of this chapter, when you create the LIM on another column, by using SharePoint Designer, not all links continue to work. You must test your solution to ensure that the links work as required.
Use the following instructions to show the LIM on a column of a list or library:
Browse to the page that contains the XLV Web Part, for example, AllItems.aspx, and then place the page in Edit mode.
In a list item row, click the cell in the column where you want the LIM to appear.
Click the On Object User Interface (OOUI) icon (a chevron icon) that appears, to display the Common xsl:value-of dialog.
On the Common xsl:value-of dialog, select Show List Item Menu, and then save the page.
Preview the page in the browser to verify that the LIM is displayed for a list item on the column that you selected, and that all the links on the LIM work as expected.

To modify a custom action, including Quick Steps, perform the following steps:
Browse to the List Settings page for the list that contains the custom action that you want to modify.
Scroll down to the Custom Actions area and either double-click the icon to the left of the custom action or click the name of the custom action, which is a hyperlink.
The Create Custom Action dialog box opens.