
Special consideration must be taken when managing site content to be shared with the general public. The techniques you’ve learned for editing lists, pages, and Web Parts in previous chapters apply equally well to public and internal sites. However, if you are managing content with SharePoint Foundation for Internet sites, take into consideration the information presented in the sections that follow.
Generally speaking, the governance for this type of website will be tightly controlled because of the potential impact on the organization. In smaller organizations, content publishing might be handled directly by the person who is responsible for the public image of the organization. In many large organizations, an entire group is dedicated to publishing any content published for public consumption. As an example of tighter governance on content management, a public website is one case for which you most likely will not be putting the All Authenticated Users Active Directory group in the Contributors SharePoint Security Group. While contributions might be more limited than on an internal site, a public site uniquely grants broad viewing permissions to another set of users—unauthenticated, or anonymous users. A discussion of managing site content for anonymous users follows later in this chapter.
Separation of public site content from internal sites is common. The level of separation is dependent mostly on your tolerance for risk of intrusion or mixing of content. To start with, consider restricting the different types of content to separate Site Collections and web applications. Both Site Collections and web applications can provide unique administrative permissions and control, and two web applications require two content databases. However, it is not uncommon for security requirements to push organizations to keep some content types isolated at the SharePoint farm level. At the furthest extreme is separating the content out to farms both on both physically and logically separated networks.
Note
Review Chapter 2, for more details on SharePoint farms, servers, content databases, and security.
At whatever level you choose to separate your content, keep in mind that it is important to treat the site that allows anonymous access as inherently more risky for intrusion by unwanted visitors. More risky than internal anonymous sites are those that allow anonymous, public access. One example of public website intrusion is automated spambots. A vigilant website manager will quickly detect and remove spam content. An even more proactive approach can keep the likelihood of unwanted content low, and one such approach is detailed in the next section.
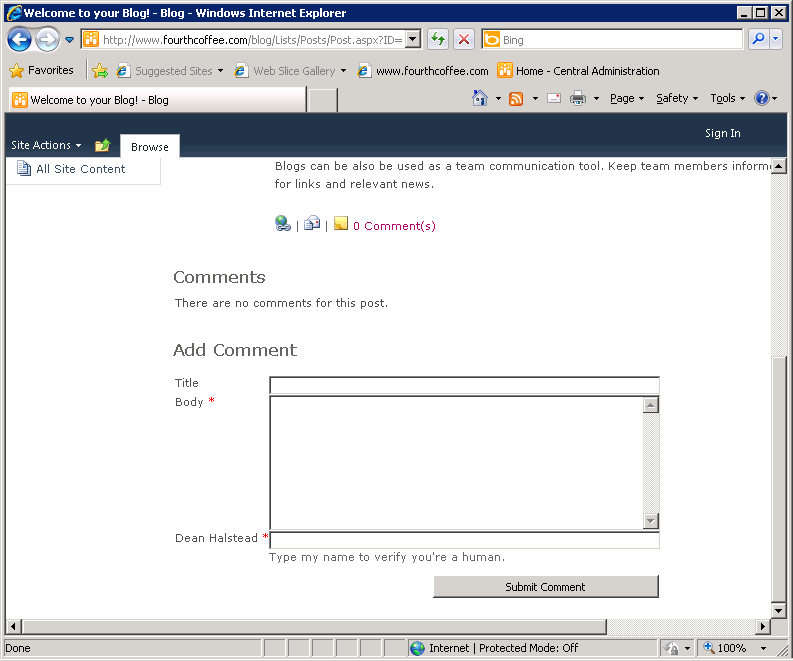
An unwelcome addition to a public site that doesn’t necessarily require compromising server security is comment spam. If your public website includes a blog, you might start to find spam in your comments list when your site becomes popular. To reduce spam, you can add a field to your list to trip up the automated spam techniques. An effective field is one that is easy for your blog readers to understand but hard for an automated spambot to interpret. One example is asking for the name of the site. Just the addition of the field, which will prompt the user for the correct entry when entering a comment, can defeat some spam attacks. On top of adding a field, a standard manual method for preventing spam messages from view by the public is to turn on content approval for the list.
Tip
INSIDE OUT Adding one extra column to your list can prevent spam
Sometimes, even the smallest change can make a big difference in managing site content. In the case of a public blog site, an open comments list invites spam. Enabling content approval in the list settings is a great first step. However, adding even one required field to the comment list can reduce the amount of spam comments you have to remove or disapprove. Figure 8-8 shows the additional field on the comments section of a blog post page. In this example, the blog author asks for the commenter to repeat the author’s name as proof that the commenter is a real person and not an automated attempt to take advantage of your site.
While lacking the Publishing Features of SharePoint Server, SharePoint Foundation is a valid choice for Internet sites. The proper licensing of SharePoint Foundation depends on the proper licensing of Windows Server. Windows Web Server 2008 R2 is designed to be used as an Internet-facing server and is a low cost option for hosting a public site on SharePoint Foundation. Another good option is adding an External Connector License for Windows Server Standard. An External Connector License allows unlimited external users.
Note
Microsoft TechNet has large sections on logical architecture planning for both SharePoint Foundation and SharePoint Server. However, only the SharePoint Server section includes the chapter “Design sample: Corporate deployment,” which is located at http://technet.microsoft.com/en-us/library/cc261995.aspx. This chapter includes many helpful tips on public Internet site design. Many of the suggestions, like the uses of the Publishing Features, only apply to SharePoint Server and might help inform your decision regarding whether you would like to license SharePoint Server for Internet sites.
For a public site, you generally don’t want to require all visitors to log on to view the content. If you don’t want an authentication prompt to appear, you want to enable anonymous access. Enabling anonymous access is at the least a two part process that requires one change at the Web Application Zone level and one change at the site level. Additionally, there are options to set anonymous access for lists, libraries, and individual items.
You might be asking an IT professional to make this change for you, but the check box that needs to be selected is shown in Figure 8-9. This check box is found on the Edit Authentication Providers dialog box for the Web Application Settings in Central Administration. Selecting the Enable Anonymous Access option in Central Administration is a required preliminary step toward enabling anonymous access on each individual Site Collection in the web application. If you don’t see the anonymous settings described in the sections that follow, it is likely this check box has not been selected for the Web Application Zone with which you are working.
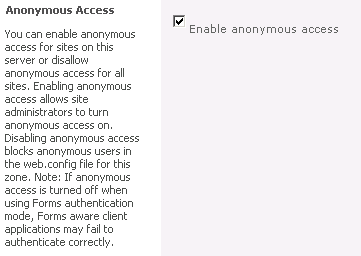
Figure 8-9. The Enable Anonymous Access check box must be selected before Site Collection administrators can enable anonymous access for Site Collections in this web application zone.
Tip
For your IT professional administrators: the name of the zone is the link to the Edit Dialog. Figure 8-10 shows the zone selection dialog for Authentication Providers from the Central Administration Site. You might never view Central Administration, but when your IT staff accesses the dialog the first time, it can be easy to miss the link. The administrator must know to click the hyperlink over the name of the zone to open the Edit dialog for that zone.

Note
If you want a refresher, Chapter 2 covers SharePoint architecture naming conventions, such as what a farm is, what a web application is, and how sites fit in Site Collections. Also, you can visit Microsoft TechNet’s “Plan authentication methods” at http://technet.microsoft.com/en-us/library/cc262350.aspx for more details, including planning web application zones and an explanation of web application zones in SharePoint.
Tip
INSIDE OUT An alternate route to edit authentication providers
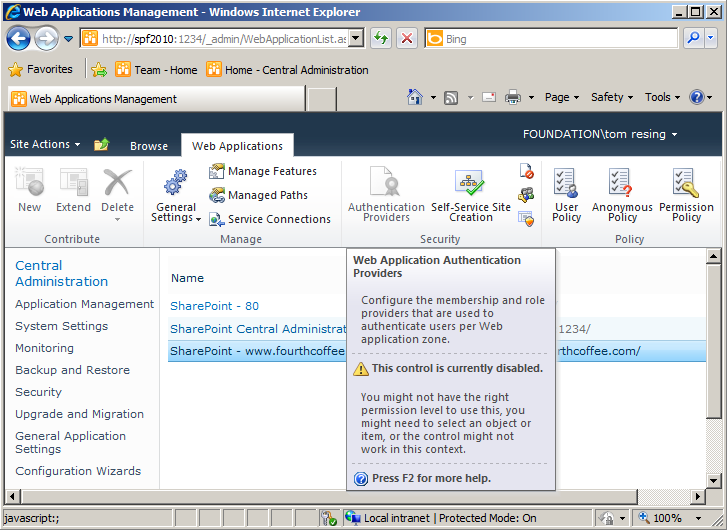
In some cases, your IT staff might find that the Authentication Providers button on the Web Applications ribbon is disabled for some user accounts in the Farm Administrators Group (see Figure 8-11). If this is the case in your farm, the Edit Authentication screen can be accessed through an alternate route. The Security Page in Central Administration has a link titled Specify Authentication Providers in the General Security section. Clicking Specify Authentication Providers, a user in the Farm Administrators Group will see a page similar to the zone selection dialog in Figure 8-10.
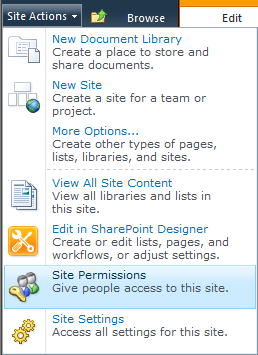
After Anonymous Access has been enabled for the web application, site administrators will see a new option on the Site Permissions page ribbon, as shown in Figure 8-12. The quickest way to access the Site Permissions page is via the Site Actions menu, as shown in Figure 8-13. Site Permissions is also easily accessible from the Users And Permissions section of the Site Settings page for any site by a user with Full Control of the site.

Figure 8-12. The Anonymous Access button is highlighted in this example from a Site Permissions page.
From the Anonymous Access dialog (see Figure 8-14), you can choose to expose the entire website or individual pieces of the site. Selecting the Entire Web Site option is the best option for publishing a public website if you want it to be available without specifying a list or library path. The next section explains the difference in more detail.

Figure 8-14. You have two anonymous access options at the site level: Entire Web Site and Lists And Libraries.
Note
If you select the Lists And Libraries option, all users viewing your site will be prompted for authentication unless navigating directly to a list, library, or individual item that has been configured for anonymous access. Follow the steps in the section Enabling Anonymous Access in List or Library Settings, later in this chapter, to allow anonymous visitors to view a list or library.
When Anonymous User Can Access Lists And libraries is selected at the site level, anonymous users cannot access the root of the site directly. Figure 8-15 illustrates the steps that happen when an anonymous user does attempt to reach the root of the site. The user might start by typing http://www.fourthcoffee.com in the address bar of a browser. Browsing to the site by that root address will result in a redirect to the home page of the site. Without the Wiki home page feature enabled, the home page is default.aspx, so the anonymous user’s end location would be http://www.fourthcoffee.com/default.aspx, if allowed. When anonymous access for the entire web site is enabled, the redirect to the default.aspx home page will occur without issue. However, when you choose the Lists And Libraries option (see Figure 8-14), the redirection becomes an issue. Without access to the entire website, an authentication prompt will appear on the redirection. The user will receive an access denied message unless valid credentials are entered in the prompt (Figure 8-15).
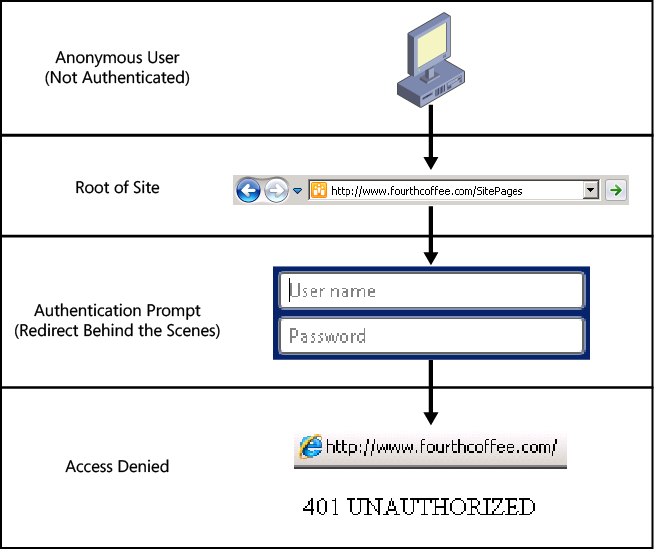
Figure 8-16 illustrates the alternative situation, wherein anonymous users do successfully view a page when Anonymous User Can Access Lists And Libraries is selected at the site level. Anonymous access can be granted to the library named SitePages. When it is, a public user could successfully browse to http://www.fourthcoffee.com/SitePages without a prompt. In this case, the document library allows anonymous viewing and the redirection to the Wiki home page is allowed. Granting anonymous access to lists and libraries is demonstrated in the next section of this chapter.

Note
Chapter 6 includes more information about wiki pages and the Wiki Pages library.
Figure 8-17 shows the ribbon for the Library Permissions page for the document library named Site Pages on an example site at the address www.fourthcoffee.com. To allow anonymous access to the library, on the ribbon, you must first click the Stop Inheriting Permissions button.

Figure 8-17. By default, all lists and libraries inherit permissions from the site level, including anonymous access.
After the inheritance chain has been broken for a list or library, an Anonymous Access button appears on the Library Settings page ribbon that is almost identical to the button in Figure 8-13 from the Site Permissions page. In a document library, your only option is to allow viewing of items, as shown in Figure 8-18.

Figure 8-18. The Anonymous Access dialog box for a document library has one check box selected for View Items.
After you allow anonymous users the View Items Access level, items in the library (in this example, pages in a Wiki Page library) will be accessible to the public when accessed directly. Individual items might also be visible through the list or library root address, which redirects to the default view. The behavior in this base level of the product is in contrast to that of SharePoint Server with Publishing. For SharePoint Server with Publishing, the default view would not be publicly accessible. Anonymous access will be blocked by the Lockdown Feature described in the Inside Out Sidebar Tip.
Note
The steps are similar if you are enabling anonymous access on a list rather than a library. However, in the case of a list, you would be going to the List Permissions page rather than the Library Permissions page.
Tip
INSIDE OUT A missing feature you might not miss
One difference between SharePoint Foundation 2010 and SharePoint Server 2010 is the Lockdown feature that affects anonymous use. The Lockdown feature is activated by default on Publishing sites in SharePoint Server. When this feature is activated, anonymous viewers of a site are prompted for authentication when they attempt to access pages like the All Items view of a list. You might not even miss this feature. For example, it’s often deactivated on sites that use the Blog Site template because it prevents anonymous users from adding comments to blog posts.
On SharePoint Foundation sites, you can be secure on public sites despite missing the Lockdown feature by keeping one concept in mind: anonymous users do have Read access to all lists and items, which inherit permissions from the website when you choose the Entire Web Site option displayed in Figure 8-14. If you would like to hide a list or item from anonymous viewers in SharePoint Foundation, you have an option without the Lockdown feature. When you break inheritance on permissions, you can choose to remove the View Items permission for anonymous users as described in the next section.
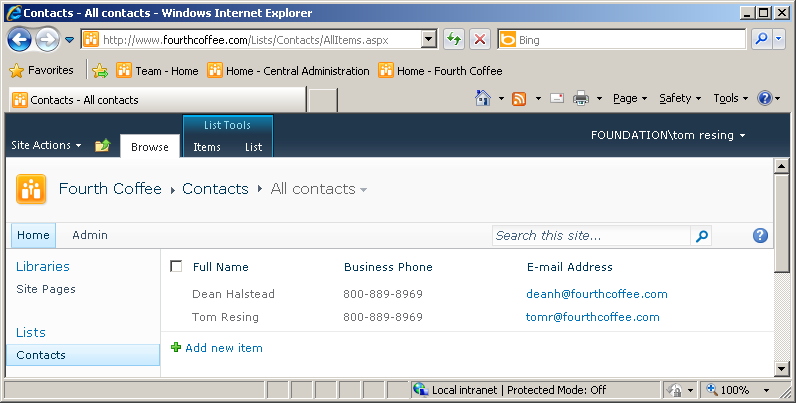
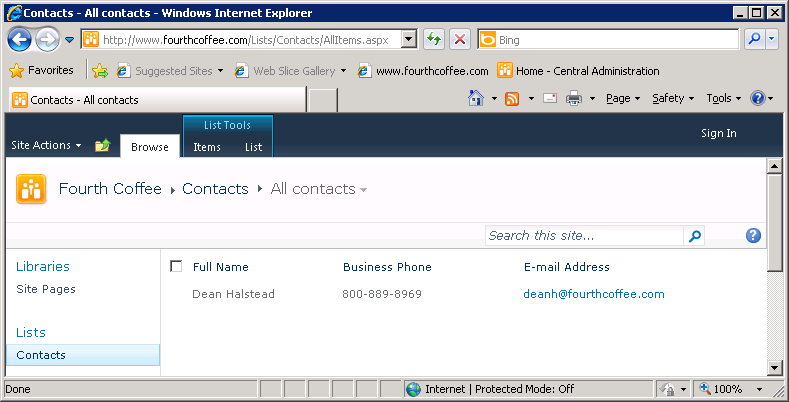
Unlike for sites and lists, the settings for List Item Permissions do not contain an Anonymous Access. Instead, when you break inheritance at the list item level for a list that has anonymous access allowed, the item you broke inheritance for does not allow anonymous access. Figures Figure 8-19 and Figure 8-20 show an example of the same list, named Contacts, first viewed by an authenticated user and then by an anonymous user. Because inheritance is broken on the item for Tom Resing, both items show in the first screen shot but not the second.
Tip
INSIDE OUT Enabling Themes for anonymous users with SharePoint Designer
By default, Themes will only be visible to authenticated visitors to your site. If you’d like anonymous users to see a theme you’ve selected, you can add the cascading style sheet (CSS) links to your default master page through SharePoint Designer. Viewing the source generated for an authenticated user, search for the tags with .css in them. Copy those link tags to the source code of your default master page by using SharePoint Designer. Be sure to remove the CSS Tag that already exists in the master page.
Note
Review Chapter 6 for more details on applying and customizing Themes and working with master pages.