
You might find an existing list or library within your organization that would meet your requirements if it only contained a few additional fields (that is, content types or columns). The topics in this section explain how to modify an existing list or library to better suit your needs.
Numerous organizations have similar data that is being captured on the same topic, but the data is in multiple lists or libraries on separate sites. The challenge is working with different users and groups to see if these lists or libraries can either be combined into a centralized one that contains all of the content types and columns; if not, then how one or more of the lists or libraries can be modified to meet the organization’s needs. Performing a quick proof-of-concept with a new list or library that contains all of the fields is sometimes a great way to show users that one centralized repository can work for everyone.
SharePoint lists and libraries are extremely flexible and customizable right out of the box. You can change their properties, behavior, security, appearance, workflow settings, and fields at will. To begin, display the list or library that you want to modify, and then under the List or Library Tools Heading, click List or Library. Select List Settings or Library Settings to display the customization page, which is illustrated in Figure 5-7. This layout should look very familiar to users of previous versions of SharePoint.
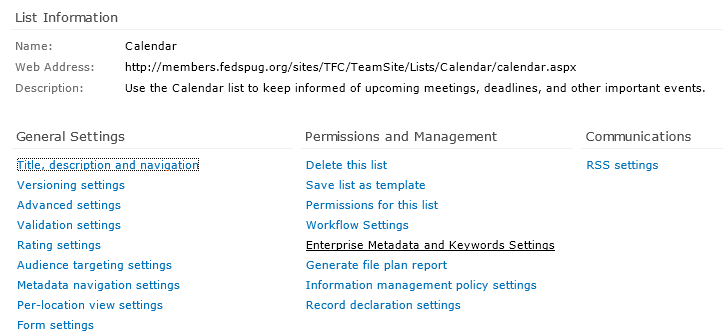
The next few sections explain how to use the commands on the customization page.
In SharePoint Foundation 2010, four links are available under the General Settings header with which you can change the general settings for the list or library. These links are Title, Description, and Navigation; Versioning Settings; Advanced Settings; and Validation Settings. To change any of these items, click the corresponding link.
To change the title, description, or navigation, click the corresponding link to display the List General Settings page, as shown in Figure 5-8.
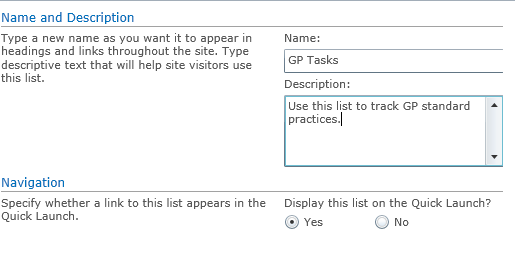
Figure 5-8. The List General Settings page, in which you can change the title, description, or navigational settings of a SharePoint site list or library.
With the List General Settings page open, make any desired changes to the following fields:
To change the versioning settings in a list, navigate to the list, and then click its link. Under the List Tools heading, click List, select List Settings, and then click the Versioning Settings link to display the List Versioning Settings page, as illustrated in Figure 5-9.

Figure 5-9. In the List Versioning Settings page, you can configure the versioning settings of a SharePoint list.
With the List Versioning Settings page open, make any desired changes to the following fields:
Content Approval Select Yes if you want to require approval for items submitted to the list; or No if you do not require approval.
Item Version History Select Yes if you want to create a new version each time you edit an item in the list. If you select Yes, you have the option to then limit the number of drafts to be retained.
Select the number of versions and the number of drafts for each version to retain. Due to SharePoint saving complete copies of a document for each version created, a considerable amount of storage space can be consumed rather quickly. As such, it is a good idea to limit the number of versions. It is generally recommended to keep three to five versions unless there is a business need to retain more. Refer to your organizations Governance Plan for specific requirements.
Draft Item Security Specify which users can see draft items in the list. The available options are Any User Who Can Read Items, Only Users Who Can Edit Items, and Only Users Who Can Approve Items (And The Author Of The Item).
To change the versioning settings in a library, browse to the library, and then click its link. Under the Library Tools heading, click Library, select Library Settings, and then click the Versioning Settings link to display the Document Library Versioning Settings page, as depicted in Figure 5-10.
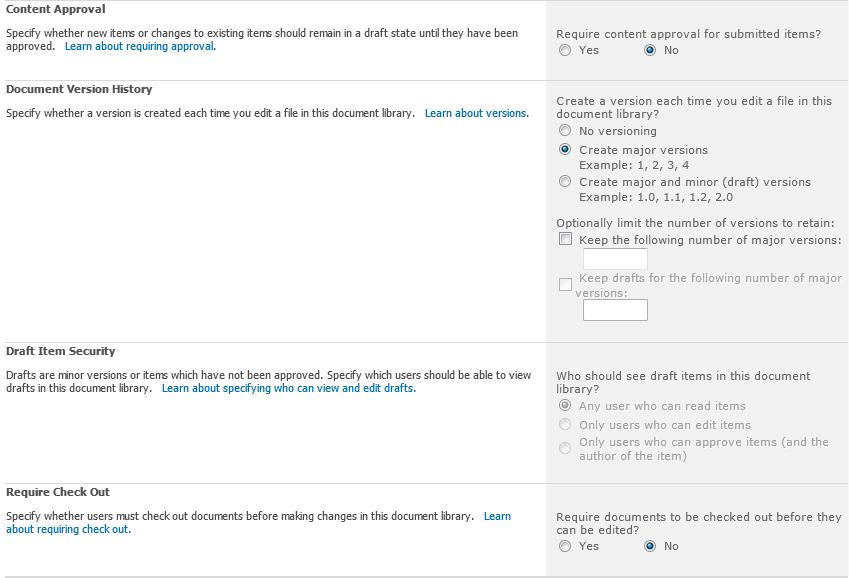
Figure 5-10. Use the Document Library Versioning Settings page to configure the versioning settings of a SharePoint library.
With the Document Library Versioning Settings page open, make any desired changes to the following fields:
Content Approval Select Yes if you want to require approval for items submitted to the library; No if you do not require approval.
Document Version History Select from No Versioning, Create Major Versions, or Create Major And Minor (Draft) Versions. If you select Yes, you have the option to then limit the number of versions that are retained.
Select the number of versions you want to retain and the numbers of drafts for each version to retain. It is a good recommendation to limit the number of versions to reduce unnecessary storage allocation. There might be business needs for a larger number of versions to be kept, but generally between three and five versions are plenty.
Draft Item Security Specify which users can see draft items in the library. The available options are Any User Who Can Read Items, Only Users Who Can Edit Items, and Only Users Who Can Approve Items (And The Author Of The Item).
Require Check Out Specify whether users will be required to check out the documents before they can be edited.
To change the advanced settings for a list, on the list’s Settings page, click the Advanced Settings link to display the List Advanced Settings page, as shown in Figure 5-11.

Figure 5-11. In the List Advanced Settings page, you can configure the advanced settings options for a SharePoint list.
With the advanced settings page open, make any desired changes to the following fields:
Content Types Select Yes if you want to allow management of content types on the list, or select No if you do not wish to allow it. If you will be adding other content types for use on the list, you will need to select the Yes option.
Item Level Permissions Specify for which items users have either read or edit access. In the Read Access section, you can specify either All Items or Only Their Own. There is also a section for Edit Access. You can specify either All Items, Only Their Own, or None.
E-Mail Notification Select Yes if you want to have the list send an email when ownership is assigned to an item or when an item has been changed. Select No if you do not want the email notifications to be sent.
Attachments Specify if users are allowed to attach files to items in the list. Select Enabled if you would like to allow attachments in the list or Disabled if you do not wish to allow attachments.
Folders Specify whether you would like to display the New Folder command on the New menu within the list. Select Yes if you want to have New Folder displayed or No if you do not wish to show this command. Changing this setting does not affect existing folders in the list.
Search Specify whether the list should be visible within SharePoint’s search results. Select Yes to allow the items to appear in the search results; select No if you do not wish them to appear. Regardless what setting you choose, users who do not have permissions to view the list items will not see them within search results.
Offline Client Availability Specify whether the list should be available for offline clients. Select Yes to allow items from the list to be downloaded to offline clients (for example Microsoft Outlook 2010); No if you do not wish them to be downloaded offline.
Datasheet Specify whether the datasheet can be used to bulk edit data on this list. Select Yes to allow items in the list to be edited by using the datasheet; No if you do not want your users to be able to edit in Datasheet.
Dialogs You can launch New, Edit, and Display Forms either in a dialog box (select the Yes option) or in a full webpage (select the No option).
To change the advanced settings for a document library, on the library’s Settings page, click the Advanced Settings link to display the Document Library Advanced Settings page, as illustrated in Figure 5-12.
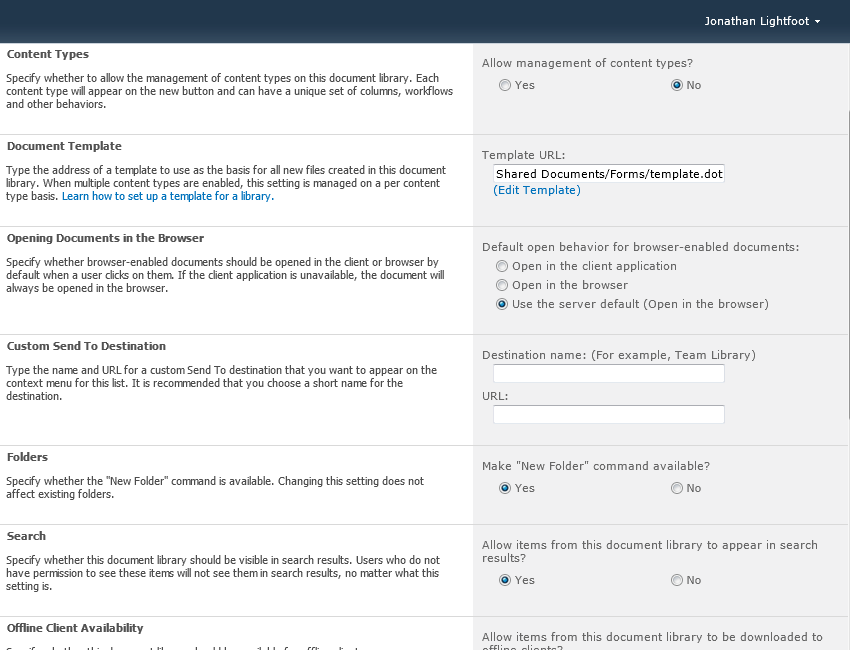
Figure 5-12. Use the Document Library Advanced Settings page to configure the advanced settings of a SharePoint document library.
With the Document Library Advanced Settings page open, make any desired changes to the following fields:
Content Types Select Yes if you want to allow management of content types in the library; No if you do not wish to manage them. If you will be adding other content types for use on the list, you will need to select the Yes option.
Document Template Specify the URL of the template to use as the basis for all new files created in this library. If multiple content types are enabled, this setting is managed on a per-content–type basis.
Opening Documents in the Browser Specify how to display documents that can be opened in either a browser or in a client application. Select from Open In The Client Application, Open In The Browser, or Use The Server Default.
Custom Send To Destination Specify the destination name and URL of a custom Send To destination that you would like to appear on the context menu for this library. This can be used for moving files to other locations within your site.
Folders Specify whether you would like to display the New Folder command on the New menu within the library. Select Yes if you want to have New Folder displayed; No if you do not wish to show this command. Changing this setting does not affect existing folders in the library.
Search Specify whether the library should be visible within SharePoint’s search results. Select Yes to allow the items to appear in the search results; No if you do not wish them to appear. Users who do not have permissions to view the library items cannot see them within the search results, regardless of this setting.
Offline Client Availability Specify whether the library should be available for offline clients. Select Yes to allow items from the library to be downloaded to offline clients; No if you do wish to allow them be downloaded offline.
Site Assets Library Specify whether the library should be presented as the default location for storing images or other files that users upload to their wiki pages. Select Yes to make this library appear as the default library for users to upload wiki-related images and files; No if you do not wish this to be the default library presented to users for loading wiki-related materials.
Datasheet Specify whether the datasheet can be used to bulk edit data on this library. Select Yes to allow items in the library to be edited by using the datasheet; No if you do not want your users to be able to edit in Datasheet.
Dialogs You can launch New, Edit, and Display Forms either in a dialog box (select the Yes option) or in a full webpage (select the No option).
To change the validation settings for a list, on the list’s Settings page, click the Validation Settings link to display the List Validation Settings page, as presented in Figure 5-13.
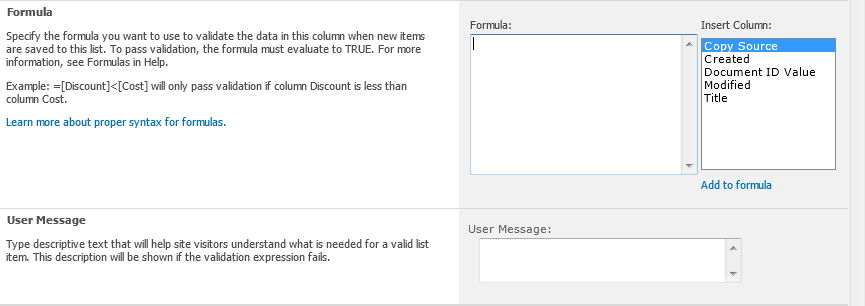
Figure 5-13. The List Validation Settings page, in which you can configure the validation settings of a SharePoint list or library.
With the List Validation Settings page open, make any desired changes to the following fields:
Formula Specify the formula that you want to use to validate the data in this column when new items are saved to this list. To pass validation, the formula must evaluate to True.
User Message Type descriptive text to help site visitors understand what is needed for a valid list item. This description is shown if the validation expression fails.