
SharePoint Foundation comes packed with many Web Parts that can be used with little configuration. They should meet most of your business requirements, but inevitably, at some point you will want to create your own.
Note
For more information about the out-of-the-box Web Parts that are available with SharePoint Foundation, read Chapter 7.
One of the big differences for Web Parts in SharePoint 2010 is the manner in which they are added to pages. In SharePoint 2007, Web Parts could only be added by using the browser in Web Part Zones. In SharePoint Foundation 2010, using the browser and wiki pages, Web Parts can be added outside of a Web Part zone into a content zone on the page along with text and images.
Note
For more information about adding content to Web Part and wiki pages, read Chapter 6.
Pages that can contain SharePoint Web Parts work differently from ordinary Microsoft ASP.NET pages and much differently from legacy ASP pages. As a result, developing and deploying a Web Part requires a different mindset and a somewhat different tool set than does developing other kinds of server-based web components.
In Visual Studio 2010, the Web Part development process has been radically improved. Visual Studio now ships with project and item templates that do not require extra extension or tools to develop and deploy Web Parts. SharePoint 2010 and Visual Studio now provide the ability for developers to create two types of Web Parts:
Standard Web Part Essentially the same type of Web Part that existed in Share-Point Server 2007 and Windows SharePoint Services 3.0. Visual Studio 2010 now ships with a new Web Part called the Visual Web Part. Visual Studio provides no design experience for standard Web Parts; you need to manually create the controls that make your user interface. Standard Web Parts can only be added to a project as SPIs; that is, there is no standard Web Part project template.
Visual Web Part A type of Web Part, that allows developers to visually design a Web Part in Visual Studio and can be deployed to a SharePoint 2010 environment. This Web Part essentially contains .NET. This is a great improvement to previous versions of Visual Studio because no out-of-the-box solution existed for creating Web Parts visually. In previous versions this could only be accomplished by using custom tools and workarounds. Visual Web Parts can be added to projects as SPIs or you can create a project with a Visual Web Part SPI already added by using the Visual Web Part project template.
One of the core components of SharePoint that makes it attractive to organizations is the use of Web Parts. The Web Parts used in SharePoint Foundation are designed and built to lie on top of the Microsoft ASP.NET Web Part Infrastructure. You can build your Web Parts by inheriting them from either of the following two Web Parts:
The ASP.NET Web Part System.Web.UI.WebControls.WebParts.WebPart can be used in most cases to create a Web Part. Web Parts that utilize this class can be deployed in ASP.Net applications as well as SharePoint applications.
The SharePoint Foundation Web Part Microsoft.SharePoint.WebPartPages.WebPart provides additional functionality for connecting Web Parts, client-side connections, cross page connections, and data-caching infrastructure. The Web Parts developed from this class can only be utilized in a SharePoint environment.
Creating a Web Part in Visual Studio is pretty simple. In the following example, you will see how to create a sample “Hello World” Visual Web Part:
Create a new project named SPFINVWP that is based on the Visual Web Part template, and then click Ok.
Enter the site to use for debugging, and then click Finish.
The file VisualWebPart1UserControl.ascx opens in the workspace, with the buttons, Design, Split, and Source displayed at the bottom of the window.
Open the Toolbox window (if it’s not already open), and then drag a Label component from the Standard section.
Open the Properties window (press F4 if it is not open), and then change the Text Attribute to Hello World.
Select Deploy Solution from the Build menu.
Once the deployment process has succeeded with no errors, browse to a SharePoint Page and add the VisualWebPart1 to the page. You should find it under the Custom category.
Building Web Parts in SharePoint Foundation 2010 is a common development task. However, sometimes it is necessary to create a Web Part that connects to other Web Parts. SharePoint provides a set of connection interfaces with which Web Parts can send and receive information at runtime. This would allow a user to enter information on a webpage, and it would automatically update information contained in other Web Parts on the page that had connections to that Web Part. This is a solution that can deliver long term return on investment (ROI) within an organization because the owners of sites do not need to repeatedly modify a page as the data changes.
There are multiple types of data that can be passed between connected Web Parts. The movement of data is performed by using different types of connection interfaces. Each connection interface has an interface that consumes information and an interface that provides information; therefore, each connection interface is a paired set of events, as listed here:
ICellProvider, ICellConsumer Provides or consumes a single value item such as a cell or field.
IRowProvider, IRowConsumer Provides or consumes a single or multiple rows of values.
IListProvider, IListConsumer Provides or consumes an entire list.
IFilterProvider, IFilterConsumer Provides or consumes a filter value. This allows one list to filter another connected list.
IParametersInProvider, IParametersInConsumer Provides or consumes a set of parameters between Web Parts. This is used when a consumer Web Part owns the parameter list and needs to connect with another Web Part.
IParametersOutProvider, IParametersOutConsumer Provides or consumes a set of parameters between Web Parts. This is used when a provider Web Part owns the parameter list and needs to connect with another Web Part.
Not all Web Parts can connect to other Web Parts; for example, a Web Part can only connect to other Web Parts if the connection interfaces are using a matching connection interface. As such, an ICellProvider connection interface can always connect to an ICellConsumer connection interface because they are a pair.
In the event that a connection interface from one Web Part is not a pair to the second Web Part connection interface, a transformer might be available for the interface. A transformer gives two Web Parts, with mismatched interfaces, the ability to communicate. Four transformers are provided out of the box:
IRowProvider to ICellConsumer
IRowProvider to IFilterConsumer
IParametersOutProvider to IParametersInConsumer
IRowProvider to IParametersInConsumer
For a Web Part to connect to Web Parts on other pages, there are five out-of-the-box interfaces that provide cross-page communication. These interfaces are for a source page to a target page interface connection:
To create a custom Web Part that can connect to other Web Parts, perform the steps that follow. This example builds on the Visual Web Part project (SPFINVWP) that you created earlier in this chapter. To test the functionality of this example, you need a Tasks list with a number of task items on the site with which you associated the SPFINVWP project:
Open the SPFINVWP project in Visual Studio, if it is not already open.
Right-click the SPFINVWP project name, click Add, and then click New Item.
Under Installed Templates, select Visual C#, and then click Interface.
In the Name text box, type TaskInterface.cs, and then click Add.
Replace the code in TaskInterface.cs with the following code:
using System;
using System.Collections.Generic;
using System.Linq;
using System.Text;

namespace SPFINVWP
{
  public interface TaskInterface
  {
    int Id { get; }
    string Name { get; }
  }
}
You have created a connection interface file, next you will create a provider Web Part by using the following procedure:
Right-click the SPFINVWP project name, click Add, and then click New Item.
Under SharePoint 2010, click Web Part. In the Name text box, type ProviderWebPart1, and then click Add.
Replace the code in ProviderWebPart1.cs with the following code:
using System;
using System.ComponentModel;
using System.Web;
using System.Web.UI;
using System.Web.UI.WebControls;
using System.Web.UI.WebControls.WebParts;
using Microsoft.SharePoint;
using Microsoft.SharePoint.WebControls;
namespace SPFINVWP.ProviderWebPart1
{
  [ToolboxItemAttribute(false)]
  public class ProviderWebPart1 : Microsoft.SharePoint.WebPartPages.WebPart,
    TaskInterface
  {
    DropDownList _TaskPicker = null;
    int TaskInterface.Id
    {
      get { return int.Parse(_TaskPicker.SelectedValue); }
    }

    string TaskInterface.Name
    {
      get { return _TaskPicker.SelectedItem.ToString(); }
    }

    protected override void CreateChildControls()
    {
      try
      {
        _TaskPicker = new DropDownList();
        using (SPSite spSite = new SPSite(SPContext.Current.Web.Url))
        using (SPWeb spWeb = spSite.OpenWeb())
        {

          SPList TaskList = spWeb.Lists["Tasks"];

          foreach (SPListItem Task in TaskList.Items)
          {
            _TaskPicker.Items.Add(new ListItem(Task.Name, Task.ID.ToString()));
          }
        }
        _TaskPicker.AutoPostBack = true;

        this.Controls.Add(_TaskPicker);
      }
      catch (Exception ex)
      {
        this.Controls.Clear();
        this.Controls.Add(new LiteralControl(ex.Message));
      }

    }

    [ConnectionProvider("Task Name and ID")]
    public TaskInterface ReturnThis()
    {
      return this;
    }
  }
}
Next you will create the consumer Web Part by using the following procedure:
Right-click the SPFINVWP project name, click Add, and then click New Item.
Under SharePoint 2010, click Web Part. In the Name text box, type ConsumerWebPart1, and then click Add.
Replace the code in ConsumerWebPart1.cs with the following:
using System;
using System.ComponentModel;
using System.Web;
using System.Web.UI;
using System.Web.UI.WebControls;
using System.Web.UI.WebControls.WebParts;
using Microsoft.SharePoint;
using Microsoft.SharePoint.WebControls;

namespace SPFINVWP.ConsumerWebPart1
{
    [ToolboxItemAttribute(false)]
    public class ConsumerWebPart1 : WebPart
    {
        TaskInterface _provider = null;
        Label _lbl = null;

        protected override void CreateChildControls()
        {
            try
            {
                _lbl = new Label();

                if (_provider != null)
                {
                    if (_provider.Id > 0)
                    {
                        _lbl.Text = _provider.Name + " was selected.";
                    }
                    else
                    {
                        _lbl.Text = "Nothing was selected.";
                    }
                }
                else
                {
                    _lbl.Text = "No Provider Web Part Connected.";
                }
                this.Controls.Add(_lbl);
           }
          catch (Exception ex)
          {
              this.Controls.Clear();
              this.Controls.Add(new LiteralControl(ex.Message));
          }
      }

      [ConnectionConsumer("Task Name and ID")]
      public void ReturnProvider(TaskInterface providerInterface)
      {
          _provider = providerInterface;
      }

   }
}
You have now created both the consumer and provider Web Parts. To deploy and test the solution, perform the following steps:
From the Build menu, click Deploy Solution. Correct any errors you might have.
When the deployment has succeeded with no errors, browse to the site you selected for debugging.
Click Site Actions, and then select More Options.
Under Filter By, click Page. Select Web Part Page, and then click Create.
On the New Web Part Page, in the Name text box, type ConnectionWebPartPage, and then click Create.
Add the ConsumerWebPart1 to one of the zones, and then add the ProviderWebPart1 to a different zone.
Click the down-arrow on the ConsumerWebPart1 Web Part title. Click Connections, click Get Task Name And ID From, and then Click ProviderWebPart1.
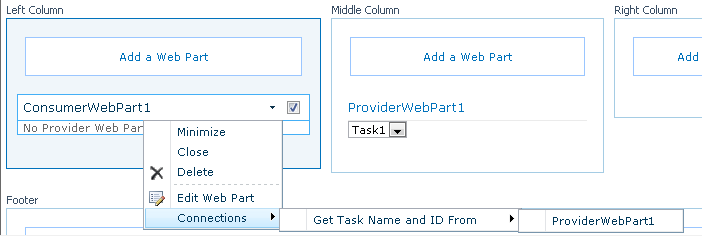
You have now successfully created a Consumer and Provider Web Part Connection.