
The Three-State workflow is a simple workflow template that you can use with lists and libraries. However, this workflow will not be sufficient for many of the business-process–related tasks that you want to automate. This is when you will use SharePoint Designer to create workflows. SharePoint Designer provides a Workflow Editor with which you can create no-code, rules-based declarative workflows. There are three types of workflows that you can create with SharePoint Designer:
List workflows Also known as content workflows, these workflows are created to automate tasks associated with content stored in lists and libraries.
Site workflows These workflows are not associated with specific SharePoint objects and are started manually at the site level.
Reusable workflows These are workflow templates that can subsequently be added (associated) with a list or library on the site for which the reusable workflow is created. You create reusable workflows by binding them with content types. Reusable workflows can be published to the global workflows catalog, which makes it reusable on every site in the Site Collection, and visible to all users. Only reusable workflows at the top-level site of a Site Collection can be published as globally reusable workflows.
Tip
INSIDE OUT Creating workflows by using SharePoint Designer on a client operating system
To create workflows by using SharePoint Designer, you must have the .NET Framework 3.5 installed on your computer. It is likely that unless you are a developer with your own copy of a SharePoint Foundation installation, you will be running SharePoint Designer on a computer that does not have SharePoint Foundation installed on it. If that is the case, you will be running a client operating system such as Windows 7, Windows Vista, or Windows XP. Windows 7 includes the .Net Framework 3.5; however, if you are using Windows Vista or Windows XP, you might need to install the .NET Framework 3.5 before you can work with workflows in SharePoint Designer. The .NET Framework is available from the Microsoft Download Center at www.microsoft.com/downloads.
When you create a workflow with SharePoint Designer, you are provided with two pages:
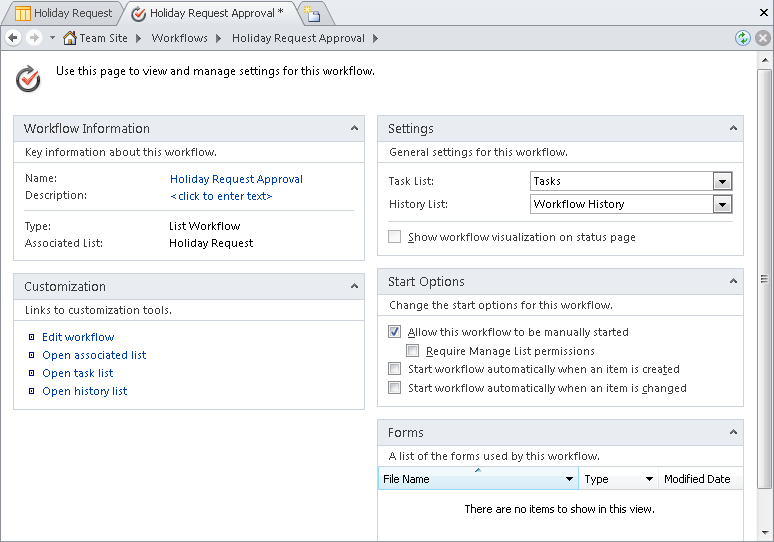
Workflow Settings Use this page to view and manage settings for the workflow. It consists of a contextual ribbon tab, as shown in Figure 10-2, and five areas, as shown in Figure 10-3.
Figure 10-2. On the Workflow Settings tab, you can save, edit, manage workflows, and create and manage variables.
Workflow Information This area displays basic workflow information, such as the workflow name, description and type (list, site, or reusable). When the type of workflow is a list workflow, then this area displays the name of the list or library with which the workflow is associated. When the workflow type is reusable, this area displays the name of the content type with which it is associated.
Customization The links provided in this area will differ depending on the type of workflow. For example, for a list workflow, this area contains links to the Workflow Editor page and links to open the associated list, Task list, and Workflow History list.
Settings Use this area to select the Task and Workflow History list that the workflow is to use. For list and site workflows, this area contains a check box which is associated with workflow visualization within the browser. This option is only applicable when you have SharePoint Server 2010 Enterprise Edition installed. Leave this check box clear for workflows that are to be published to SharePoint Foundation sites.
Start Options Use this area to select the start options for the workflow.
Forms This area displays the pages that SharePoint Designer automatically creates during the publish process. Depending on the type of workflow and the start option selected, a number of pages will be created. Whenever a workflow can be started manually, an initiation page is created. When you use the task action to collect data from a user, then task pages are created.
Workflow Editor Use this page and the Workflow tab to create and change the workflow. Each workflow consists of conditions and actions, which can be grouped into steps. SharePoint Designer workflows can become large; you can use steps to document the major set of activities that need to be completed as part of your workflow. Use the content area of the workspace and Workflow tab to add, delete, and modify conditions, actions, and steps. The Workflow tab consists of five tab groups, as shown in Figure 10-4.
Save Use this group to check your workflow for errors, save your workflow, and publish your workflow. The Save and Publish commands are the same commands that you find in the Save group on the Workflow Settings tab. Use the Save command when you want to save your changes but have not completed the workflow, and therefore you do not wish other users on the site to use the workflow. When you click the publish command, it also saves the workflow.
Modify Use the commands in this group to move and delete conditions, actions, and steps, as well as to modify the advanced properties of conditions and actions. Actions can be moved between steps and within steps, whereas conditions can only be moved up or down within their respective condition block. A condition block starts with an If statement, subsequent conditions start with an and or an or. You cannot copy and paste steps, conditions, or actions within a workflow or between workflows—which at times can be very frustrating.
Insert Use the commands in this group to insert conditions, actions, and steps. Use the Else-If Branch commands to add another condition block so that you can define actions to be performed if the conditions of the first condition block are not true. Use the Parallel Block command when you want a set of actions to execute at the same time and not in sequence. Parallel actions might not be performed absolutely simultaneous. The exact order cannot be specified and can vary each time a workflow instance runs. You can use the Impersonate Step command to add a special step to your workflow that allows the conditions and actions within that step to execute by using the security credentials of the workflow author.
Manage This group contains three commands that are the same as those in the Manage group on the Workflow Settings tab. The commands available on the Workflow tab allow you to publish a reusable workflow as a globally reusable workflow, export the workflow as a .vwi Visio file, and switch to the Workflow Settings page. You can also switch to the Workflow Settings page by using the workspace breadcrumb and clicking the name of the workflow, which appears in the workspace breadcrumb to the right of Workflows.
Variables This tab group contains three commands that are the same as those in the Variables group on the Workflow Settings tab. Variables are temporary storage that persist for the lifetime of the workflow. Use the Initiation Form Parameters command when a workflow instance is manually started; thus, the initiator of the workflow can provide values stored in initiation variables, which can then be used in the workflow. The values entered by the workflow initiator are only available for the lifetime of the workflow instance. Use the Local Variables command to pass values from one condition or action to another condition or action; for example, to save the Task ID created from the Collect Data From A User action so that a subsequent action can use the values a person entered into the task. Use the Association Columns command to have the list or reusable workflow add site columns to the list or library with which the workflow is associated. Review existing site columns before you create new site columns within the Association Columns dialog box.


Each workflow is created for a combination of conditions and actions. Conditions are used to create rules that portray the logic of the workflow. Actions are the basic unit of work performed by the workflow. When a condition is true, then all the actions associated with that condition are performed. To help you visually see which actions are associated with which conditions, the Workflow Editor surrounds conditions and their associated actions with a gray rectangle. A condition and its Else-If Branch conditions must be completed in a single step; that is, they cannot extend from one step to another.
Using a combination of conditions and actions, you can define which actions should be performed under which conditions. A workflow does not need to contain any conditions, but should contain at least one action such as writing to the history log or sending the creator of a list item an email. If a workflow does not contain any conditions, then all the actions defined in the workflow will be performed.
Note
When the set of built-in conditions and actions does not meet your business needs, a developer can create new conditions or actions, which are known as custom activities, by using Visual Studio 2010 or a third-party tool. Creating a custom activity by using Visual Studio is detailed later in this chapter.
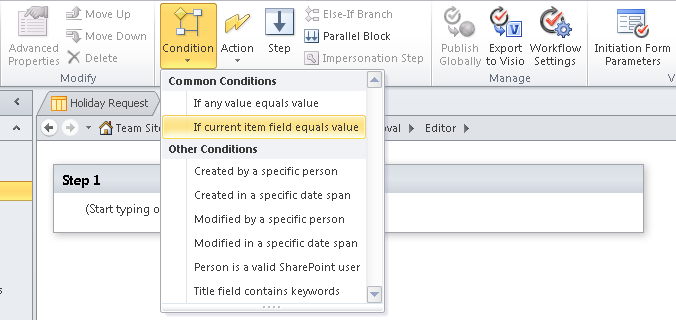
SharePoint Designer divides the built-in conditions into two categories:
Common Condition This category contains two conditions:
If Any Value Equals Value
If Current Item Field Equals Value
Other Conditions This category contains eight conditions:
Check List Item Permission Levels (only available within an Impersonation Step)
Check List Item Permissions (only available within an Impersonation Step)
Created By A Specific Person
Created In A Specific Date Span
Modified By A Specific Person
Modified in A Specific Date Span
Person Is A Valid SharePoint User
Title Field Contains Keywords
Note
You can find a quick reference guide to workflow conditions in SharePoint Designer 2010 at http://office.microsoft.com/en-us/sharepoint-designer-help/workflow-conditions-in-sharepoint-designer-2010-a-quick-reference-guide-HA010376962.aspx. For information about creating compact and powerful conditions, go to http://blogs.msdn.com/b/sharepointdesigner/archive/2008/05/14/create-compact-and-powerful-conditions-in-your-workflows.aspx.
A SharePoint 2010 workflow action is a task that needs to be completed. You can choose to run actions in serial—that is, an action starts only if the preceding one is complete—or you can choose to run actions in parallel, known as a parallel block, where all actions start at the same time. SharePoint Designer divides built-in actions into four categories:
Core Actions This category contains the common actions that you will use in many of your workflows. It consists of twelve actions:
Add A Comment
Add Time To Date
Do Calculation
Log To History List
Pause For Duration
Pause Until Date
Send An Email
Send Document To Repository (only available on workflows associated with libraries)
Set Time Portion Of Date/Time Field
Set Workflow Status
Set Workflow Variable
Stop Workflow
List Actions This category contains actions with which you can manipulate list items in a list and files within a library. This category contains fifteen actions:
Add List Item Permissions (only available within an Impersonation Step and should be used with care.)
Check In Item
Check Out Item
Create List Item
Delete Item
Discard Check Out Item
Inherit List Item Parent Permissions (only available within an Impersonation Step)
Remove List Item Permissions (only available within an Impersonation Step)
Replace List Item Permissions (only available within an Impersonation Step)
Set Content Approval Status
Set Field In Current Item
Update List Item
Wait For Change In Document Check-Out Status (only available on workflows associated with libraries)
Wait For Field Change In Current Item
Task Actions This category contains actions with which you can assign a task to a specific user or group. This category contains three actions:
Assign A Form To A Group
Assign A To-Do Item
Collect Data From A User
Utility Actions This is a new category in SharePoint 2010. It contains five actions that can be used to manipulate strings:
Note
SharePoint Server 2010 provides two other categories: Document Set Actions and Relational Actions. The Relational Actions category contains only one built-in action, which you can use to look up a user’s profile imported from Active Directory. The action then returns the user’s manager from that profile. SharePoint Foundation does not support document sets or importing user’s information from Active Directory; hence, this is why you will not see those categories when you work with workflows in SharePoint Designer on a SharePoint Foundation site.
Note
For additional information, read the quick reference guide to workflow actions in SharePoint Designer 2010, which is available at http://office.microsoft.com/en-us/sharepoint-designer-help/workflow-actions-in-sharepoint-designer-2010-a-quick-reference-guide-HA010376961.aspx.
The best way to understand the options of building a workflow by using SharePoint Designer is to build a workflow. In the following section, you will use a number of conditions and actions as you build a workflow for a holiday request scenario, which will use a list workflow that is triggered to start a workflow instance when an employee creates a new calendar item in the Holiday Schedule list. During the course of developing the workflow, it’s likely that you will use the option to manually start the workflow. The information needed for this workflow is stored in three related lists, as shown in Figure 10-5.
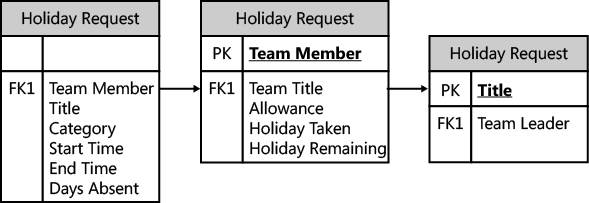
Teams This list is based on the Custom list template and contains all the teams a department might have, such as IT, Help Desk, User Adoption, and Training. The Title column is used for the name of team. A People Or Group column is added, which is named Team Leader.
Holiday Allowance A list created from the Custom list template, which has a list item for each employee in a team and consists of four columns. Because you will not be using the Title column, this field should be set as not required. All other columns should be configured as required:
Team This column is a lookup column to the Teams list and displays the Title field. Optionally, you can enforce restricted delete relationship behavior.
Allowance A number field with a default value of 20, a minimum value of 0, and a maximum value of 50.
Holiday Taken A number field with a default value of 0, a minimum value of 0, and a maximum value of 50.
Holiday Remaining A calculated column with a formula, [Allowance]– [Holiday Taken].
Holiday Request This list is based on a Calendar list template with content approval enabled and two additional columns:
Prior to creating and testing the workflow, using either the browser or SharePoint Designer, you should create three lists and populate the Teams and Holiday Allowance lists with data similar to that in Tables Table 10-1 and Table 10-2 so that you can test your workflow.
Table 10-1. Test Content for the Teams List
Title | Team leader |
|---|---|
IT | Peter Connelly |
Human Resources | Erin Hagens |
Marketing & Sales | Jack Creasey |
When a team member wants to submit a holiday request, he enters the following data:
Set the category of the request to Holiday
Holiday start date
Holiday end date
The number of days from their holiday allowance that they are requesting
You can enhance the solution by using list validation for the Holiday Request list to enforce that the [End Time] > [Start Time].
Perform the following steps to create a list workflow for a list or library:
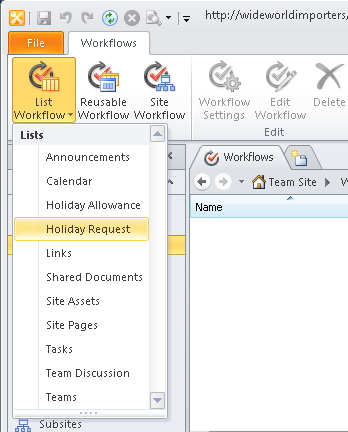
In SharePoint Designer, using the Navigation pane, click Workflows.
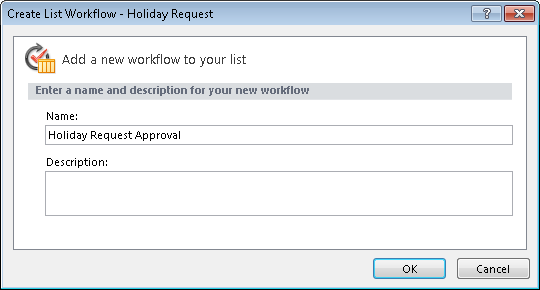
On the Workflows tab, in the New group, click List Workflow, and then click the name of the list or library (such as Holiday Request) to display the Create List Workflow dialog box.
You can also display the Create List Workflow dialog box by using the List Workflow command in the New group on the Site tab and the List Settings tab.
In the Name text box, type Holiday Request Approval, and then click OK.
If the Downloading Data dialog box opens, wait for it to close.
A new tab, named Holiday Request Approval opens with an asterisk, indicating that the workflow is not saved. The Workflow Editor contains one step, Step 1, and a flashing orange horizontal line where the first condition or action can be inserted.
On the workspace breadcrumb, click Holiday Request Approval to navigate to the workflow settings page.
On the Workflow Settings tab, click Save.
The Microsoft SharePoint Designer dialog box temporarily opens as the workflow is saved back to the SQL content database.

The two most commonly used conditions in a SharePoint Designer workflow are If Any Value Equals Value and If Current Item Field Equals Value. The first of these conditions is a generic condition that you can use to compare two values, where a value can be:
A metadata value from the list item or file on which the workflow instance was initiated, known as the current item.
A metadata value for a list item or file in list or library, where the workflow instance was not initiated.
Workflow variables or parameters, such as initiation form parameters and local variables.
Workflow context, such as the name of the workflow template, the current site URL, or the current user.
A value from items stored in the workflow’s associated tasks or history list.
When the value that you want to compare is not in the current item, you need to provide logic to specify from which item the workflow can obtain the value. You do this by using the Define Workflow Lookup dialog box. When the value to be compared in the condition is from the current item, then use the second common condition format, as described in the following steps:
In the Navigate pane, click the workflow that you want to modify to display the workflow settings page, and then in the Customization area, click Edit Workflow to display the Workflow Editor in the workspace.
Within the Workflow Editor, click where you would like the condition to appear (for example, within Step 1).
On the Workflow tab, click Condition in the Insert group, and then click If Current Item Field Equals Value.
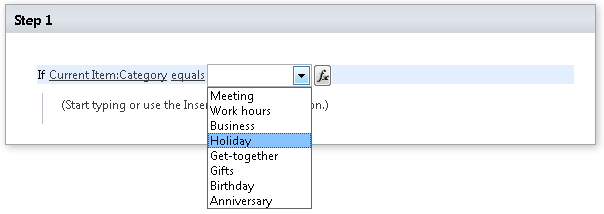
A two-row gray rectangle is added to Step 1, with the text, “If Field Equals Value,” added to the top row of the rectangle. The words Field, Equals, and Value are hyperlinks.
Click Field, and then click Category. Click Value, and then click Holiday.
The Equals link offers you with a number of comparison operators that differ depending on the data types of the comparison values.
Tip
INSIDE OUT If Current Item Field Equals Value versus If Any Value Equals Value
When the value that you want to compare is a metadata value stored in one of the columns of the current item, then for performance reasons, you should use the If Current Item Field Equals Value condition. Obtaining metadata values for other list items, whether you are using the If Any Value Equals Value condition or actions such as Update List Item, can cause additional database operations, and when a list has many list items and many active workflow instances, each resulting in many database operations, this can cause performance issues for the workflow associated with the list and other lists as well as how quickly a SharePoint server responds to requests for webpages.
Therefore, when there are two similar conditions or actions, and the value you wish to reference is stored in a column of the current item, use the condition or action for the current item. Similarly, within your workflow, when you reference the same value again and again, such as Holiday Taken in the Holiday Allowance list, which is a value you might refer to in a condition, a calculation, the body of emails, and as values in the workflow history log, then you should store the value at the start of the workflow in a variable and use that variable throughout the workflow when you need to know the number of days that a person has taken as holiday. The use of variables is described later in this chapter.
SharePoint Designer does not provide any diagnostic or debug facilities. When your workflow fails to run to completion, the only way to track which branch of a condition or which actions completed successfully is to write many items to the History list by using steps similar to the following procedure:
Click where you would like the action to appear, for example, within Step 1, click Start Typing Or Use The Insert Group In The Ribbon. On the Workflow tab, in the Insert group, click Action, and then under Core Actions, click Log To History List.
The message “Log This Message To The Workflow History List” appears, with the words “This Message” being a hyperlink.
Click This Message to display a text box, the Ellipse button (also known as the Display Builder button), and the Define Workflow Lookup button.
This action creates a list item in the Workflow History list chosen on the workflow settings page. You can choose any of these three input methods to define the contents of the Description column for the History list item. You can use the text box to add static text; the Define Workflow Lookup button allows you to add content that is specified in one of the columns of the current item or from a column for a list item from another list. Choose the Display Builder button to use a combination of static text and content from list items in lists and libraries or workflow variables.
Click the Display Builder button to display the String Builder dialog box, and then type, Holiday Request submitted by.
Click Add Or Change Lookup to display the Lookup For String dialog box.
In the Data Source list, leave Current Item selected.
This will allow you to retrieve values from the Holiday Schedule from the list item the team member created.
In the Field From Source list, select Created By and in the Return Field As list, select Display Name.
Click OK twice to close the Lookup For String and String Builder dialog boxes.


There will be circumstance in which you find yourself in need of information, but it is not saved in the list where the workflow is associated nor in other lists or libraries in your site. However, the information can be calculated from the information in your site. SharePoint Designer does not provide any looping facility, but it does allow you to specify a condition, so you are able to match retrieved data from a list item within another list or library; however, it will only return the first item that matches your condition. In the following steps, you will find the list item in the Holiday Allowance list that matches the team member who submitted the holiday request. You will then calculate the number of days a team member plans to take when adding the new holiday request to the number of days the team member has taken as holiday previous to this request:
Click where you would like the calculation action to appear (for example, within Step 1, in the same rectangle as the log action).
On the Workflow tab, in the Insert group, click Actions, and then under Core Actions, click Do Calculation. The words “Then Calculate Value Plus Value (Output To Variable: Calc)” appear.
Click Variable: Calc, and then click Create A New Variable to open the Edit Variable dialog box.
You can also create new variables by using the Local Variables command on the Workflow tab in the Variables group. It is good practice to not use the variables that SharePoint Designer creates because it might not be of the correct data type for your calculation, and the name will not indicate the information stored in the variable. You should use the variable name as a mechanism to document your workflow, and in large workflows where there are many variables using an appropriate name, this can save you time when you need to change your workflows. When you create a new workflow variable, create it first before completing any links within an action or condition. When you create a variable after completing the links then the links will clear and you will need to complete them again.
In the Name text box, type TotalHolilday, and then in the Type list, select integer. Click OK to close the Edit Variable dialog box.
Some actions, such as the Start Approval Process or the Start Feedback Process available in SharePoint Server 2010, when incorporated into your workflow will create their own variables; therefore, when you create a variable, it is advisable to devise a naming standard so that you can quickly identify the variables that you generated.
Click the first occurrence of Value, and then click the Define Workflow Lookup button to open the Lookup For Integer dialog box.
Leave Current Item as the selected item in the Data Source list, and then in the Field From Source list, select Days Absent. Click OK to close the Lookup For Integer dialog box.
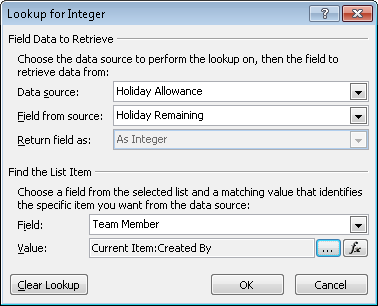
Click the remaining Value link, and then click the Define Workflow Lookup button to open the Lookup For Integer dialog box.
In the Data Source list, scroll down and click Holiday Allowance.
The Lookup For Integer dialog box expands to include a second section called Find The List Item.
In the Field Data To Retrieve section, click Field From Source, and then select Holiday Remaining.
In the Find The List Item section, click the down-arrow to the right of Field, select Team Member, and then in the Value, click the Ellipse button to open the Select Users dialog box.
Under Or Select From Existing Users And Groups, select User Who Created Current Item, and then click Add. Click OK to close the Select Users dialog box.
Click OK to close the Lookup For Integer dialog boxes.
A Microsoft SharePoint Designer dialog box opens, stating that the lookup you defined does not guarantee to return a single value, and that if more than one value is returned, only the first value will be used. Therefore, when you use SharePoint Designer to join two lists or libraries, you should verify that your workflow design ensures that only one value is returned. In this scenario, there should only be one list item in the Holiday Allowance list for each Team Member. Unfortunately, you cannot use the Enforce Unique Value option when you create a column of type People Or Group.
Click Yes to close the Microsoft SharePoint Designer dialog box.

In the following steps, you will check if the number of days that a team member requests, together with the number of holidays already taken exceeds the holiday allowance for the team member:
Click where you would like the condition to appear (for example, within Step 1, under the Calculation action).
On the Workflow tab, click Conditions on the Insert tab, and then under Common Condition, click If Any Value Equals Value.
The words “If Value Equals Value” appears.
Click the first Value link, and then click the Define Workflow Lookup button to open the Define Workflow Lookup dialog box.
In the Data Source list, select Workflow Variables And Parameters, and then in the Field From Source list, select Variable: TotalHoliday. Click OK to close the Define Workflow Lookup dialog box.
Click Equals, and then select Is Less Than Or Equal To.
Click the remaining Value link, and then click the Define Workflow Lookup. In the Data Source list, select Holiday Allowance, and then in the Field From Source list, select Allowance.
In the Find The List Item section, in the Field list, select Team Member, and then to the right of Value, click the Ellipse button to open the Select Users dialog box. Select User Who Created Current Item, click Add, and then click OK twice to close the open dialog boxes. Click Yes to the SharePoint Designer dialog box.

Workflows developed by using SharePoint Designer are human centric, and therefore, as the workflow progresses, you will need to communicate with users of the site, either to complete a task or to obtain additional information. This is where you can use the three task actions: Assign A Form To A Group, Assign A To-Do Item, and Collect Data From A User. When you include one of these actions in the workflow, the workflow pauses until the task is completed. These actions are the same as they were with Windows SharePoint Services 3.0 and SharePoint Designer 2007; they are the only ones available in SharePoint Foundation 2010. Three new task actions are introduced with SharePoint Server 2010: Start Approval Process, Start Feedback Process, and Custom Task Process.
Note
You can view a comparison of the three task actions at http://office.microsoft.com/en-us/sharepoint-designer-help/assign-a-to-do-item-in-a-workflow-HA010233623.aspx. Although this write-up pertains to SharePoint Designer 2007, it is still relevant to SharePoint Designer 2010.
To assign a task item to a user, perform steps similar to those that follow. In this example, you will create a task item for the team leader of the user who created the holiday request. This will require a three-way lookup, because the team leader is in the Teams list and the team which the user is in can only be found from the Holiday Allowance list:
In the Workflow Editor, under the second If condition, place the insertion point, type to, and then press Enter. From the list of actions with “to” in their names, select Assign A To-Do Item.
The words “Assign A To-Do Item To These Users” appear.
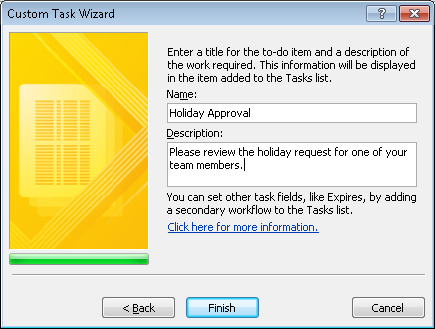
Click a To-Do Item to open the Custom Task Wizard dialog box, and then click Next to display the second page of the task wizard.
In the Name text box, type Holiday Approval, and in the Description text box, type Please review the holiday request for one of your team members. Click Finish to close the dialog box.
Click These Users to open the Select Users dialog box.
Under Or Select From Existing Users And Groups, select Workflow LookUp For A User, and then click Add to open the Lookup For Person Or Group dialog box.
In the Data Source list, select Teams. In the Field From Source list, select Team Leader In the Return Field As list, and then select Email Address.
In the Find The List Item section, in the Field list, select ID, and then in the Value list, click the Define Workflow Lookup button to open the Lookup For Integer dialog box.
In the Data Source list, click Holiday Allowance, and then in the Field From Source list click Team. In the Return Field As list, select Lookup Id (As Integer).
In the Find The List Item section, in the Field list, select Team Member, and then to the right of Value, click the Ellipse button to open the Select Users dialog box.
Under Or Select From Existing Users And Groups, select User Who Created Current Item, and then click Add. Click OK or Yes as appropriate to close all open dialog boxes.
The words Assign Holiday Approval to Teams:Team Leader appear in the workflow.

Tip
INSIDE OUT Scenario alternatives when using SharePoint Server 2010
When using SharePoint Server 2010, and when Active Directory is populated to contain a user’s manager, then in place of the Teams list, you could use the Lookup Manager Of A User action, which stores the user name of the manager in a variable. In step 6 of the previous procedure, in the Data Source list, select Workflow Variables And Parameters, and then in the Field From Source list, select the variable. Steps 7 through 10 would then not be necessary. This results in the SharePoint Server sending a query across the network to a domain controller. Alternatively, if the SharePoint Server 2010 User Profile Synchronization service is configured so that Active Directory Manager property has been imported into a user’s profile, then in step 6, in the Data Source list, select User Profiles, and then in the Field From Source list, select Manager, matching the Account Name to Field in the Find The List Item section and User Who Created Current Item to Value. This second method results in a database operation.
To encourage the participants of the workflow to complete tasks or to keep them informed, use the Send An Email action, as described in the following steps:
Place the insertion point in the appropriate position, for example, under the Else branch, type email, and then press Enter.
The words “Email These Users” appear.
Click These Users to open the Define E-mail Message dialog box.
Click the Book icon to the right of the To text box to open the Select Users dialog box. Under Or Select From Existing Users And Groups, select User Who Created Current Item, click Add, and then click OK.
Click the Ellipse button to the right of the Subject text box to open the String Builder dialog box. In the Name text box, type Holiday Request Denied, and then click OK.
In the body text box of the Define E-mail Message dialog box, type Dear, and then click Add Or Change Lookup to open the Lookup For String dialog box.
In the Field From Source list, select Created By, and in the Return Field As list, click Display Name. Click OK to close the Lookup For String dialog box.
In the body text box, on a new line, under Dear, type Your Holiday Request for, and then click Add Or Change Lookup to open the Lookup For String dialog box. In the Field From Source list, select Days Absent. Click OK to close the Lookup For String dialog box.
In the body text box, type has been denied. You have exceeded your holiday allowance.
You could enhance the message by obtaining the number of days the team member is allowed as holiday from the Holliday Allowance list, or more efficiently, if you want to display the holiday allowance in the email, you should save this value in a workflow variable, when you retrieved the holiday allowance in the calculation action earlier in the workflow.
Click OK to close the Define E-Mail Message dialog box.


Once you have created or modified a workflow you should use the commands in the Save group of the Workflow tab to check for errors, save, and then publish the workflow. The Publish command also checks for errors and saves the workflow. Use the following steps to publish your workflow:
On the Workflow tab, click Save, and then click Check For Errors in the Save group.
A Microsoft SharePoint Designer dialog box opens, stating that the workflow contains no errors. Click OK. If errors are reported, then this is usually because you have failed to complete link values in conditions or actions. Review and correct any errors, and then recheck your workflow.
On the Workflow tab, click Publish in the Save group.
A Microsoft SharePoint Designer dialog box displays as the workflow files are saved to the server.
You can now test your solution by creating a holiday request in the Holiday Schedule list. You might need to manually initiate a workflow instance on your list item, depending on the workflow start options you set on the workflow settings page.
Tip
INSIDE OUT Where are SharePoint Designer workflows saved?
SharePoint Designer workflows are saved in a hidden document library named Workflows that contains a folder for each workflow you create. This folder contains the declarative workflow files as well as the workflow initiation page and any task pages. The Workflows library has version enabled, and therefore, theoretically you could revert a workflow to a previous state.
When a workflow instance starts, it runs under the identity of the user who starts the workflow instance—the initiator; therefore, the actions that the workflow can execute is limited by the actions that the workflow initiator can perform. If you want to move an item from a list (source) to another list (destination), then the workflow initiator must have contribute rights on the destination list. However, in many scenarios, you do not want to give the workflow initiator access to the destination list. SharePoint Foundation contains a new workflow function—Impersonation Step—that allows the workflow instance to execute actions and conditions under the security permissions of the user who authored the workflow.
There are four additional actions that are available within the Impersonation Step. These are:
Add List Item Permissions
Inherit List Items Parent Permissions
Remove List Item Permissions
Replace List Item Permissions
Note
When you use the Add List Item Permissions action, you are breaking the inheritance of the item from the security settings of the list. This is known as using unique permissions within a list or library. This can result in performance implications, such as long page load times across the farm, cause high load on the SQL servers, and timeouts. Microsoft recommends that lists and libraries have no more than 50,000 unique permissions, which can be easily reached with a list that contains a couple of thousand items and accessed by a large number of users. Information on unique item permission limitations can be found at http://msdn.microsoft.com/en-us/library/cc262787.aspx.
The Impersonation Step comes with its own set of limitations that you must be aware of before you use it. Unlike the default step, the Impersonation Step cannot be nested within an existing step; therefore, the Impersonation Step command in the Insert group on the Workflow tab is only active when the insertion point is outside all steps in the workflow editor workspace. When the workflow author leaves the company and her user account is removed from the system, the workflow terminates when the Impersonation Step is executed. Similarly if the Impersonation Step moves an item from one list to another and the workflow author does not have contribute permissions on the destination list, then the Impersonation Step will fail. This is most likely to happen when using the Impersonation Step within reusable and globally reusable workflows. It is important to document the permissions the workflow author must have to ensure that the Impersonation Step will work as designed. You can use the Add A Comment action to include documentation within your workflow.
To add an Impersonation Step to your workflow, perform the following steps:
Place the insertion point in the appropriate position (for example, outside and under Step 1).
On the Workflow tab, in the Insert group, click Impersonation Step.

This is one of the greatest improvements incorporated by SharePoint Designer 2010. No-code, reusable workflows can be developed in non-production environments and then moved to the live environment. No-code, reusable workflows developed in the live environment can be used on other lists and libraries, within the same site, within all sites in a Site Collection, or on sites within other Site Collections. In fact, there is little reason to build list workflows.
When you create a reusable workflow you must associate it with a content type—either a specific content type, such as Event, or with All content types. The advantage of associating a reusable workflow with a specific content type, if you choose your content type carefully, is that the columns you need to retrieve values for the current item will be present. The disadvantage is that you will only be able to use that reusable workflow with lists or libraries where that specific content type is added.
When you create a reusable workflow associated with All content types, you need to create site columns and use the Association Column command to make columns that you want to work with available to your workflow. This entails more planning and forethought when you create your workflows.
Tip
INSIDE OUT Association column naming considerations
When you add a reusable workflow to a list or library that already has a column with the same name as an association column, the association column is added, but the association column name is made unique by adding a number to the end of the name. The workflow is dynamically modified to refer to the new association column name.
Also, when you create a workflow to be used by other users, with slight variations to your business scenario, you need to create a more robust workflow, more error messages in the history log, and probably additional tests that will cater to values you had not envisioned. It is usual when such reusable workflows are created that the support and maintenance might be handed over to the central team that supports the SharePoint Foundation implementation, thereby allowing you, the business user, to continue with your day job.
If you create a reusable workflow not in the top-level site of a Site Collection, which you then need to use on all sites within a Site Collection, you will need to export the workflow as a solutions file (.wsp) and then import the .wsp into the Site Collection’s Solution gallery.
Before you can export a reusable workflow, first publish the workflow, and then save the reusable workflow as a .wsp file by performing the following steps:
Open a site that contains the reusable workflow that you have created in SharePoint Designer.
In the Navigation pane, click Workflows.
Click the appropriate reusable workflow to display the Workflow Settings page.
On the Workflow Settings tab, in the Manage group, click Save as Template.
A dialog box appears, stating that the template has been saved to the Site Assets library. The workflow template is saved with a filename that is the same as the name of the reusable workflow.
In the Navigation pane, click Site Assets to display the gallery page that displays all the files stored in the Site Assets library.
Click the icon to the left of the appropriate .wsp file, and then on the Assets tab, in the Manage group, click Export File to display the Export Selected As dialog box.
Choose a directory in which to save the file, and then click Save. A Microsoft SharePoint Designer dialog box opens, stating that the .wsp has been successfully exported.
To use a reusable workflow in a site where it was not created, execute the steps that follow. You can also use these steps if you create a reusable workflow in a Subsite of a Site Collection; therefore, you cannot publish it as a globally reusable workflow:
Using the browser, navigate to the top-level site of the Site Collection where you want to make the reusable workflow available.
Click Site Actions, and then click Site Settings.
Under Galleries, click Solutions.
On the Solutions tab, in the New group, click Upload Solution.
Click Browse to open the Choose File To Upload dialog box, navigate to where you saved the .wsp workflow template file. Click Open, and then click OK.
The Solution Gallery – Activate Solution dialog box opens.
On the View tab, click Activate.
Browse to the site where you want to use the workflow, click Site Actions, and then click Site Settings.
Under Site Actions, click Manage Site Features.
Click the Activate button to the right of the workflow template.