
You can use Visual Studio to extend the ribbon further than can be achieved with the browser or SharePoint Designer. For example, you can extend the ribbon on pages other than the view and form pages. You can create new tab sets, tabs, groups, and add other types of buttons, such as check boxes, drop-down menus or text boxes. Or, you can remove existing controls. Your extensions with Visual Studio can target specific types of pages or all pages and is not limited to just the ribbon but to other elements, such as the Site Action menu.
So far in this chapter, the contents of the XML file CMDUI.XML have been used to obtain information on how the core Server ribbon has been defined. Like other XML files that Microsoft provides and SharePoint Foundation uses for configuration, you should not modify the CMDUI.XML file to extend the ribbon with you own tab sets, tabs, groups, and controls.
The development process for other XML files allows you to create your own XML file with similar content to the Microsoft-provided files that SharePoint uses, as long as the files follow a specific naming convention. For example:
The out-of-the-box site definitions that are shown on the Create page are defined in the WEBTEMP.XML file on the server in the TEMPLATE[LCID]XML subfolder of the SharePoint root, where [LCID] represents the locale of the SharePoint installation and any language packs that are installed. For site definitions that you create to appear on the Create page, you should not modify WEBTEMP.XML, but create your own XML file, using a naming convention, WEBTEMP*.XML, where * can be any number of characters such as WEBTEMP_SPFIO.XML or WebTempWideworldimpoorters.xml. The name of the file is case-insensitive.
When you create a workflow by using SharePoint Designer, the out-of-the-box, SharePoint Designer conditions and actions that you can use are based on information found on the server in the WSS.ACTIONS XML file stored in the TEMPLATE[LCID]Workflow subfolder. Using Visual Studio, you can publish your own custom actions; however, users of SharePoint Designer will not have access to them until the relevant XML is placed in an ACTIONS file. Again, you should not modify the Microsoft-provided file, but create your own. Any file found in the workflow folder with an ACTIONS extension will be pulled down to the computer running SharePoint Designer, when the user tries to create a workflow.
However, the way to develop extensions to the ribbon is not to create new XML files in a SharePoint root subfolder or modify CMDUI.XML; instead, you should use Visual Studio to develop a package that contains a Feature, in which an XML file is an element, and the ribbon components are declared in the XML file.
The ribbon XML element file consists of an outer <Elements> tag, which contains one or more <CustomAction> tags that can be used to define a ribbon control, a link on a Site Settings page, a script block, or a link to a file that contains a script to be executed. When defining a ribbon control, the <CustomAction> tag contains a <UrlAction> tag or a <CommandUIExtension> tag, which also contains a number of other tags.
Each elements file can contain one or more <CustomAction> tag; therefore, if your solution requires a set of controls on a list view, and another set of controls on the Site Action menu, and yet another set of controls on the LIM, these can all be included in one elements file.
A <CustomAction> tag can define where one or more ribbon controls should be located. This is a high-level location such as a list or one of the standard menus. If the location is the ribbon and not a menu, then the specific information as to which tab and group each ribbon control is to be placed in is defined in the <CommandUIDefinition> tag, which is a child tag of the <CommandUIDefinitions> tag.
The code that follows defines the content of an element file that contains one <CustomAction> tag, which can contain ribbon controls that only appear on pages where the list view Web Part is used to display the contents of announcement lists:
<?xml version="1.0" encoding="utf-8"?>
<Elements xmlns="http://schemas.microsoft.com/sharepoint/">
   <CustomAction Id="SPFIO.Ribbon.AnnList"
      Location="CommandUI.Ribbon">
      RegistrationType="List"
      RegistrationId="104"
      Title="SPFIO Announcement Ribbon Button">
         <CommandUIExtension> ... . <CommandUIExtension>
   </CustomAction>
</Elements>
The <CustomAction> tag consists of a number of attributes, such as the following:
Location When the <CustomAction> defines ribbon controls, it must contain a <CommandUIExtension> tag, and the Location attribute must start with CommandUI.Ribbon. When the location is CommandUI.Ribbon and not one of its descendants and the RegistrationType equals List, then the pages on which the ribbon controls will be placed are list views, and the edit, new, and display forms of a list or library. If you only want the commands to effect views of a list or library, the location attribute should be set to CommandUI.Ribbon.ListView. If the RegistrationType attribute is not included, then all page types could be targeted.
Id This is used to specify a unique identifier for the custom action. It can also be used to document the purpose of the custom action.
RegistrationType This is an option attribute that is used to define a per-item action.
RegistrationID This is an option attribute that can be used to target a specific RegistrationType; for example, if the RegistrationType equals List, then the Id attribute can be used to target a specific list or library type.
Text This is a required attribute that defines the end-user description for the custom action.
Note
To learn more about the attributes for the <CustomAction> tag, go to http://msdn.microsoft.com/en-us/library/ms460194. For more information about the list and library Id numbers, go to http://msdn.microsoft.com/en-us/library/microsoft.sharepoint.splisttemplatetype.aspx.
The code that follows is an example of a <CustomAction> tag that adds a link to the Site Actions menu. In this example, the link is to the StorMan.aspx page that was introduced with SharePoint 2010 Service Pack 1. This page displays information with which a user can understand the quota, if one is applied, and make decisions regarding the removal of content to reduce the size of their sites:
<CustomAction Id="SPFIO.SiteActionsMenu"
   Location="Microsoft.SharePoint.StandardMenu"
   GroupId="SiteActions"
   ImageUrl="/_layouts/images/Settings.gif"
   Sequence="500"
   Title="SPFIO Navigate to Storage Management page">
   <UrlAction Url="/_layouts/StorMan.aspx" />
</CustomAction>
In the next example, a <CustomAction> tag adds a custom action to the LIM, similar to the one added previously in this chapter by using SharePoint Designer. Note that the ribbon schema uses the acronym, ECB, whereas SharePoint Designer refers to it as the LIM:
<CustomAction Id="SPFIO.ECB.LIM"
   Location="EditControlBlock"
   RegistrationType="List"
   RegistrationId="104"
   Rights="ManageLists"
   ImageUrl="~site/SiteAssets/SPFIO16x16.gif"
   Sequence="205"
   Title="SPFIO Navigate to site owners edit form for this item">
   <UrlAction Url="~site/Lists/Tasks/SOEditForm={ItemID}" />
</CustomAction>
In both the preceding examples, the <UrlAction> tag is used to identify the page to be displayed when the control is clicked.
The previous example also uses the Rights attribute, which specifies the set of rights that a user must have for the link to be visible. This is a common requirement for when you create a list form that allows contributors to modify a subset of the values for a list item, and another form that allows list and site owners to modify other values for a list item. Therefore, in this example, this link will only be available to users who have the Manage Lists right.
Note
The Rights attribute uses the values of the SPBasePermissions enumeration, the details of which you can find at http://msdn.microsoft.com/en-us/library/microsoft.sharepoint.spbasepermissions.aspx.
When defining a ribbon control, the <CustomAction> tag has a location starting with CommandUI.Ribbon, and contains a <CommandUIExtension> tag that contains <CommandUIDefinitions> and <CommandUIHandlers> tags. The first of these tags defines the visual presentation of one or more controls, whereas the second tag defines the actions to be performed by the ribbon controls. The Command attribute of the control tag must match with one of the Command attributes of the <CommandUIHandler> tags.
The <CommandUIDefinitions> tag can contain one or more <CommandUIDefinition> tags. Each <CommandUIDefinition> tag defines one ribbon control. Some of values of the attributes of the <CommandUIDefinition> tag are similar to those used to define a custom action in SharePoint Designer. For example, the Location attribute specifies the tab and group of the control in dot-separated notation, as used in the Ribbon Location text box of the Create A Custom Action dialog box. The value of the Id attribute can be anything; however, the convention is to mimic the dot-separated notation of the Location attribute.
In the code that follows, a new button control is defined on the display form of a list. Referring to Table 15-1, using a sequence number of 25 instructs SharePoint to place the control between the Check Out and Alert Me controls:
<CommandUIDefinition Location="Ribbon.ListForm.Display.Controls._children">
  <Button Id="Ribbon.List.Display.SPFIONewControl"
      Sequence="25"
      Command="SPFIONewCommand"
      Description="SPFIO New Control"
      LabelText="New SPFIO Control"
      Image32by32="~sitecollection/SiteAssets/SPFIO32x32.gif"
      Image16by16="~sitecollection/SiteAssets/SPFIO16x16.gif"
      TemplateAlias="o1"
      ToolTipTitle="SPFIO New Control Tool Tip"
      ToolTipDescription="SPFIO Tool Tip Description"
      ToolTipShortcutKey="Ctr-T,E"
      ToolTipImage32by32="~sitecollection/SiteAssets/SPFIO32x32.gif"
      ToolTipHelpKeyWord="SPFIO"
   />
</CommandUIDefinition>
The TemplateAlias attribute instructs SharePoint where in the group template to place the image for this control. A number of templates are predefined in the CMDUI.XML file. Microsoft recommends that you create your own, especially when creating your own tabs, because the templates from the CMDUI.XML file might not be loaded when your tab is displayed. To define a new template, use the <CommandUIDefinition> tag with a location of Ribbon.Templates._children and a child tag of <GroupTemplate>.
To replace a ribbon control, use the <CommandUIDefinition> tag, and on the Location attribute, specify the name of the control. In the code example that follows, the New Folder control in the New group on the Documents tab is replaced with a different icon and calls the SPFIOExScriptBlock command defined in the <CommandUIHandler> tag. For SharePoint to overwrite the existing New Folder control, the sequence number must be lower than the out-of-the-box sequence number for that control. You can find this number by referring to the CMDUI.XML file. If you and other developers have created many custom actions for the same control, then the lowest sequence number will win:
<CommandUIDefinition Location="Ribbon.Documents.New.NewFolder">
   <Button Id="Ribbon.Documents.New.NewFolder.SPFIOFolderButton"
      Alt="SPF New Folder control"
      Sequence="5"
      Command="SPFIOExScriptBlock"
      LabelText="SPFIO New Folder"
      Image32by32="~site/SiteAssets/SPFIO32x32.gif"
      TemplateAlias="o1" />
</CommandUIDefinition>
The following code is an example of a custom action that adds a group and a button to the ribbon of Web Part pages:
<CustomAction Id="SPFIO.WebPage" Location="CommandUI.Ribbon">
   <CommandUIExtension>
      <CommandUIDefinitions>
         <CommandUIDefinition Location="Ribbon.WebPartPage.Groups._children">
            <Group Id="Ribbon.WebPartPage.SPFUI.WebPart"
               Sequence="20" Description="SPFIO Ribbon group"
               Title="SEF Group" Template="Ribbon.Templates.Flexible2">
               <Controls Id="Ribbon.WebPartPage.SPFIO.WebPart.Controls">
                  <Button Id="Ribbon.WebPartPage.SPFIO.WebPart.Command"
                     Command= "SPFIOExScriptBlock"
                     Description="SEF Custom action"
                     Image16by16="~sitecollection/SiteAssets/SPFIO16x16.gif"
                     Image32by32="~sitecollection/SiteAssets/SPFIO32x32.gif"
                     LabelText="SEF Action"
                     TemplateAlias="o2"
                     Sequence="35" />
               </Controls>
            </Group>
         </CommandUIDefinition>
      </CommandUIDefinitions>
      <CommandUIHandlers>
         <!-see next section ->
      </CommandUIHandlers>
   </CommandUIExtension>
</CustomAction>
When this control is clicked, the command that is defined in the <CommandUIHandler> tag, which has a command named SPFIONewCommand, is executed.
Note
To learn more about customizing the ribbon, read Chris O’Brien’s series on Ribbon Customization, which is available at www.sharepointnutsandbolts.com/2010/01/customizing-ribbon-part-1-creating-tabs.html. You can also read Wictor Wilen’s series on Creating a SharePoint 2010 Ribbon extension at www.wictorwilen.se/Post/Creating-a-SharePoint-2010-Ribbon-extension-part-1.aspx.
Tip
INSIDE OUT Using the out-of-the-box images with your custom actions
For consistency, when your control executes an action, similar to an existing control, you might want to use the same icon to represent your new custom action. Many of these images are in the SharePoint root folder in the TEMPLATEIMAGES subfolder. To quickly find the image file that’s used, in Microsoft Internet Explorer (IE), open the page on which the icon is displayed, and then press F12 to open the IE developer tools. On the HTML tab, click the pointer, and then on the page, select the relevant image.
Not all out-of-the-box ribbon images are stored in their own file, and therefore, you might see code similar to the following:
<img style="left: -80px; top: -176px; " alt=""
  src="/_layouts/1033/format16x16.png" unselectable="on" />
SharePoint 2010 uses special image files—formatmap32x32.png and format16x16.png—which contain a collection of images, as shown in Figure 15-13. These files are stored in the SharePoint root, in the subfolder TEMPLATELAYOUTS[LCID]IMAGES.
You can refer to images from these two files in your action controls by using the Image32by32Top and Image32by32Left attributes when you use the Image32by32 attribute or the equivalent attributes for a 16×16-pixel image.
The top and left attributes identify the upper-left corner of an image in the image map and are used to set the CSS top and left attributes for the inline style of an HTML <IMG> tag. To calculate the upper-left corner of an image, open the image in Microsoft Paint, display the status bar, and then place the cursor on the upper-left corner of the desired image. In the format32x32.png file, the upper-left coordinate is a multiple of 32, and in the format16x16.png file, the upper-left coordinate is a multiple of 16. This number represents the offset from the upper-left corner of the image map and is a negative number.
For example, the image used for the New Quick Step command can be found in the second column and eleventh row of the format32x32.png file, and whose coordinates would be –32, –320. In a custom action this image would be referred as:
Image32by32="_layouts/1033/images/formatmap32x32.png"
      Image32by32Top="-32" Image32by32Left="-320"
The <CommandUIHandlers> tag can contain one or more <CommandUIHandler> tags. The value of the Command attribute of the <CommandUIHandler> tag has the same name as the value of the Command attribute in the <CommandUIDefinition> tag.
Each <CommandUIHandler> tag defines one command, written by using ECMAScript, which is the scripting language (such as JavaScript and Jscript) that is commonly used for client-side scripting; that is, code that is parsed and executed by the browser. There are two types of commands that you can use:
UI handlers These are a mixture of declarative markup and ECMAScript. All of the code for this type of command is contained in the same file as the definition for the control that calls them. This type of command, although easy to write, can be hard to troubleshoot and debug.
Page components These are ECMAScript objects that are defined in an external file, which can be targeted by the ScriptSrc attribute of a <CustomAction> tag or added to the script from managed code. This type of command might be harder to code; however, you can utilize Visual Studio for troubleshooting and debugging, and because the code is independent of the features file, page components can be modified separately and used by a number of independent features.
Both types of commands are targeted by using the <CommandUIHandler> tag. The code that follows contains three examples of UI handlers. The first contains the JavaScript within the <CommandUIHandler> tag, the second calls a script block defined in a <CustomAction> tag, and the third displays a page when a control is clicked:
<CommandUIHandler Command="SPFIONewCommand"
   CommandAction="javascript:alert('SPFIO New Display Form Control Clicked!'),"
/>

<CommandUIHandler Command="SPFIOExScriptBlock"
   CommandAction="javascript:SPFIOCode();"
/>

<CommandUIHandler Command="SPFIONavSiteSettings"
   CommandAction="/_layouts/settings.aspx"
/>
The <CustomAction> section that defines the script block inline would look similar to the following code:
<CustomAction Id="Ribbon.ListForm.Display.NewButton.Script"
   Location="ScriptLink"
   ScriptBlock="
      function SPFIOCode()
      {
         alert('SPFIO Ribbon Script Block'),
      }"
/>
Use the ScriptBlock method to quickly insert short amounts of code, which will be merged into the page with other JavaScript that is included by using the <link> tag. If your code is large or needs to be referenced by a number of custom action solutions, you should place your JavaScript code in one file, and then use a custom action to reference the file, as shown in the following code:
<CustomAction Id="Ribbon.ListForm.Display.Script"
   Location="ScriptLink"
   Scrptsrc="~site/SiteAssets/SPFIO_RibbonControls.js" />
Note
An MSDN white paper, “Customizing and Extending the SharePoint 2010 Server Ribbon,” by Andrew Connell, contains two complete examples that use both UI handlers and page components. You can view this white paper at http://msdn.microsoft.com/en-us/library/gg552606.aspx, together with the source code.
Visual Studio 2010 provides out-of-the-box templates with which developers can quickly create an application page in Visual Studio. However, there is no template that is specific to custom actions. Therefore, you need to use an Empty SharePoint project template.
The following steps outline how to remove the Edit HTML Source control in the Markup group on the Format Text tab in the Editing Tools tab set. This tab set appears when you have a wiki page open in Edit mode or when you are editing the contents of a Content Editor Web Part:
Note
For more information about using Visual Studio to create SharePoint Foundation solutions, and how set up your development environment, see Chapter 16.
Open Visual Studio with administrative privileges. On the Start Page tab, click New, Project, or on the toolbar, click File | New, and then click Project to open the New Project dialog box.
Under Installed Templates, under the appropriate language (such as Visual C#), expand SharePoint, if not already expanded, and then click 2010.
In the middle pane, select Empty SharePoint Project.
In the Name text box, type SPFIO_RibbonActions for the Project Name, and then click OK.
The SharePoint Customization Wizard opens.
Specify the site on which you want to deploy and test the extension to your ribbon.
You can select either to deploy the solution as a sandboxed solution or as a farm solution. Click Finish to close the SharePoint Configuration Wizard.
In Solution Explorer, right-click the SPFIO.RibbonActions project node. Click Add a new item, and then select Empty Element and type a name for the elements file, such as, SPFIO_RibbonElementsFile.
The Elements.xml file opens. Note in Solution Explorer that Feature1 was added under the Features node.
Type the code that follows; place it between the opening and closing <Elements> tags.
Notice that Visual Studio understands the ribbon schema and provides IntelliSense to your coding experience:
<CustomAction Id="SPFIO_RemoveControl" Location="CommandUI.Ribbon" >
   <CommandUIExtension>
      <CommandUIDefinitions>
        <CommandUIDefinition
      Location="Ribbon.EditingTools.CPEditTab.Markup.Html.Menu.Html.EditSource"
        />
      </CommandUIDefinitions>
   </CommandUIExtension>
</CustomAction>
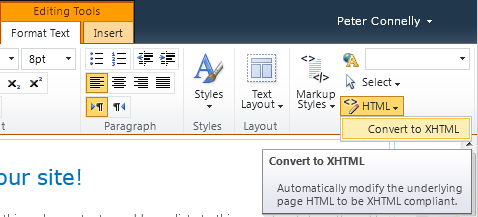
Press F5 to build and deploy your project. In the browser, navigate to a Team Site’s wiki page, and then place the page in Edit mode.
On the Format Text tab, the HTML control in the Manage group should only have one drop-down menu option: Convert To HTML.
Note
Microsoft has provided a Visual Studio add-in that can be used as a learning tool toward customizing the ribbon. You can find this add-in at http://code.msdn.microsoft.com/vsixforsp. This site also contains a hands-on lab and a walkthrough video. You can read A blog post by Paul Stubbs that introduces the add-in at http://blogs.msdn.com/b/pstubbs/archive/2010/04/26/sharepoint-2010-extensibility-projects-server-ribbon.aspx.
The ribbon is aggressively cached; therefore, while you are developing your custom actions, to test your modifications you will need to clear your browser cache. If you are using the IE developer tools, you can use the keystroke Ctrl+R. To avoid the need to repeatedly purge your cache, a better option might be to use InPrivate Browsing, which does not use caching.
Note
The Internet contains many examples if you wish to learn more about extending the ribbon. Here are just some of the websites that you might find useful:
User Interface Enhancements: Channel 9 Videos: http://channel9.msdn.com/learn/courses/SharePoint2010Developer/UiEnhancements/
Microsoft SharePoint Team Blog: Enabling a Button on the Ribbon Based on Selection: http://sharepoint.microsoft.com/blog/Pages/BlogPost.aspx?pID=436
How to Create a Web Part with a Contextual Tab: http://blogs.msdn.com/b/sharepointdeveloperdocs/archive/2010/01/28/how-to-create-a-web-part-with-a-contextual-tab.aspx
How to Add a Tab to the Ribbon in SharePoint Foundation: http://blogs.msdn.com/b/sharepointdeveloperdocs/archive/2009/12/07/sharepointfoundationhowtoaddtabtoribbon.aspx
SharePoint 2010 Ribbon Customization series: http://makarandrkulkarni.blogspot.com/2010/01/architecture-of-sharepoint-2010-ribbon.html
Code to Hide the Ribbon and Site Actions Menu for Anonymous Users: www.elumenotion.com/Blog/Lists/Posts/Post.aspx?ID=106