Introducing SharePoint Designer
MICROSOFT SharePoint is not just another web development platform that IT uses to develop applications, which are then handed over to the users. SharePoint changes the game. SharePoint empowers users to do whatever they need to do for themselves. Users no longer need to send content in an email to someone else for them to add it to a website. When solutions are built on top of SharePoint, the aim is to remove IT staff from the day-to-day tasks, make users self-sufficient, and even to let users build solutions for themselves.
Using the browser and other what-you-see-is-what-you-get (WYSIWYG) tools such as, SharePoint Designer 2010, Microsoft InfoPath 2010 and Microsoft Visio Premium 2010, users can create successful SharePoint non-code solutions because they know what they want to achieve, they understand the business needs, and with a bit of SharePoint knowledge, they can wire together the business processes or sets of tasks. Such users have been termed by Gartner[1] as citizen developers.
SharePoint Designer 2010 is not just another HTML editing tool; it is a tool for business users. And because business users rarely have access to any environment other than the production environment, Microsoft expects users to use SharePoint Designer in the production environment. However, new with SharePoint Designer 2010 is that you can now develop solutions in non-production environments and transfer them to the production environment.
SharePoint Designer’s focus is not on adding static images and text to webpages, rather; it is an alternative tool for Site Collection and site owners to administer and manage sites and go beyond what the browser provides.
This chapter details a number of techniques that are useful when working with SharePoint Designer 2010 and SharePoint Foundation 2010 sites. SharePoint Designer adheres to the security settings of the site; therefore, to use SharePoint Designer you need to be a Site Collection owner, site owner, or someone who has the Add and Customize Pages, Remote Interfaces, and Browse Directory site permissions. To create and delete lists, add or remove columns in a list, add or remove public views of a list in SharePoint Designer, you also need the Manage Lists permission. These permissions are automatically selected in the Full Control and Design permission levels.
This is not the first chapter to use SharePoint Designer. Chapter 6, details how to use SharePoint Designer for creating and customizing webpages, and Chapter 9, details how to use SharePoint Designer to connect with content that is not stored within SharePoint and how to use SharePoint Foundation to present that data.
This chapter along with the next two chapters will give you the tools and techniques you need to build solutions with SharePoint Foundation to meet your organization’s custom business and functional requirements. In this chapter, we go into more detail on how to use SharePoint Designer to create, design, and manage sites.
Tip
INSIDE OUT When to use the 64-bit version of SharePoint Designer
Similar to its predecessor, Microsoft Office SharePoint Designer 2007, SharePoint Designer 2010 is available as a free download in both 32-bit and 64-bit versions from Microsoft’s download site at www.microsoft.com/downloads. The 32-bit version is strongly recommended for most users.
SharePoint Designer 2010 can only be used with SharePoint 2010 sites. To connect to SharePoint 2007 and earlier sites, you must continue to use SharePoint Designer 2007, which can be installed side-by-side with the 32-bit version of SharePoint Designer 2010. Install SharePoint Designer 2007 first before installing SharePoint Designer 2010.
Install the 64-bit version of SharePoint Designer when all of the following points are true:
You have a 64-bit supported operating system on your computer.
You have not installed any 32-bit Office applications, including SharePoint Designer 2007 or Microsoft Expression Web. All these applications share common components with SharePoint Designer 2010. If 32-bit Office applications are installed on your computer, a 64-bit SharePoint Designer 2010 installation is blocked by default.
You do not maintain SharePoint sites built on Windows SharePoint Services 3.0 or Microsoft Office SharePoint Server 2007 or earlier versions of SharePoint.
You intend to use the 64-bit version of Microsoft Office 2010 applications.
All applications, ActiveX controls, or third-party add-ins can communicate with the 64-bit version of Office 2010.
To learn more about which version of Office 2010 to install, go to http://technet.microsoft.com/en-us/library/ee681792.aspx and http://blogs.technet.com/b/office2010/archive/2010/02/23/understanding-64-bit-office.aspx.
Microsoft SharePoint Designer 2010 has been the beneficiary of major improvements over its predecessor, Microsoft Office SharePoint Designer 2007. It is now the preferred tool for site owners and citizen developers (users operating outside the scope of IT who create new business applications for use by others).
You can open a site in SharePoint Designer from the browser or by opening SharePoint Designer first and then opening a site from within SharePoint Designer. You cannot open Microsoft Office SharePoint Server 2007 or Windows SharePoint Services 3.0 sites with SharePoint Designer 2010. You can open a file in SharePoint Designer, such as an HTML file, that does not reside in a SharePoint site; however, to do so a SharePoint site must already be open in SharePoint Designer.
Tip
If you are using a different authentication authority for your SharePoint sites than the one you use when you sign on to your computer—for example, when your SharePoint site is hosted by a third party—then it is easier to open the SharePoint site in the browser and then use one of the methods detailed below to open SharePoint Designer from the browser.
To open a site from within SharePoint Designer, use the following steps:
On the Windows Start menu, point to All Programs, click SharePoint, and then click Microsoft SharePoint Designer 2010.
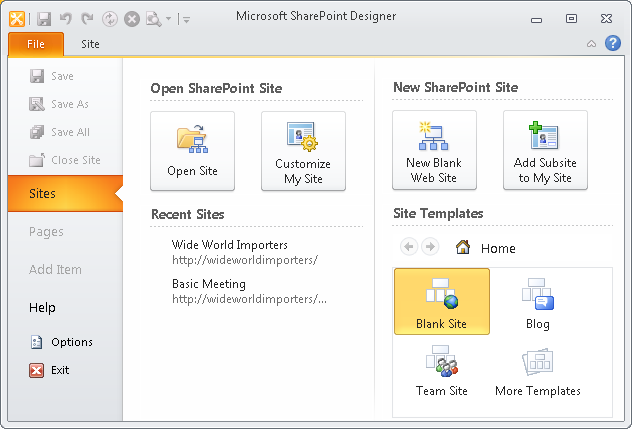
The SharePoint Designer window opens, displaying Backstage view with the Sites tab highlighted. If you previously opened a SharePoint site, these will be listed under Recent Sites.
To open a site not listed under Recent Sites, under Open SharePoint Site, click Open Site to display the Open Site dialog box.
In the Site Name text box, type the URL of your SharePoint site, and then click Open. You might be prompted for your user name and password.
When you have a site already open in SharePoint Designer, you can open subsequent sites by clicking the File tab to display the Backstage view, and then click Sites in the left pane. Then under Open SharePoint Site, click Open Site. Alternatively, on the Subsites tab (which can be displayed by clicking Subsite in the Navigation pane), you can use the Open Site command in the Edit group. If you have a SharePoint site already open in SharePoint Designer, when you open additional sites, a new SharePoint Designer window opens.
Tip
SharePoint Designer’s focus is still on an individual site in a Site Collection; that is, when you customize a site, your customizations are applied to the site that you have open. Therefore, if you want to customize more than one site, SharePoint Designer opens a separate window for each site. As you drill down sites in a Site Collection, you can open a massive number of instances of SharePoint Designer. Because sites can look very similar in SharePoint Designer, to ensure that you do not customize the wrong site, only open one site at a time.
To open a site in SharePoint Designer from the browser, use one of the following methods:
Click Site Actions, and then click Edit in SharePoint Designer.
On a wiki page, on the Page tab, click the Edit command down arrow, and then click Edit in SharePoint Designer, as shown in Figure 14-1.
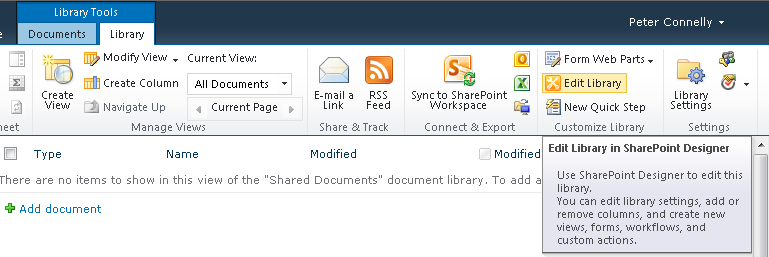
When viewing a list or a library, in the Library Tools tab set, click the Library tab, and then in the Customize Library group, click Edit Library as illustrated in Figure 14-2.

When you use any of the browser commands to open SharePoint Designer but you do not have SharePoint Designer installed on your computer, and if you have an Internet connection, you will be presented with a dialog, (see Figure 14-3) from which you can download and install SharePoint 2010.

When you click Free Download, a File Download dialog box opens, with which you can install SharePoint Designer or save SharePointDesigner.exe to a location on your computer and install it at a later time. You can prevent the installation of SharePoint Designer, as you can any product, by using software restriction policies.
Note
To read about software restriction policies, go to http://technet.microsoft.com/en-us/library/dd348653(WS.10).aspx.
Tip
INSIDE OUT Site Pages and the Site Assets libraries
No matter which site you open, in the Navigation pane you will always see references to the Site Pages and Site Assets libraries. These libraries are created by default on a Team Site. The Site Pages library contains the home page for the Team Site and any other wiki pages that you create. The Site Assets library should be used for files that are referenced within a page, such as images. It should not be used to store files that are used by the members of the team as part of their day-to-day tasks. Instead, use the Shared Documents library or create new libraries for those tasks. Cascading Style Sheet (CSS) or XSL files should be stored in the Style Library, which is created when any site is first created.
On sites that do not contain the Site Pages or Site Assets libraries, such as blogs, meeting workspaces, group work sites, or document workspaces, if you click one of these two libraries in SharePoint Designer’s Navigation pane, they will be created.
Don’t be put off by its name; SharePoint Designer is not aimed at just web designers. With SharePoint Designer, you can carry out similar tasks to the browser; however, you can now complete more tasks natively, without the need to jump back and forth between SharePoint Designer and the browser. For example, when you first open a site with SharePoint Designer, within the SharePoint Designer workspace, you are presented with a site’s summary page, as shown in Figure 14-4. This page provides you with key site information organized in five areas: Site Information, Customization, Settings, Permissions, and Subsites. You can use this page to change many site settings, manage permissions, and create new Subsites. You will see settings pages for other site artifacts, such as, for a list, library, master page, and workflow.

Notice also in Figure 14-4 that SharePoint Designer has a redesigned user interface (UI) that uses the Microsoft Office Fluent UI. The ribbon contains one or more tabs, and it works in a similar manner to the server ribbon when a SharePoint site is displayed in the browser—that is, the tabs are dynamic and context sensitive. The commands are organized into groups, and if there is not sufficient space on the ribbon, then the commands are displayed as an icon or options in a drop-down menu.
Similar to other Microsoft applications, SharePoint Designer has a Quick Access Toolbar that contains a set of commands that are independent of the currently active ribbon tab. You can add commands to the toolbar, which is very useful when you find that you frequently use a SharePoint Designer command. For example, if you often create a Web Part page or create a list or library, you can add these commands to the Quick Access Toolbar. To add commands to the Quick Access Tool bar, complete one of the following steps:
On the ribbon, click the appropriate tab to display the command that you want to add to the Quick Access Toolbar. Right-click the command to open the shortcut menu, and then click Add To Quick Access Toolbar, as shown in Figure 14-5.
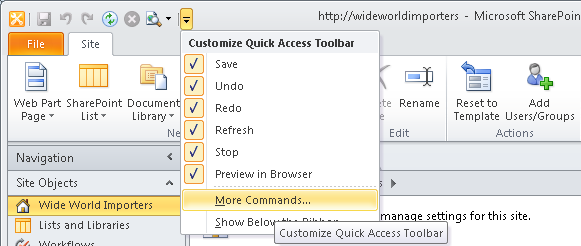
On the Quick Access Toolbar, click the last icon, and then click More Commands, as shown in Figure 14-6.
Click the File tab to display the Backstage view. Click Options to display the SharePoint Options dialog box, and then click Add and OK.

In Figure 14-4, in the Navigation pane, selecting the first site object provides a summary of the SharePoint site, and makes the Site tab in the ribbon available. When you click the icon to the left of a Subsite in the Subsites area, the Site tab set appears, which contains one tab, the Subsites tab. If you then select the Lists And Libraries site object in the Navigation pane, a gallery page displays a list of site artifacts, which in this case is lists and libraries, and in the ribbon, the Site tab and the Site tab set are replaced with the List And Libraries tab, as shown in Figure 14-7.

The workspace breadcrumb can be compared to Windows Explorer in as much as you can drill down and step upward, as shown in Figure 14-8. Use the back and forward arrows in the breadcrumb as you would use then in the browser to display previous or following content.

The status bar is context sensitive and provides you with additional tools and information, depending on what is displayed in the workspace. It also contains a Log In command with which you can log in as a different user, similar to the Sign In As Different User command that appears when you click the down-arrow to the right of your name in the upper-right corner of a SharePoint site in the browser.
You might have also noticed that when you open a site in SharePoint Designer 2010, you are no longer presented with the file and folder structure of the site, known as the Web Site URL Structure. Although the URL structure in a SharePoint site does not exist—it is created from a combination of files from the SharePoint server and content in the SQL content database—it is what web developers expect to see in a web editing tool for non-SharePoint sites.
The URL structure, which was the default view in SharePoint Designer 2007, did not make it easy for business users to find SharePoint objects—you had to know where each of the site objects lived within that URL structure; for example, master pages can be found in the _catalog/masterpage folder. Now in SharePoint Designer 2010, the Navigation pane allows Site Collection and site owners to browse easily between the site objects that they wish to create and manage. You can now easily create a custom application by creating a Subsite, lists and libraries on that Subsite, associate site columns, content types and workflows with those lists and libraries, as well as manage the security groups, without leaving SharePoint Designer.
You can use SharePoint Designer to add static content, such as text or images to your webpages; however, its strength is to help present and manipulate content to develop no-code solutions and customizations that meet business needs. These solutions and customizations can then be exported from SharePoint Designer and handed over to the IT department, where they can be imported into Visual Studio, making SharePoint Designer a rapid application, prototyping, no-code tool. When you have developed as far as you can by using the browser and SharePoint Designer, the developer can take your modifications as a starting point.
Note
For more information on editing pages with SharePoint Designer, see Chapter 6.
Note
Although you can upload files into libraries by using SharePoint Designer, you cannot associate metadata with those files or create, modify, or delete list items with SharePoint Designer. You must use the browser to complete those tasks.
The URL structure of a site is still available by clicking All Files in the Navigation pane, as shown in Figure 14-9.

SharePoint Designer has historically been a very powerful and useful tool for customizing SharePoint sites and creating solutions. However, the long lasting implications of using SharePoint Designer 2007 and its predecessor, Microsoft Office FrontPage 2003, on SharePoint sites, caused organizations to prohibit the installation of SharePoint Designer or to limit its use to all but a few trained users.
When the save command was clicked in SharePoint Designer 2007 or FrontPage 2003, SharePoint would unnecessarily break the link between a page and its site definition file stored on the SharePoint Server, resulting in what is known as a customized or unghosted page. A copy of the page from the SharePoint server would be stored in the SQL server content database. The customizing or unghosting of a page was not always made obvious to the untrained user. SharePoint Designer 2007 and FrontPage 2003 also did not provide an easy method for controlling the level of modifications that users could carry out with SharePoint Designer.
Customizing pages by using SharePoint Designer 2010, as with SharePoint Designer 2007, in most cases does not adversely affect the performance of a page—it is more of a maintenance issue, which is most often experienced when upgrading from one version of SharePoint to another, or when an organization implements a major change to the look and feel of their installation.
Note
For more information on customized and unghosted pages, read the section Site Template Pages, in Chapter 6.
SharePoint Designer 2010 contains many improvements and implements a “safe by default” approach that places reasonable limits around its usage so that citizen developers do not accidently create solutions that have a negative effect. You can still customize a page in SharePoint Designer; however, first you need to be allowed to customize a page, and second, you must explicitly change your edit mode to advanced mode before you can customize a page.
SharePoint 2010 implements a new set of settings at the web application and Site Collection levels that can be used to prevent or restrict the usage of SharePoint Designer. These are SharePoint Designer usage settings and not security settings. When configured at the web application level, these settings affect all users, including Site Collection administrators for all Site Collections and sites within the web application. When they are configured at the Site Collection level, they apply only to site owners and designers for sites within that Site Collection.
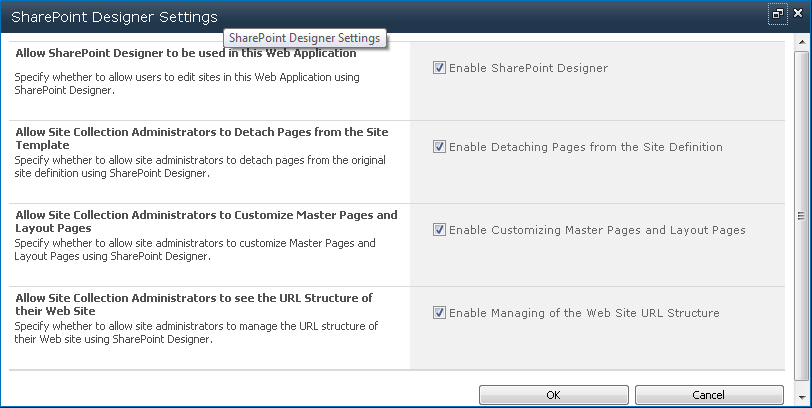
At both web application and Site Collection levels, there are now four settings that allow or disallow the following SharePoint Designer usages (when a web application is created, by default all four security settings are selected):
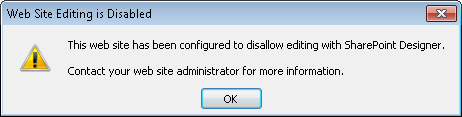
Enable SharePoint Designer If a user has SharePoint Designer open and you clear this check box, then it will not close SharePoint Designer for that user. However, the next time that user tries to open the site in SharePoint Designer, the Web Site Editing Is Disabled message box opens, stating that the website has been configured to disallow editing with SharePoint Designer, as shown in Figure 14-10.
Detach pages from site definitions Use this option to prevent any pages associated with a site definition file from being customized (unghosted), including master pages and publishing page layouts. Content within Web Parts or within the Embedded FormField can still be modified. This option does not affect pages that are created in the content database and have never been associated with site definition files.
Customize master pages and page layouts This is similar to the previous option; however, by selecting this option, you will only prevent the customization of master pages and publishing page layouts that are associated with site definition files. These are often the types of pages that cause organizations major maintenance problems if they are customized, because it is often to these page types that organizations want to apply global changes across all sites. If this option is not selected, then the Master Page object will not be available on the Navigation pane in SharePoint Designer. If you are using SharePoint Server 2010 and displaying a publishing site in SharePoint Designer, then the Page Layout option will also not be available in the Navigation pane.
See the URL structure of the web site Within SharePoint Designer, users will not see the All Files option on the Navigation pane, the All Files gallery page in the workspace, or All Files in the mini-gallery. If this option is enabled but the Customize Master Pages And Page Layouts option is selected, then site owners and designers can see the master pages and page layouts, but they are not allowed to modify them.
You cannot use these options to control the usage of SharePoint Designer for different groups of people or to apply different usage rules on a per-site basis within the same Site Collection.
When any of the out-of-the-box site templates are used to create the root site of a Site Collection, site owners and designers can use SharePoint Designer; however, they cannot detach pages from site definitions, customize master pages or page layouts, or see the URL structure of their websites. Site collection owners are only restricted by the settings at the web application level and are not affected by the selection of check boxes on the SharePoint Designer Settings page at the Site Collection level.
If you are using SharePoint Server 2010 and the root site of a Site Collection was created by using a publishing site, then all four check boxes on the SharePoint Designer settings page at the Site Collection level are selected.
Tip
INSIDE OUT Other methods of controlling the use of SharePoint Designer
SharePoint Designer 2010 can use all but the contributor settings methods for controlling the use of SharePoint Designer 2007 and FrontPage 2003; that is:
Disabling the Add And Customize Pages permission.
Disabling the Manage List permission.
Disabling the Browse Directories permission.
Disabling the Use Remote Interfaces permission.
At the server level, preventing any user, including SharePoint server administrators, from opening sites created from specific site definition by modifying the Project element to include the attribute
DisableWebDesignFeatures=“wdfopensite”in the ONET.XML file for that site definition. You need to make this change on all SharePoint servers in your farm, and it affects all sites created from the site definition across all web applications created on the farm. You can change the DisableWebDesignFeatures attribute retroactively after a site is created and SharePoint will not allow the site to be opened with SharePoint Designer.As the site definition files are cached, to make this attribute change take effect, you need to do an IISREST. The DisableWebDesignFeatures attribute can be set to other values, most of which are no longer applicable to SharePoint Designer 2010, for example, sdfbackup and wdfrestore were used to disable SharePoint site backup and restore, but because SharePoint Designer 2010 cannot be used to backup or restore SharePoint sites, they have no effect.
However, the attribute wdfnewsubsite can be used to prevent the creation of new Subsites using SharePoint Designer. No user feedback is provided when you set the wdfnewsubsite attribute and the user clicks the Subsite command in the New group on the Sites tab. However, when you set the wdfopensite attribute, the Web Site Editing Is Disabled dialog box opens stating that the website has been configured to disallow editing with SharePoint Designer, as shown in Figure 14-10.
Per user or per computer, using group policies.
Permissions can be disabled at the web application level and excluded from permission levels at sites or Site Collections.
Note
You can find information on locking down SharePoint Designer 2007 at http://blogs.msdn.com/b/sharepointdesigner/archive/2008/11/25/locking-down-sharepoint-designer.aspx.
To apply restrictions at the web application level, complete the following steps. Note that you must be a SharePoint Server administrator to complete these steps:
In SharePoint Server, on the Windows taskbar, click Start, point to All Programs, click Microsoft SharePoint 2010 Products, and then click SharePoint 2010 Central Administration.
In the Application Management section, click Manage Web Applications to display the Web Applications page.
Click the web application for which you want to restrict the use of SharePoint Designer.
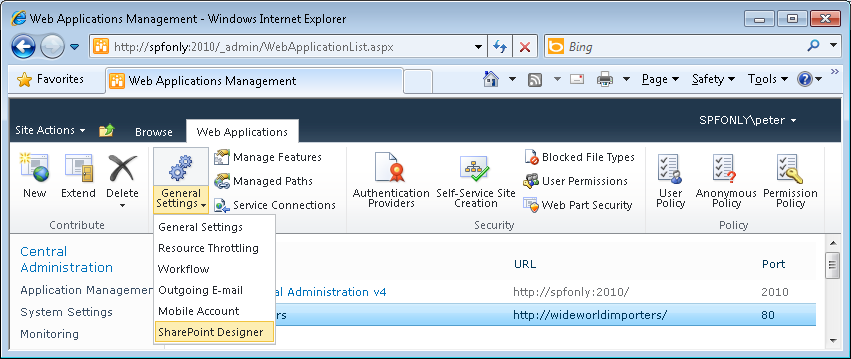
On the Web Applications tab, in the Manage group, click General Settings, and then click SharePoint Designer.
Clear or select the check boxes, as needed, and then click OK.
Alternatively, in the SharePoint 2010 Central Administration website, you can configure SharePoint Designer usage settings at the web application level by going to the General Application Settings page. Click Configure SharePoint Designer settings to display the SharePoint Designer Settings page, and then select the appropriate web application in the Web Application section.
To configure SharePoint Designer settings at the Site Collection level, complete the following steps. Note that you must be a Site Collection administrator to complete these steps:
Open the root site of your Site Collection in the browser. Click Site Actions, and then click Site Settings to display the site settings page.
Under Site Collection Administration, if you see only Go To The Top Level Site Settings, you have opened a Subsite in the browser. Click the link to go to the root site’s Site Settings page. If you do not see the Site Collection Administration section on the Site Settings page, you are not a Site Collection owner and cannot complete the rest of the steps.
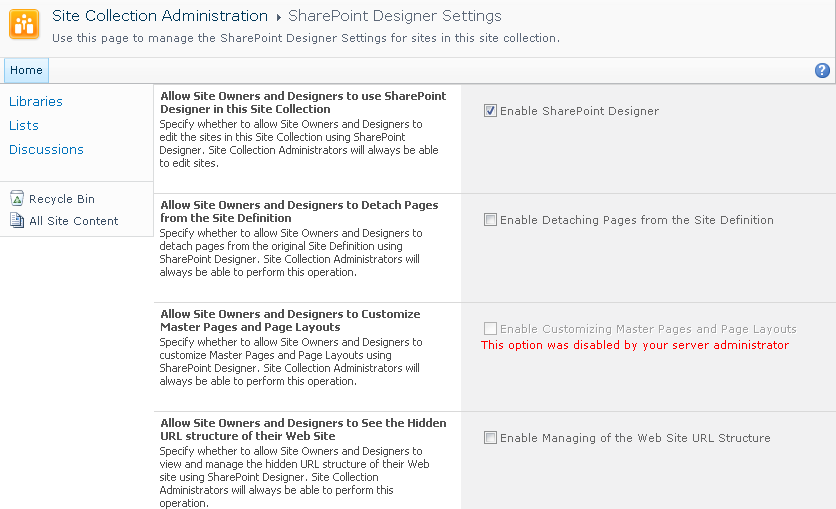
Under Site Collection Administration, click SharePoint Designer Settings.
The SharePoint Designer Settings page is displayed. When any of the four check boxes is not selected at the web application level, then the corresponding check boxes at the Site Collection level are unavailable and a red text message that the option was disabled by your server administrator is displayed.
On the SharePoint Designer Settings page, select the check boxes, as needed, and then click OK.