
The first step to designing your site is to understand your content. Too often, people start designing their sites by creating wireframes without understanding the content. Content is King, and as such, you should try to find the answers to the following questions:
How often is it going to be updated?
Who is going to update it?
How often are they going to update it?
Where is the content coming from?
What is the main message of the site, of the page, or parts of the page?
When you design a page, if users to your site could walk away with just one thing from your site, what would it be? What is going to make users come back to our site?
These questions will help you to decide the site template to use, the content types, site columns, workflows, lists, libraries, and types of pages to create, as well as which Web Parts to place on those pages. For example:
When users have a great deal of static content and images to add to a page, if you design your site so that this content is stored, for example, in a Content Editor Web Part (CEWP), then not only will you have to train users on how to use that Web Part, but users might find this too hard and time consuming to update at the frequency they require. Therefore, the information on the page will become dated and other employees will not visit the site because it is not a representation of the business process. You should perhaps use a wiki page.
When content is not going to change frequently, such as company policies, but information on company polices must be readily available to all employees. There might also be associated information that you want to be displayed on the page, such as when the policy is to be reviewed; plus your company’s human resources (HR) department might own the production of the policy pages and they might also require that part of the page is used to tell visitors to the page of the HR department’s plans, and an RSS feed of the directors’ blog sites as well as what they are twittering about. So the page you design needs to contain both static content that needs to go through an approval process and dynamic content. This affects the page layout and how you layout the content onto your pages. Is there any special branding consideration that the HR department requires for their site? Are they using any custom Web Parts that do not follow the same CSS style as the other Web Parts?
You need to understand the navigation requirements. You do not want to use a different navigation standard that is used elsewhere on your site. This will confuse visitors of your site. The larger the organization, the more complex the navigation is. If the navigation does not follow a consistent pattern, the users will not know what they are doing and how to get back to where they were originally, or how to get back to a specific step in a business process.
You must also consider the user experience—UX. Although computers have been around for over half a century there are still many users in organizations who have an aversion to computers, and therefore, it is important to gather requirements and understand the skill level of the users who will make use of your solution. Most users of SharePoint are not developers or administrators—they do not understand the technology behind the pages, lists, and libraries that they need to use and maintain. Many users have experienced myriad system changes, and to a large number of them, your solution is just one more in a very long line of systems that they are going to use. They don’t have the time to sit down and learn your new system—they’ve got their day job to get on with.
So when you design your site, there are many aspects to consider, which not only affect your page layout, content types, site columns, lists, and libraries that you should use, but also how you want your sites to look. Do you want to move some of the UI objects and do you want your sites to represent your company’s branding? Do you want to brand all sites—Team Sites, Group Work Sites, Document Workspaces, Meeting Workspaces—or only some of them? Do you want the site owners to be able to choose and apply their own branding? This will also help you identify if you need any custom development or whether you can meet your design requirements by using the browser and SharePoint Designer.
When you modify the look and feel of your site, you can change the colors and the fonts by using themes. SharePoint Foundation offers a choice of 20 themes, and you can also create your own custom themes. This is the easiest method of changing the branding of your site, and it requires the least amount of effort and no knowledge of web technology.
In Windows SharePoint Services 3.0, a theme was a CSS file and images. Custom themes were files stored on the SharePoint server, and therefore, you needed administrative access to the server to deploy them. Not so with SharePoint Foundation 2010, where the theme engine has been completely redesigned. Now when we talk about themes, we are talking only about colors, fonts and effects. There are two distinct fonts: one for the heading and the other for the body text; and the color palate can be anything.
Themes consist of combinations of colors, fonts and effects. You can choose from an existing combination, known as Quick Styles, or you can build your theme by choosing each component individually.
You can choose from among twelve colors: four text and background colors, six accent colors, and two hyperlink colors, as shown in Figure 14-17. All of these colors have variations: Lightest, Lighter, Medium, Darker and Darkest. The twelve theme colors are associated with CSS attributes and rules in the SharePoint 2010 CSS files. When you apply a theme, those CSS attributes are overridden by the colors in the theme. When you develop your own CSS files and you do not associate the theme tags with CSS attributes, then the theme will take no affect.

The four text and background colors are labeled Dark 1, Light 1, Dark 2, and Light 2. Text that is created with the light colors are legible over dark colors, and text that is created with dark colors are legible over the light colors. Light 1 is a base white color, and Light 2 is a slightly darker color than Light 1, for example, beige. The dark and light colors are not used just for text or backgrounds, they can be intermixed. However, if you are working with an out-of-the-box template from Microsoft, then Light 1 is the text color on the Dark 2 background and Dark 1 is the text color used on the Light 2 background color.
The other colors you might want to modify are the Hyperlink and Followed Hyperlink colors. You can also change the Accent colors. You will typically need to experiment with changing the colors to get the theme you require.
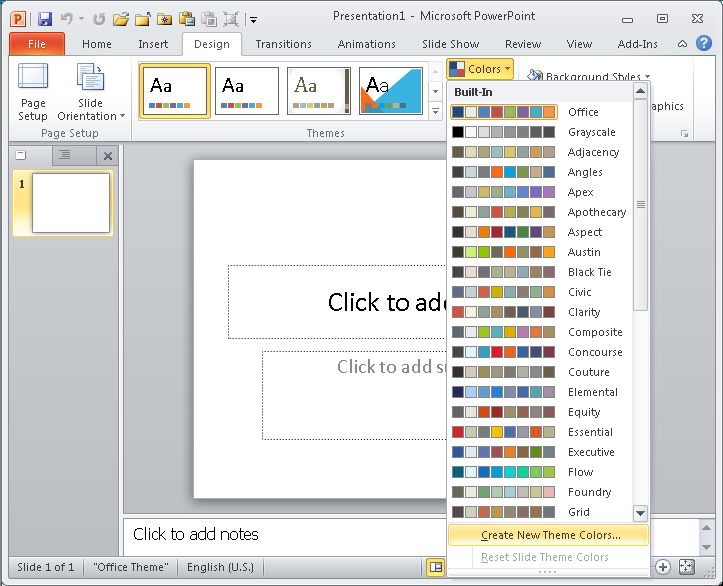
If you prefer, you can also create a theme by using one of the Microsoft Office 2010 client applications, such as Microsoft PowerPoint 2010 or Microsoft Word 2010. You then save your theme and upload it via the browser. It’s that simple! To create your custom theme, find a color scheme that is similar to what you want to create and then perform the following steps:
Open PowerPoint 2010.
On the Design tab, in the Themes group, click Colors, and then click Create New Theme Colors.
The Create New Theme Colors dialog box opens, in which you can make your color selections.
Select the colors as required for each theme color, and then type the name of your custom theme in the Name text box. Click Save to close the Create New Theme Colors dialog box.
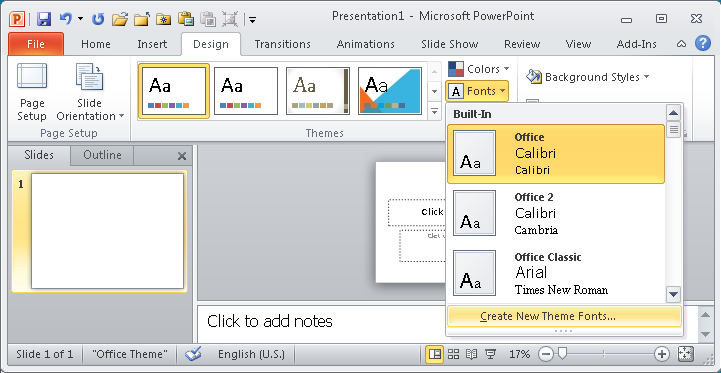
On the Design tab, in the Themes group, click Fonts, and then click Create New Theme Font.
In the Create New Theme Fonts dialog box, select the fonts for the text that appears in the heading and body areas of your page, and then click Save.
On the Design tab, click Effects, and then choose the effect that you want to use in your theme.
On the Design tab, to the right of the Quick Styles gallery, click the More button, and then click Save Current Theme.
In the Save Current Theme dialog box, browse to where you want to save your theme, such as your desktop, and then, in the File Name text box, type the name of your custom theme. Click Save.

Once you have created your custom theme, you need to upload it to the Theme library for your SharePoint site. You can use the browser or SharePoint Designer to upload your custom theme. To upload your custom theme by using the browser, perform the following steps:
Open the SharePoint Site Collection that contains the sites for which you want to use the theme, click Site Actions, and then click Site Settings.
Under Galleries, click Themes, and then on the Documents tab, click Upload Document.
In the Theme Gallery – Upload Document dialog box, browse to where you saved your theme file. The default location for saving theme files is %UserProfile%/AppData/Roaming/Microsoft/Templates/Document Themes/. Click OK.
In the Theme Gallery dialog box, type a description, and then click Save.
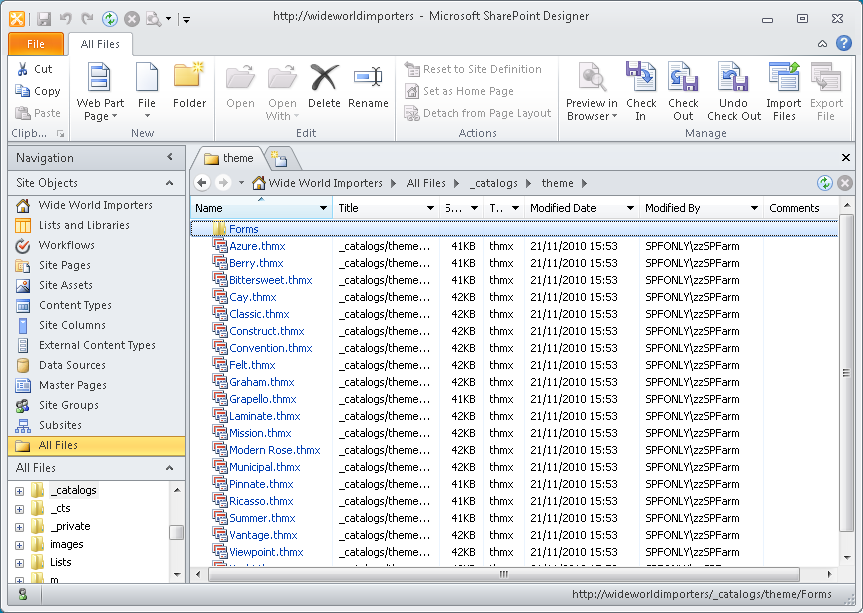
To upload your theme by using SharePoint Designer, complete the following steps. You will need permissions to see the URL structure of your site, as explained in the section, Controlling the Use of SharePoint Designer, earlier in this chapter:
Open the SharePoint Site Collection that contains the sites on which you want to use the theme, and then in the Navigation pane, click All Files.
Click _catalogs, and then click theme.
On the All Files tab, in the Manage group, click Import Files to display the Import dialog box.
Click Add File. In the Add File To Import List that appears, browse to where you stored your custom theme file, and then click Open.
Click OK to close the Import dialog box and upload the theme file.

To apply the theme to your site, by using the browser, execute the following steps:
Browse to the site on which you want to apply the theme, click Site Actions, and then click Site Settings.
Under Look And Feel, click Site Theme to display the Site Theme page.
Click your custom theme, and then click Apply.
Note
Using SharePoint Designer to display the site settings page in the workspace, you can use the Change Site Theme link in the Customization section to display the Site Theme page in the browser.
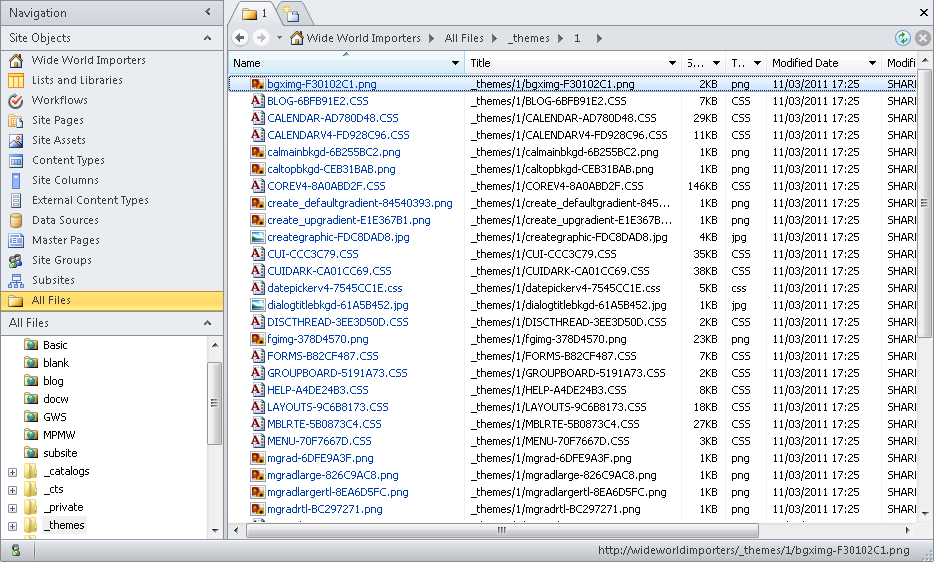
When a theme is applied to a site, SharePoint opens the .thmx file and creates a number of CSS files and images. A _themes folder and a subfolder is created in the root of the SharePoint site where these files are stored. The first time a theme is applied, the subfolder is named 0 (see Figure 14-18). Each time you apply a new theme, the subfolder name is incremented by 1. You can change the files in this folder; however, your changes will be deleted if another theme is applied, including changing the theme to the default (no theme).
Tip
INSIDE OUT Applying a theme to more than one site
On a SharePoint Server 2010 site where the publishing feature has been activated, you can modify theme colors and fonts by using the browser. You can also apply the theme to all Subsites by using the browser. However, in SharePoint Foundation, there is no browser page with which you can do this. You can use PowerShell to apply a theme to a number of sites in a similar fashion to the method used earlier in this chapter for SharePoint Designer usage settings. You can also apply a theme to all sites in a Site Collection by using PowerShell, similar to that used in the following example:
$themeName = "SPFIOTheme";

Start-SPAssignment -Global;

$sc = Get_SPSite http://wideworldimporters;
$theme = [Microsoft.SharePoint.Utilities.ThmxTheme]::GetManagedThemes($sc) |
    where { $_.Name -eq $themeName };
$sc.AllWebs | foreach { $theme.ApplyTo ($_, $true) };

Stop-SPAssignment;
This example uses the SharePoint 2010 SPAssignment cmdlet to dispose of the memory used to store the object that contains Site Collection information for http://wideworldimporters. To restore the default setting, that is no theme applied, use the following commands:
Start-SPAssignment -Global;

$sc = Get_SPSite http://wideworldimporters;
$sc.AllWebs |
   foreach {
     [Microsoft.SharePoint.Utilities.ThmxTheme]::SetThemeUrlForWeb( $_, $null)
   };
Stop-SPAssignment;If themes do not meet your needs, you will probably need to create your own master pages and CSS files. Both of these processes take some time, especially if you are new to branding and have never tried to change the look and feel of a SharePoint site before, and you have no previous web design or development knowledge. Using a theme can be likened to painting your house; CSS is analogous to moving or hanging new pictures in your house; and you use master pages to add an extension to your house.
Note
Although you could create your company’s Internet website by using SharePoint Foundation to create your master page and CSS files, most companies will use SharePoint Server to create such a site. SharePoint Server contains many web content management features that are required by an Internet site. If you are asked to create an Internet presence for a company based on SharePoint 2010, you should investigate the two editions: SharePoint Server 2010 for Internet Sites, Standard Edition and Enterprise Edition. You can find more information on these two editions at http://sharepoint.microsoft.com/en-us/internetsites/products/Pages/SharePoint.aspx?Product=SharePoint, and a trial version can be downloaded from the Microsoft download site at www.microsoft.com/downloads/en/details.aspx?displaylang=en&FamilyID=895a1dba-0c3f-47a0-8d6d-163b50364335.
When you want to change the structure of the pages and apply those changes to all pages within a site or across a number of sites, that is when you need to create a new master page. Master pages were introduced in Chapter 6.
Note
For more information about master pages, go to http://msdn.microsoft.com/en-us/library/ms443795.aspx.
When you use a browser to request a page from a site, it combines two Microsoft ASP.NET pages: a master page and a content page. In Chapter 6, you discovered that when you open a content page in SharePoint Designer, the Design view displays the merged page (not only the content page). In Code view, only the source code from the content page is displayed. A master page is a special ASP.NET 2.0 page that is used to provide a consistent appearance and navigation for each page within one or more sites. Components that are usually placed on master pages are your company’s branding images and logo, navigation tabs and links such as a breadcrumb component and the Site Actions button; footer links, such as contact us, accessibility, and copyright statements; and links to CSS files and JavaScript files that contain common functions. A master page cannot be viewed in a browser, but you can view and customize a master page by using SharePoint Designer.
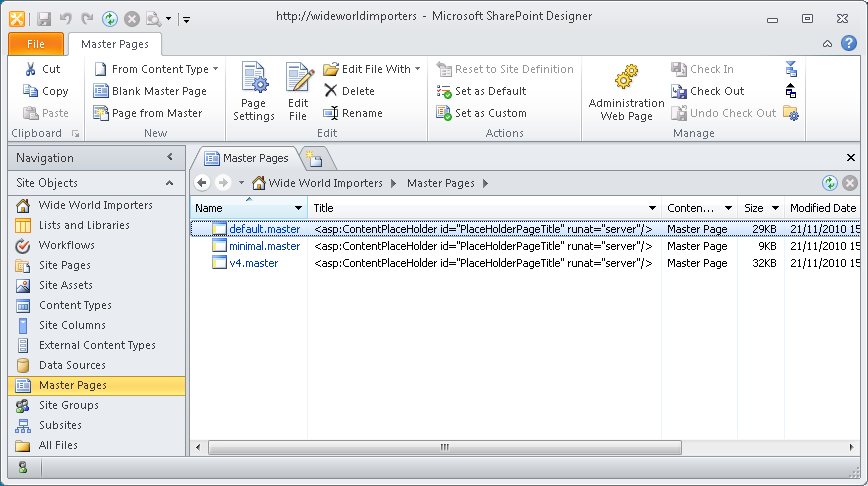
SharePoint 2010 makes heavy use of master pages to control the general layout of pages within a SharePoint site. When you install SharePoint 2010, the default master page and other master pages are located on the web server. SharePoint Foundation contains a number of master pages:
v4.master This is the master page that is applied when you first create a site.
default.master This provides the look and feel and controls for Windows SharePoint Services and SharePoint Server 2007 but does not include the ribbon. If you have upgraded to SharePoint Foundation 2010 from Windows SharePoint Services 3.0, and you have not upgraded the user interface, the default master page used by your sites will be default.master.
mwsdefaultv4.master and mwsdefault.master These are the default master pages for meeting workspaces.
Minimal.master This can be used on pages where you want the minimum amount of controls and branding. None of the out-of-the-box site definitions in SharePoint Foundation use this master page, however, in SharePoint Server 2010; it is used with the Search Center site definitions.
simple.master This is a slimmed down master page used for logon and error pages. It is stored in the layouts folder on the servers and cannot be modified by using SharePoint Designer.
Each page in a site is initially configured to use the site’s default master page. The @Page directive at the top of the content page specifies the master page to be used. When you first create a SharePoint Foundation site, all pages but a select few use the site’s default master page. The MasterPageFile attribute of the @Page directive is set to token, ~masterurl/default.master. To set a master page as the site’s default master page, perform the following steps:
Tip
INSIDE OUT When is the Custom command available?
The Set As Custom command in the Action group of the Master Pages tab is for use with SharePoint Server and publishing pages.
You can modify which master page a content page uses. For example, you can specify whether you want to use the default master page or a different master page. Theoretically, each page within a Site Collection can use a different master page. Such a scenario would defeat the purpose of using master pages, however, because as stated earlier, master pages were introduced to support a common look and feel across entire sites. However, making a content page use a specific master page can be very useful when you are developing a new master page, because you can test your modification on one page without affecting all pages within a site. To attach a master page other than the site’s default master page to a content page, perform the following steps:
In SharePoint Designer, browse to the content page; for example, in the Navigation pane, click Site Pages.
Click the icon to the left of the content page. On the Pages tab, click the down-arrow on the Edit File command, and then in Advanced Mode, click Edit File.
Note
For more information about the Advanced Edit mode, see Chapter 6.
On the Style tab, in the Master Page group, click Attach, and then click the master page that you want to attach to the content page.
If you now switch to Code view, you will see that the @Page directive at the top of the content page, no longer uses the ~masterurl/default.master token, but points to a specific master page, for example:
<%@ Page Language="C#" Inherits=Microsoft.SharePoint.WebPartPages.WikiEditPage"
   MasterPageFile="../_catalogs/masterpage/SPFIIO.master"
   meta:webpartpageexpansion="full"
   meta:progid="SharePoint.WebPartPage.Documet" %>
Save the content page, and if the content page is a site definition page, you will need to click Yes to the Site Definition Page Warning dialog box that is displayed. View the page in the browser.

Tip
INSIDE OUT Migrating pages from a non-SharePoint site
You can also use these steps if you have an .aspx page that is not associated with any master page. This can be very useful if you are migrating pages from a non-SharePoint site and you want the pages to look like all other pages within your site.
You can also create new content pages from a master page, and then add the necessary controls to the content page by using the following steps. However, users will not be able to edit the page in the browser if you do not include Web Part zones or the SharePoint control, EmbeddedFormField. Therefore, it is easier to create these by using the browser, especially if you do want to create a wiki page:
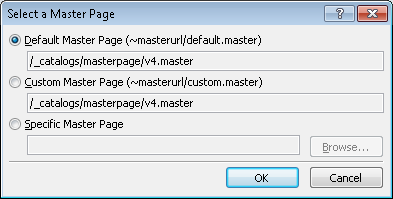
In the Navigation pane, click Master Pages, and then on the Master Pages tab, click Page From Master to open the Select A Master Page dialog box.
Select the Default Master Page if you want to create the page from the site’s default master page, or select Specific Master Page, if you want to create a page from a specific master page.
Click Browse to choose the specific master page.
Unlike content pages, master pages contain the tags <HTML>, <HEAD>, <BODY> and <FORM>. Master page file names have the extension .master, whereas content pages have an extension of .aspx. Master pages can also contain most of the content and functionality of content pages, including JavaScript, Web Parts (including Data Views and XLV Web Parts), and components such as the Search box and the component that displays the Quick Launch headings and links. Master pages cannot contain Web Part zones, however.
Each master page contains multiple core controls, which can be divided into four types:
Controls for links, menus, icons, and navigation components such as the SiteMapPath control that populates the global navigation breadcrumb.
Content placeholders, such as the PlaceHolderMain control, that match areas on the content page where you can enter information.
Delegate controls, which define a region on the page in which content can be substituted by another control driven by feature activation.
Controls for scripts. These manage the communication of the page and assist with the ribbon, toolbars, and other controls.
You can include style information in a master page, but it’s good practice to use a CSS file linked to the master page. The key benefit of using a master page is that any global design changes to your site can be made in one place. By using a master page, you can design your site efficiently and quickly and avoid the need to make changes on every page in the site. To locate and edit a master page, perform the following steps:
Open your SharePoint site in SharePoint Designer, and then in the Navigation pane, click Master Pages.
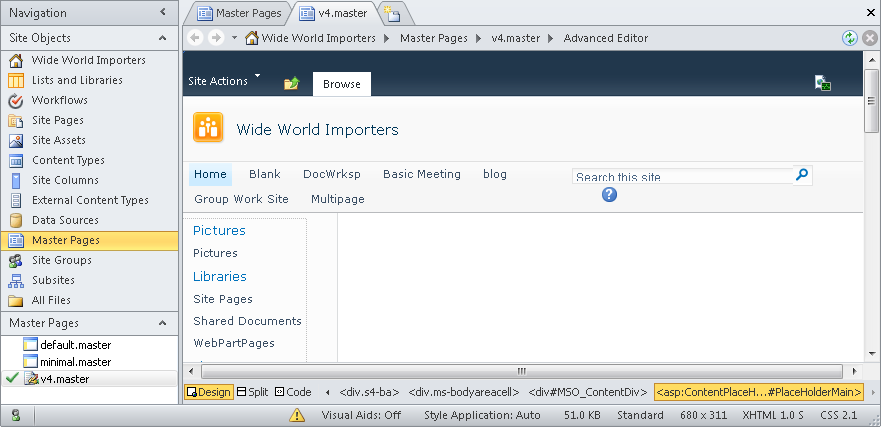
Click the icon to the left of the master page that you want to edit, and then on the Master Pages tab, click Edit File.
The master page opens in the workspace, and on the breadcrumb, the text Advanced Editor indicates that the page is open in Advanced Edit mode.
In the mini-gallery below the Navigation pane, right-click the master page that you want to edit, and then click Check Out. A green check mark appears to the left of the master page.
If you want to make a simple customization to v4.master, make a copy of the file or create a blank master page and paste the contents from v4.master into the blank master page. Make your changes to the copy and test those changes by attaching your copied file to a single page. Then when you have tested your changes, make your copied file the default master page, as described earlier in this chapter. It is good practice to never modify the files provided by Microsoft.
Tip
INSIDE OUT The Master Page gallery
Master pages are stored in the master page gallery which is a hidden library. Each site has its own master page gallery. In the browser, you can browse to the Master Page Gallery at the top level of the Site Collection by using the Site Settings page. Using SharePoint Designer, you can navigate to each site’s Master Page Gallery by using the Navigation pane and clicking Master Pages or using All Files and navigating to _catalogs/masterpage. The master page gallery has major versioning enabled; therefore, you can restore a previous version of a master page. In SharePoint Server, in a Site Collection where the SharePoint Server Publishing Infrastructure feature is enabled, this library is also used for page layouts and is also configured with content approval and major and minor versions.
The key component of a master page is the content placeholder control. It is placed on the master page where content will eventually appear. The content page specifies which content placeholder the components should be placed in, such as:
<asp:Content ContentPlaceHolderID="PlaceHolderMain" runat="server">

</asp:Content>
On the master page, the following code defines the content placeholder and specifies where on the page the content placeholder is located:
<asp:ContentPlaceHolder id="PlaceHolderMain" runat="server">

</asp:ContentPlaceHolder>
A master page typically has a number of content placeholders, the most important of them being PlaceHolderMain, which usually maps to the region on the master page where the elements from the content page should be placed.
Note
For a list on SharePoint Foundation content placeholders and how to upgrade a Windows SharePoint Services 3.0 master page, go to http://msdn.microsoft.com/en-us/library/ee539981(office.14).aspx.
To locate content placeholders on a master page, complete the following steps:
Open the master page in edit mode and look in the SharePoint Designer status bar. If Visual Aids is Off, click Visual Aids on the View tab, and then select Show.
The controls on the page are displayed surrounded by a purple line.
Click the content placeholder, if you know where it is positioned on the page; for example, click Search This Site.
The label, PlaceHolderSearchArea, appears above a purple box. In the workspace status bar, <asp:PlaceHolderSearchArea> is highlighted in orange to identify it as the active tag.
When you are unsure where the placeholder is positioned on the page, you can search for the control in Code view or in Design view on the Style tab, click Manage Content Regions in the Master Page group.
The Manage Content Regions dialog box opens, which lists all the regions on the page. Using this dialog box, you can rename, delete, or go to the placeholder.

Note
You can only use the above steps to navigate to content placeholders when you are working with a master page. On content pages, when you want to find a reference to a content placeholder, and it is not obvious in Design view where that reference is, you need to use the Code view of the page and the find functionality in SharePoint Designer.
Other placeholders contain components that you can decide not to incorporate in the page, on a content page-by-content page basis. That is, the components stored within a content placeholder in a master page can be viewed as optional. For example, the components that display the Quick Launch, are stored in the master page in the PlaceHolder LeftNavBar content placeholder. When you create a Web Part page, the template used modifies the contents of the PlaceHolderLeftNavBar so that the Quick Launch does not appear. On a content page, those content placeholders that inherit their components from the master page are appended with (Master), and those content placeholders that do not inherit the components within the content placeholders from the master page are appended with (Custom). To modify the contents of a content placeholder on a content page, perform the following procedure:
In SharePoint Designer, browse to the content page, and then open it in Advanced Edit mode.
Click the content placeholder; for example, click the name of the site so that the PlaceHolderSiteName content placeholder is the active control.
Click the On Object User Interface (OOUI), which is represented by a small floating arrow to the far right of the content placeholder, and then click Create Custom Content.

The placeholder and its content are copied from the master page, which you can now edit. The text (Custom) is appended to the name of the content placeholder.
On a content page that has modified the contents of a content placeholder, you can restore the content in the content placeholder back to the content that was defined on the master page by using the following steps:
In SharePoint Designer, browse to the content page, and then open it in Advanced Edit mode.
Click the content placeholder that you want to revert back to the master page. Click the OOUI, and then click Default To Master’s Content.
A Confirm dialog box opens, warning you that everything in the content placeholder (region) will be removed from the page. Click Yes to confirm that you want to continue. The code for the content placeholder is removed from the page.

Tip
INSIDE OUT Do not start with a blank master page
If you want to create your own master page, then do not start with a blank master page and add the controls yourself. It is likely that you will not include all the controls that are needed, and any content page associated with that master page will not display, as shown in Figure 14-19.

Figure 14-19. Content page displayed in SharePoint Designer, where the master page does not contain all the necessary content placeholders.
Use the master pages at the following locations as starting points for your master page:
These two master pages contain comments and the required content placeholders and SharePoint controls on the page. They will be placed in a hidden section on the page. You can move these controls into other locations, based on your design.
Like most industry-standard sites, SharePoint sites use CSS, and SharePoint Designer contains style sheet editors that make it easy to identify and edit the CSS rules and attributes. SharePoint Designer uses a set of configuration options to decide how it should add the CSS tags to your page. You can change these default settings from within the Page Editor Options dialog box, which you can open on the File tab by clicking Options.
CSS separates the look and feel from the content in your webpages. It is a declarative language that browsers use to format fonts, the color within the page, as well as the size and position of elements on the page. All modern browsers support CSS, and CSS functions exactly the same for SharePoint Foundation sites as it does with any other website.
The main CSS file in SharePoint Foundation is corev4.css, which contains over 7,000 lines of code and defines most of the styles you need to customize your site. Corev4.css is stored on the server in the root directory, %ProgramFiles%Common FilesMicrosoft SharedWeb Server Extensions14TemplateLayouts<LCID>Styles, where <LCID> is the locale for the language packs you have installed. You should not modify this file, but instead create your own style files, which contains only those styles from corev4.css that you need to modify. All of the CSS files provided by Microsoft are linked into the master page using the SharePoint control:
<SharePoint:CssLink runat="server" Version="4" />
When the master page is merged with your content page, and the CssLink control is run on the server, the following code is generated on a wiki page and sent to the browser, together with the CSS files:
<link rel="stylesheet" type="text/css"
 href="/_layouts/1033/styles/Themable/wiki.css?rev=9pXM9jgtUVYAHk21JOAbIw%3D%3D"
/>

<link rel="stylesheet" type="text/css"
  href="/_layouts/1033/styles/Themable/corev4.css?rev=iIikGkMuXBs8CWzKDAyjsQ%3D%3D"
/>
On a Web Part page, only a link to the corev4.css file is generated.
If you want to change the CSS styles for your site or a number of sites and if you do not have a development environment, create your own Site Collection, or if that is not possible, a test site. On your test site, create a new .css file in your site’s Style Library, add the required CSS styles to your .css file, and then edit your master page and add the following code after the CssLink SharePoint control:
<SharePoint:CSSRegistration Name="/Style Library/SPFIO.css"
   After="corev4.css" runat="server" />
In the preceding example, SFPIO.css is the name the custom .css file. If your site is not the root site of a Site Collection, you will need to change the URL specified in the Name attribute. The CSSLink control reads the information from the CSSResgistration SharePoint control and inserts a link tag into the page sent to the browser after the link tag for corev4.css, thereby ensuring that your CSS styles are applied after the styles in corev4.css. If you create multiple custom CSS files, you can also use the CSSRegistration control to ensure that your custom CSS files are applied in the correct order by using the After attribute.
You might need to reference image files from your CSS files. Upload these into the Style Library in a subfolder named images.
Tip
INSIDE OUT Creating themeable CSS rules
If you look inside the corev4.css file, you will notice that some of the CSS attributes are prefixed by CSS comments, such as in the following example:
.ms-gb {
 padding-bottom:1px
 /* [ReplaceColor(themeColor:"Light2-Medium")] */ border-bottom-color:#b5bdc7;
}
When a theme is applied to your site, the CSSLink control recompiles the CSS files, and for the above CSS code, it substitues the color code #b5bdc7 with the one specified in the theme by Light2-Medium. This recompilation will only occur when the Theme SharePoint control is included with the CSSLink control. If you wish to create CSS rules that can be themed, you need to create a Themeable folder in your site’s style library.
Earlier in this chapter, we discussed how to customize a master page and CSS files by using SharePoint Designer. You might now want other sites to use a master page, CSS files, and associated files. If you want other site owners in your Site Collection to use your design, you could export the master page from your site’s Master Page gallery and the associated files from your site’s style library, and upload them to the Site Collections Master Page gallery and style library. You might need to change the URL reference specified in the Name attribute in the CSSRegistration control and references to images in your custom CSS file. Using relative URL references to files might overcome this problem.
The best option is to deploy the master page plus its associated files as a Feature. You will need Visual Studio 2010 to create a Feature. Visual Studio does not provide a master page designer; however, when teamed with SharePoint Designer, each tool can compensate for the other tool’s shortcoming. For example, SharePoint Designer stores any changes to the content database and provides no source code control. Visual Studio supports source control and can deploy files to the SharePoint server’s file system, as you will see in the following steps.
To export the customized master page, perform the following steps. In the steps, the customized page is called SPFIIO.master, and the module is named SPFIOMaster. Replace these names when you complete the steps with the name of your customized master page and any naming standards that you might use in your organization:
Using SharePoint Designer, open the site for which you customized the master page.
On the Navigation pane, click Master Pages, and then click the icon to the left of the appropriate master page, such as SPFIO.master.
On the Master Pages tab, in the Manage group, click Export File to display the Export Selected As dialog box and save the master page, say, on your desktop, and then click Save.
At this point you might consider deleting the customized master page from the Master Page gallery by clicking Delete in the Edit group.
Use Visual Studio to create a package to deploy the master page as a Feature. As Visual Studio does not provide any built-in support to deploy SharePoint artifacts such as master pages, you will need to use the SharePoint 2010 Module project template. The following steps outline the process:
Note
For more information on using Visual Studio to create SharePoint Foundation solutions, and how to set up your development environment, see Chapter 16.
Open Visual Studio with administrative privileges. On the Start Page tab, click New, Project, or on the toolbar, click File | New, and then click Project to open the New Project dialog box.
Under Installed Templates, under the appropriate language (such as Visual C#), expand SharePoint, if it is not already expanded, and then click 2010.
In the middle pane, select Empty SharePoint Project.
This is the most basic SharePoint project type. If you want to add this project to source control, select Add To Source Control.
In the Name text box, type SPFIOBranding for the Project Name, and then click OK.
The SharePoint Customization Wizard is displayed.
Specify the site where you want to deploy and test the master page, and then select Deploy As A Farm Solution for the trust level.
If you are using a hosted solution such as Office365, you could select the sandbox option. Click Finish to close the SharePoint Configuration Wizard.
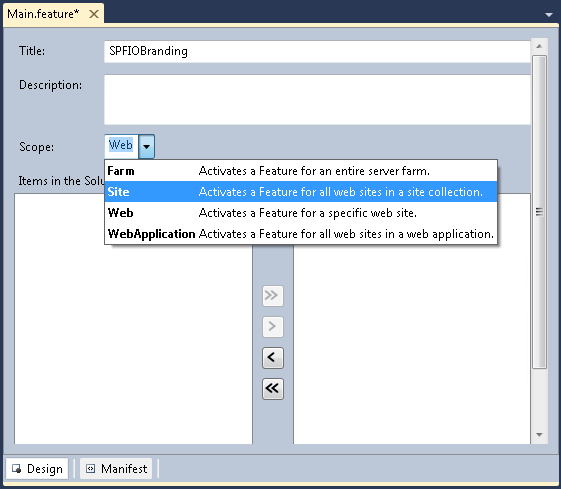
In Solution Explorer, under Features, right-click Feature1, click Rename, and then type Main.
In Solution Explorer, under Main, double-click Main.feature to display the Feature designer, and then on the Main.feature tab, in the Scope drop-down list, select Site.
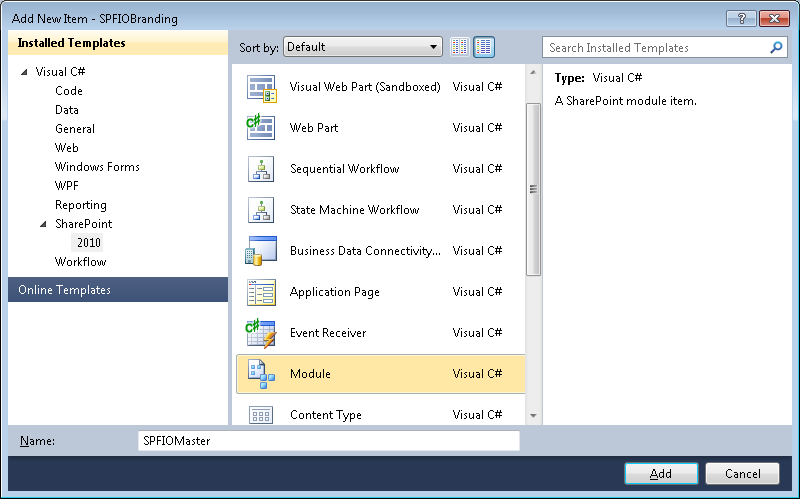
Add a module to the project by right-clicking the project name, click Add, and then click New Item. In the Add New Item window, click Module, type SPFIOMaster in the Name text box, and then click Add.
In Solution Explorer, the _catalogs module is added with an Elements.xml file and a Sample.txt file. The Elements.xml file is opened.
In Solution Explorer, right click _SPFIOMaster, click Add, and then click Existing Item. Browse to where you exported your custom master page, and then click Add.
Under the _SPFIOMaster module, right click Sample.txt, and then click Delete.
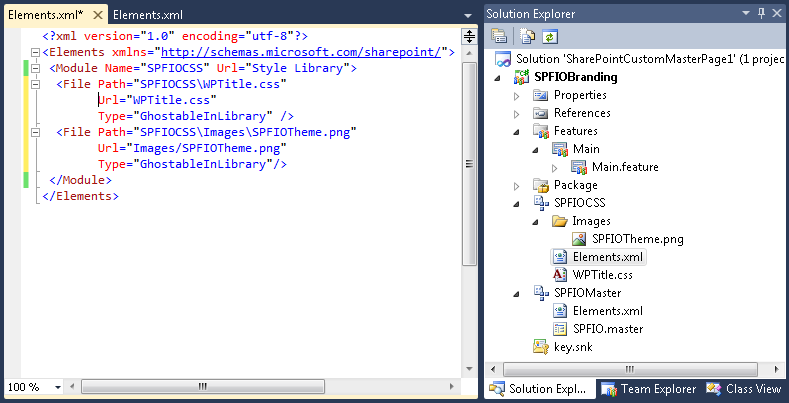
Modify the Elements.xml so that it deploys the master page into the master page gallery by changing the Url attribute on the Modules tag. Remove SPFIOMaster/ from the Url attribute of the File tag so that the feature does not create a subfolder, named SPFIOMaster in the master page gallery, and then add a Type attribute with a value of GhostableInLibrary so that the master page is visible in the master page gallery.
Add two property tags to the module to set the necessary column values in the master page gallery. The Elements file should match the following code:
<?xml version="1.0" encoding="utf-8"?>
<Elements xmlns="http://schemas.microsoft.com/sharepoint/">
  <Module Name="SPFIOMaster" Url="_catalogs/masterpage">
    <File Path="SPFIOMasterSPFIO.master" Url="SPFIO.master"
      IgnoreIfAlreadyExists="True" Type="GhostableInLibrary">
        <Property Name="ContentType" Value="Master Page" />
        <Property Name="UI Version" Value="4" />
    </File>
  </Module>
</Elements>
Deploy the project. Browse to the site settings page for the site you chose as the target when you created the project, and check that your custom master page is in the master page gallery and the SPFIOMasterPage feature is activated at the Site Collection level.
To add your CSS files and images to your solution, perform the following steps:
Repeat the previous sets of steps to add a second module to the project, named SPFIOCSS.
Remove Sample.txt from the modules, and then in the new Elements.xml, change the Url attribute on the Module tags to Style Library.
Right-click SPFIOCSS, click Add, and then click New Folder. Name the folder Images.
Right-click, SPFIOCSS, click Add, and then click Existing Item. Remove SPFIOMaster/ from the Url attribute of the File tag, and then add a Type attribute with a value of GhostableInLibrary. Repeat this step for each CSS and image file.
Move any image files into the Images folder.
Deploy the project. Browse to the Style library for the site you chose as the target when you created the project and check that your files are visible.
You have only added the master page and associated files to one site where Visual Studio has deployed the solution in this exercise. You could use PowerShell to set each site’s master page property, MasterURL, to the new master page, or you could create an event receivers on the Visual Studio project and write code in that event receiver so that when the feature is deployed and activated, all sites within the Site Collection have the MasterURL propery set to the new master page.
Note
You can find information on deploying branding solutions for SharePoint 2010 sites by using sandboxed solutions and an example of the code to write in the event receiver at http://msdn.microsoft.com/en-us/library/gg447066.aspx.
Tip
INSIDE OUT Using the AlternateCSSURL site property
If you only create one custom CSS file and you need to make no other changes to the master page, then do not use the CSSRegistration control; instead, modify the AlternateCssUrl site property to point to the custom CSS file that you have uploaded into the Style Library.