
The ability for a Business Analyst to communicate effectively with developers is greatly improved through the implementation of Office Visio Premium 2010, SharePoint Designer 2010, and SharePoint Foundation 2010. In the past if business analysts needed to coordinate some new business process, they would create a Visio document or other graphical drawing that depicted the new process. When the process was handed to the developer, the developer would need to recreate each step in the development application to match the diagram.
With Visio Premium 2010, you can now create a Visio diagram from a new template called the Microsoft SharePoint Workflow. You can design your workflow diagram just like you can with any other Visio diagram by using the drag-and-drop functionality to create a nice layout. Once the diagram is complete, you can run the validation provided by Visio to ensure that no branches or paths have been missed.
Next, you export the Visio diagram as a Visio Workflow Interchange (.vwi) file, which can be imported into SharePoint Designer, where the conditions and actions, together with any additional rules that need to be added, can be configured. You cannot import the .vwi file into Visual Studio; however, once you configure the workflow in SharePoint Designer, you can then save the workflow as a workflow template solutions file (.wsp), which can then be imported into Visual Studio.
Note
More information on using SharePoint Designer and Visual Studio to create workflows is detailed later in this chapter.
To create a SharePoint 2010 workflow by using Visio 2010, perform the following steps:
Open Visio 2010 to display the Backstage view.
On the New tab, under Template Categories, click Flowchart, and then click Microsoft SharePoint Workflow.
In the right pane, click Create to open a blank template.
In the Shapes pane (on the left), three stencils are displayed: SharePoint Workflow Actions, SharePoint Workflow Conditions, and SharePoint Workflow Terminators.
In the Shapes pane, under SharePoint Workflow Terminators, click Start.
Drag the Start shape to the left side of the template drawing area.
Repeat the steps 4 and 5 to add the Terminate shape to the right of the drawing area.
On the Home tab, in the Tools group, click Connector, and then drag a line from the Start shape to the Terminate shape so that a red square appears on the left-most edge of the Terminate circle.
The connecting line automatically connects the Start shape to the Terminate shape.
On the Home tab, click Pointer.
If you leave your cursor as a connector, you might inadvertently draw lines on your diagram. When you return the cursor to a pointer, you can drag other shapes to your diagram or move shapes around without accidently drawing lines.


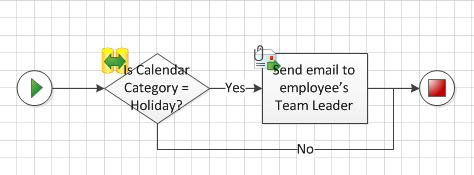
You can now add conditions and actions that represent the tasks of your business process that you wish to automate. For example, you can add a condition to check whether a calendar item is set to a category of holiday and then creates a task item for the team leader.
In the Shapes pane, under SharePoint Workflow Conditions, click Compare Document Field. Drag it to the drawing area to the right of the Start shape and place it on the line connecting the Start shape to the Terminate shape.
In the Shapes pane, under SharePoint Workflow Actions, drag Send An Email to the drawing area to the right of the Compare Document Field, and then place it on the line connecting the Compare Document Field shape to the Terminate shape.
Right-click the line connecting the Compare Document Field shape and the Send An Email shape, and then click Yes.
On the Home tab, in the Tools group, click Connector, click the bottom corner of the Compare document field shape, and then drag a line to the Terminate shape. Right-click the connecting line, and then click No.
On the Home tab, in the Tools group, click Pointer Tool. Double-click Compare Document Field, and then type Is Calendar Category = Holiday?. Double-click Send An Email, and then type Send email to employee’s Team Leader to approve holiday.
Tip
INSIDE OUT Visio workflow actions and conditions limitations
The SharePoint Designer workflow conditions and actions that are displayed in Visio are coded into Visio. Visio does not connect to a SharePoint installation to find which SharePoint Designer conditions and actions are installed. So, if you use Visual Studio to develop any custom conditions and actions, they will not be visible in Visio, and more important, there are some action shapes displayed in the Shapes pane that are only installed if you have SharePoint Server 2010. The action shapes that you cannot use with SharePoint Foundation are:
Start approval process
Start custom task process
Start feedback process
Send approval for document set
Send document set to repository
Set content approval status for document set
Look up manager of a user
If you do add one of these actions to your Visio diagram, when you import the .vwi file into SharePoint Designer, it will throw the error message, Could not deserialize object. The <object name> could not be resolved, where <object type> varies depending on the shape you added in Visio. For example, when you add the Look Up Manager Of A User action, the type is Microsoft.Office.Workflow.Actions.LookUpManagerOfActivity.
Once you have created a diagram of your workflow and modified the text for each shape to document the details of the process, you need to validate the drawing before you can export the diagram and give it to the person who will create the workflow as either a SharePoint Designer or Visual Studio workflow. To validate and export a Visio SharePoint Workflow, complete the following procedure:
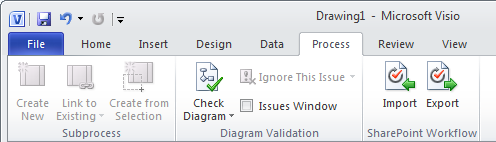
On the Process tab, in the Diagram Validation group, click Check Diagram.
A Microsoft Visio dialog box opens, stating No Issues Were Found In The Current Document. If your workflow has issues, an Issues task pane opens at the bottom of the Visio window. The erroneous component is highlighted. The Issues pane can be opened or closed by selecting the Issues Window check box in the Diagram Validation group on the Process tab.
On the Process tab, in the SharePoint Workflow group, click Export.
The Export Workflow dialog box opens so that you can browse to where you want to save the .vwi file. In the File Name text box, type the name of the file, and then click Save to save the .vwi file and close the dialog box.
Close Visio. You can choose to save the .vsd file of your workflow for documentation purposes, if needed.

To import a .vwi file into SharePoint Designer, perform the following steps:
Using SharePoint Designer, open a SharePoint site for which you want to develop a SharePoint Designer workflow.
If you want to create a globally reusable workflow from the file, the site must be a top-level site of a Site Collection.
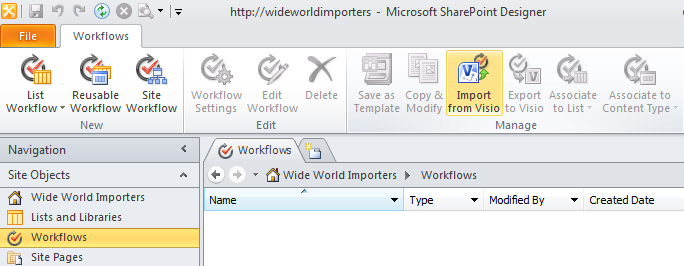
In the Navigation pane, click Workflows. On the Workflows tab, in the Manage group, click Import From Visio to open the Import Workflow From Visio Drawing dialog box.
Click Browse, navigate to the location where you stored the .vwi file, click Open, and then click Next.
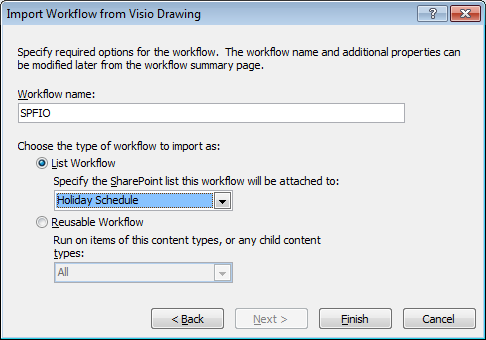
In the Workflow Name text box, type the name of the workflow as it will be seen by users on a SharePoint site, and then select either List Workflow or Reusable workflow.
If you select List Workflow, you need to select a list with which to associate the workflow defined in the .vwi file. If you select the Reusable workflow, associate a workflow with a content type.
Click Finish.
If this is the first time you’ve created a workflow, a dialog box opens asking you to wait while SharePoint Designer downloads the necessary information from the SharePoint site you have open. The information is related to the SharePoint Designer workflow conditions and actions that are installed.
Note
You can find more information about SharePoint Designer in the next section and in Chapter 14.