
Earlier in this chapter, you used the standard Three-State workflow template, and then you used Visio 2010 Premium and SharePoint Designer 2010 to create custom workflows. You should use SharePoint Designer, with or without Visio, whenever you can to create custom workflows. However, there might be some scenarios for which you need more than the out-of-the-box conditions and actions that SharePoint Designer provides. This is when you should consider using Visual Studio 2010.
Note
For more information about using Visual Studio to create SharePoint Foundation solutions and how to set up your development environment, see Chapter 16.
Visio Studio can help your organization to use workflows with SharePoint Foundation in two ways:
By developing custom actions that can be used in SharePoint Designer
By developing custom workflow templates.
Note
You can find information about developing workflows in SharePoint Foundation at http://msdn.microsoft.com/en-us/library/ms416312.aspx.
Visual Studio provides several pieces of functionality that aide in the creation of workflows for SharePoint Foundation. One of these components is the SharePoint Customization Wizard. With the SharePoint Configuration Wizard, you can specify settings about the workflow that you are creating. You can specify the following for workflows in the customization wizard:
The site and security level that the workflow will use
The workflow association with a list or a site
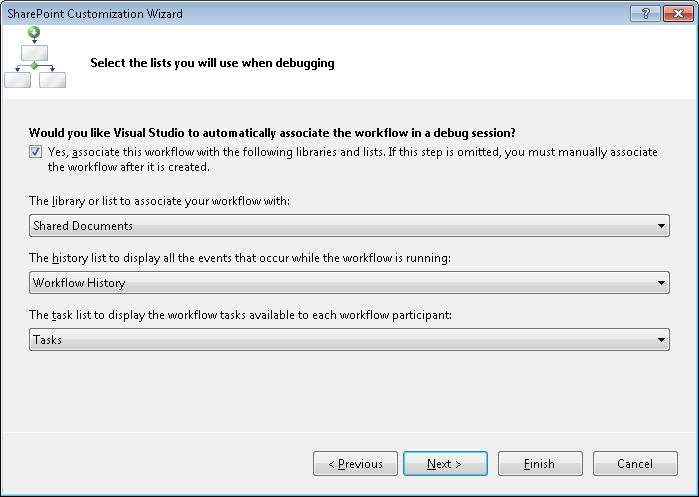
The list that you will use when debugging the workflow
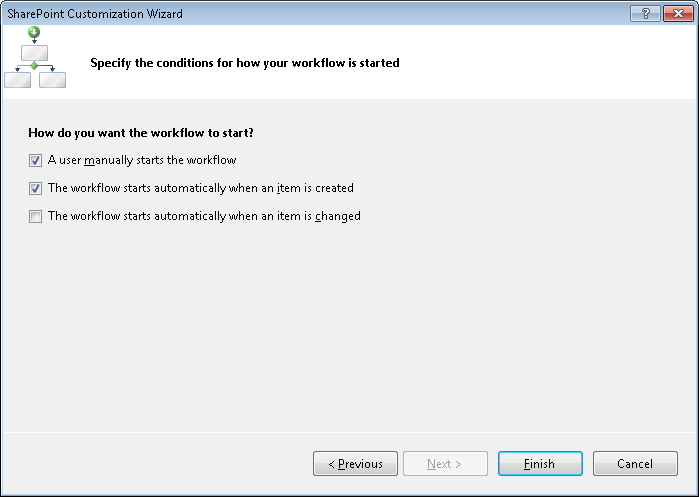
The conditions for how your workflow is started
One of the key differences in the workflows that are created in SharePoint Foundation when compared to previous versions of SharePoint is the ability to create workflows that run against a site, not against a list item or document. However, as stated earlier in this chapter, site workflows in most cases must be started manually. In that case, it can be started through the SharePoint applications programming interface (API). Figure 10-6 shows an example of the new SharePoint Customization Wizard setting with which you can specify if the Workflow is associated with a site or a list.
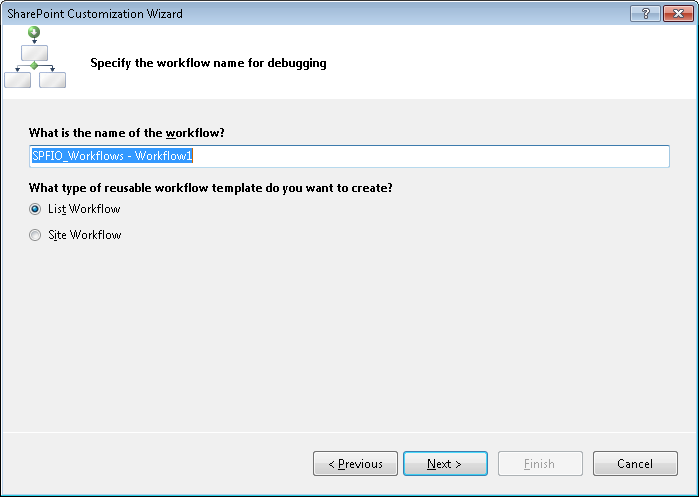
Figure 10-6. Specifying if a workflow will be associated with a site or a list in the SharePoint Customization Wizard.
Once you select the desired settings for the workflow that is being defined, the SharePoint Configuration Wizard generates a project in Solution Explorer. This project contains the base files and references that are used to create a custom SharePoint workflow in Visual Studio.
Visual Studio provides two methods for creating custom actions:
Sandboxed actions These custom actions are loaded with partial trust and can be executed in a sandboxed environment, hence the name. Microsoft Office 365—where SharePoint 2010 is hosted online in the cloud, and therefore, you do not have access to the server—is an example of where you would use sandboxed actions. With such actions, cross Site Collection queries are not possible; therefore, you cannot, for example, retrieve a list value if the list is in a different Site Collection than the site or list with which the workflow is associated.
Full trust actions These actions are created by using custom activity classes and are deployed on the server; however, they require more knowledge of the Windows Workflow Foundation (WF) and SharePoint Designer workflow architecture. Such actions are therefore more powerful but harder to develop.
Note
To view Hands-On Labs and videos for building workflow solutions for SharePoint Online and in sandboxed environments, go to http://msdn.microsoft.com/en-us/Office365TrainingCourse.
Tip
INSIDE OUT Where are the SharePoint Designer actions and conditions stored?
When you create a workflow by using SharePoint Designer, it connects to the SharePoint Foundation server and retrieves a list of available actions. You can find these actions in the SharePoint 2010 root folder in the Template<LCID>Workflow subfolder. Here, you will find a number of XML .actions files that define the actions that are available and how they should be configured.
Visual Studio provides several methods for creating workflows for SharePoint Foundation. With these workflows, users can programmatically control the life cycle of documents and list items in a SharePoint site.
When deciding to create workflows in SharePoint Foundation, you must decide what type of workflow to create. There are two basic types of workflows that are created in Visual Studio for SharePoint Foundation:
Sequential workflows These are considered predictable workflows. This is because the execution of the workflow must follow the activities, conditions, and rules that have been defined to move forward in the workflow. So in this case, the defined workflow is in control of the path that the process must take. This also means that any steps that occur in the workflow must be done one after another until the last activity is completed. This is the type of workflow you create when using SharePoint Designer.
State Machine workflows These do not have a defined path that it must follow. A State Machine Workflow is driven by events that take place during the lifecycle of the workflow. The workflow is given a state based on a set of states, transitions, and actions. The workflow always remains in some state until an event occurs that causes it to move to another state. So the path that a workflow takes is not predefined, and the steps in the workflow execute asynchronously. The state machine workflow has a final state that determines the end of the workflow.
Once you have determined the required type of workflow, you need to actually create it in Visual Studio. Perform the following steps to create a workflow:
Open Visual Studio with administrative privileges. On the Start Page tab, click New, Project, or on the toolbar, click File, select New, and then click Project to open the New Project dialog box.
Under Installed Templates, under the appropriate language (such as Visual C#), expand SharePoint, if not already expanded, and then click 2010.
In the middle pane, select Sequential Workflow.
In the Name textbox, type SPFIO_SequentialWorkflow, and then click OK.
Specify the site on which you want to deploy and test the application page, select Deploy As A Farm Solution for the trust level, and then click Next.
Leave the default value for the Name Of The Project and leave List Workflow for the type of workflow template to create, and then click Next.
Select the library or list that you want to use for debugging your workflow. Leave all the other default values for this page, and then click Next.
Leave the default values for this page to be able to start the workflow manually or start the workflow any time an item is created.
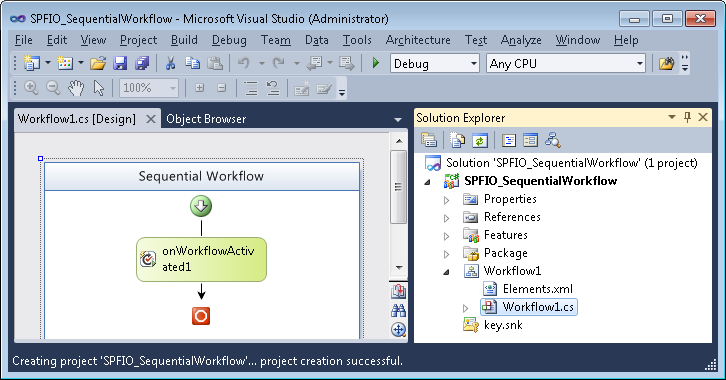
Click Finish. The Project is created with a single project item, Workflow1, and the workflow designer is displayed.
Open the Toolbox on the left (Ctrl+Alt+X), and then under SharePoint Workflow, drag a LogToHistoryListActivity on the screen after the onWorkflowActivated1.
Type SPFIO Workflow in for the HistoryDescription and HistoryOutcome.
Save, Build, and deploy the Project.
Note
To see a sample sequential workflow for SharePoint 2010, go to http://archive.msdn.microsoft.com/SharePointDev2010, and http://channel9.msdn.com/Learn/Courses/Office2010/ClientWorkflowUnit/ClientWorkflowLab/Exercise-3-Building-a-Workflow-in-Visual-Studio-2010.
When you are working on the development computer that has SharePoint Foundation already installed, if your build does not contain any errors, your new workflow will automatically be deployed to the site when you build and deploy your solution. This only works when you need to deploy this solution to the server on which Visual Studio 2010 is running. If you need to deploy a solution to another SharePoint Foundation installation, you will need a different set of steps to accomplish this.
Note
For information about deploying custom workflow assemblies to SharePoint Foundation, go to http://msdn.microsoft.com/en-us/library/ee538248.aspx.
You can use SharePoint Foundation to easily package and deploy Workflows via the Packaging Designer in Visual Studio and PowerShell. The packaging and deployment of a workflow template in Visual Studio is no different from deploying any other solution, because the process has been standardized in Visual Studio 2010. However, SharePoint Foundation provides a new method for deploying SharePoint Designer workflows into SharePoint Foundation by utilizing Visual Studio 2010.
In previous versions of SharePoint, out of the box, it was not possible to take a workflow developed in SharePoint Designer and use it on other sites. Also, there was no way to take a workflow in SharePoint Designer and automatically create a workflow in Visual Studio. With SharePoint Designer 2010, you can now take a workflow developed in SharePoint Designer and import it into Visual Studio. This is accomplished by using the Visual Studio Import Reusable Workflow project template.
To import a workflow into Visual Studio 2010, using SharePoint Designer, create a .wsp file based on a reusable workflow, as described earlier in this chapter. You can also create a .wsp file when you save the whole site as a template, which saves the .wsp file in the Site Collection’s solutions gallery. To import the reusable workflow from a .wsp file in Visual Studio, perform the following steps:
Open Visual Studio 2010. In the middle pane, select the Import Reusable Workflow.
In the Name text box, type SPFIO_WorkflowImportProject, and then click OK.
Enter the Site to use for debugging, and then select Next.
Click Browse to open the Open dialog box.
Navigate to and select the .wsp file you saved by using SharePoint Designer, click Open, and then click Next to display the Select Items To Import page of the SharePoint Customization Wizard.
Select the workflow to be converted from the list, and then click Finish.
The Import Completed dialog box opens, stating that the SharePoint solution import completed successfully. Click OK. Visual Studio has converted the reusable workflow from the .wsp file into a workflow project.
In Solution Explorer, expand the Workflows and double-click the imported workflow folder to display the workflow in designer.
Select WorkflowImportProject1, and then set the Startup Item property to the Imported Workflow.

At this point, the workflow has been imported into Visual Studio, but there are still a few items that might need to be set up. The imported reusable workflow does not import association properties for the workflow, so for each workflow listed you will need to:
Open the Properties task pane, if not already open, and then to the right of Target List, select the Ellipse button to open the SharePoint Customization Wizard.
Enter the appropriate information in the SharePoint Customization Wizard for the workflow.
When the Customization Wizard is complete, repeat the previous two steps for any other properties that need values.
Build and deploy your project.
The Workflow is deployed and you have now successfully imported and deployed a workflow by using the Import Reusable Workflow project template.
Earlier in this section, we talked about the different types of workflows that can be created for SharePoint Foundation in Visual Studio. Using one of the newest workflow types, you can create a site workflow activity that allows you to apply a workflow for an entire site. The following procedure illustrates how to set up a site workflow activity. To test this sample code you need an announcements list created in the top-level site of your Site Collection on your development computer.
Open Visual Studio with administrative privileges. On the Start Page tab, click New, Project, or on the toolbar, click File, select New, and then click Project to open the New Project dialog box.
In the middle pane, select the Sequential Workflow.
In the Name textbox, type SPFIO_SiteLevelActivity1, and then select OK.
Enter the Site to use for debugging, and then select Next.
Leave the default value for the name of the project, select Site Workflow for the type of workflow template to create, and then click Next.
On the Select The Lists You Will Use When Debugging page, you are unable to select a list or library. Leave all the default values for this page, and then click Next.
On the Specify The Conditions For How Your Workflow Is Started, only the option to start the workflow manually is available and is selected by default. Leave the option selected, and then click Finish.
Once the project is created, right-click the project SPFIO_SiteLevelActivity1, click Add, and then click New Item.
In the Add New Item dialog box, under Installed Templates, click Code, and then in the middle pane, click Class.
In the Name text box, type CustomActivity1, and then click Add.
The CustomActivity1.cs file opens.
Replace the code in the CustomActivity1.cs file with the following code. Use your Site Collection URL in place of wideworldimporters:
using System;
using System.Collections.Generic;
using System.Linq;
using System.Text;
using Microsoft.SharePoint;
namespace SPFIO_SiteLevelActivity1
{
    class CustomActivity1 : System.Workflow.ComponentModel.Activity
    {
        public CustomActivity1()
        {
        }
         // Triggers when the activity is executed.
        protected override System.Workflow.ComponentModel.ActivityExecutionStatus
            Execute(System.Workflow.ComponentModel.ActivityExecutionContext
executionContext)
        {
            try
            {
                // Referencing the Site
                SPSite site = new SPSite("http://wideworldimporters");
                SPWeb web = site.OpenWeb("/");
                // Getting the Announcements list
                SPList TaskList = web.GetList("Lists/Announcements");
                // Adding an Announcement
                SPItem SiteAnnouncement = TaskList.AddItem();
                SiteAnnouncement["Title"] = "SPFIO";
                SiteAnnouncement["Body"] = "SPFIO Announcement Body";
                // Saving the changes
                SiteAnnouncement.Update();

            }
            catch (Exception ex)
            {
                System.Diagnostics.Debug.WriteLine("Error: " + ex.ToString());
            }
            return base.Execute(executionContext);
       }
    }
}
Build the solution.
Open the Workflow1.cs in Design mode.
In the Toolbox task pane, under SPFIO_SiteLevelActivity1 Components, drag the CustomActivity1 below onWorkflowActivated1.
Build and deploy the solution.
Now that you have built and deployed the workflow, you should test it. You can do this as follows:
Go to the top-level site of your Site Collection that you selected for debug purposes.
On the Quick Launch, click All Site Content, and then to the right of Create, click Site Workflows.
Under Start A New Workflow, click SPFIO_SiteLevelActivity1 - Workflow1. The home page of the site is displayed.
On the Quick Launch, click All Site Content, and then under Lists, click Announcements. A new announcements list item should appear.