
BCS is all about bringing data that lives outside SharePoint into SharePoint. The BCS provides connectivity to your external LoB systems by using connectors. Earlier in this chapter, SharePoint Designer was used as a no-code method to define the BDC model and use ECT as External lists and external data columns. This method has some limitations:
You can only create CRUD operations. BCS supports other operations that cannot be created by using SharePoint Designer, such as the stream operation that allows you to access a file that is stored as a Binary Large Object (BLOB) in an SQL database.
The declarative XML created in the BDC model can only be changed if you export the BDC model and then open the file created by the export activity in SharePoint Designer. You would then need to know the BCS model schema to amend the XML. SharePoint Designer does not provide any no-code assistance in editing the BDC model XML file.
External lists cannot be used to represent any hierarchy or relationship between the content stored in the external systems. The data is presented as a flat, table-like structure; there is no built-in tree or folder structure that you can configure to match the relationship between the content.
SharePoint Designer only allows the use of SQL Server, .Net Assembly, and WCF connectors, and typically no-code solutions use the SQL Server or the WCF connectors.
SharePoint Designer does not allow you to create the VSTO add-ins that could provide extract functionality to work with the external content.
To create a new BDC model, start Visual Studio 2010 and create a new project based on the “Business Data Connectivity Model” project template, as shown in Figure 9-9. Give the project a meaningful name and connect to a SharePoint website that you want to use for debugging. Notice that you can only create BDC model projects as farm solutions. When you build a BDC model by using Visual Studio, you create a .bdcm file and an assembly. The assembly is deployed to the BDC service application database, which requires full trust and hence, why the project must be configured as a farm solution.
Note
For information on how to set up your Visual Studio environment for SharePoint and more information on SharePoint solutions, see Chapter 16.

The project opens and displays a graphical representation of an entity (ECT) with one identity (property) and two methods (operations), the ReadItem—a specific finder method, and ReadList—a finder method. This is the minimum needed to create an External list. The External list displays one or more entity items that are returned by the ReadList method, and if you select one of those items and choose to view properties, the ReadItem method is called.
The other task panes open and might include the Solution Explorer, which displays the project structure that includes the BDC model, BdcModel1.bdcm, the Properties, BDC Method Details, and the BDC Explorer, which abstracts the underlying XML and displays it in a tree view (see Figure 9-10). To display the BDC Explorer, you can click the link in the BDC Method Details task pane or on the View menu. Next, click Other Windows, and then click BDC Explorer. It will then appear in the upper-right corner, in front of the Solution Explorer task pane. If the Properties task pane is not open, press F4.
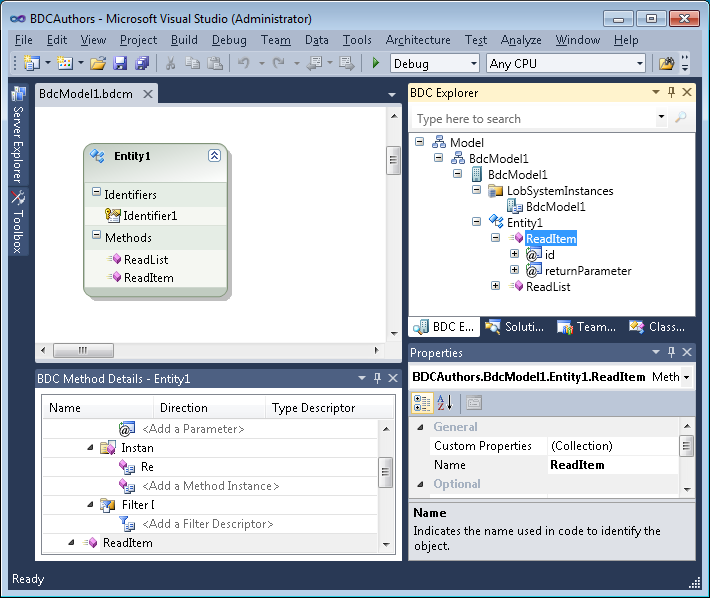
The task panes are related to one another. When you click the BdcModel1.bdcm file in Solution Explorer, the Properties task pane displays file properties. When you click the ReadItem method in the BDC Explorer, the Properties and BDC Method Details task panes are populated with related information. For example, you can see that the ReadItem method has two parameters: id with an in direction and returnParameter with a direction of Return. The ReadItem method passes the id parameter, the primary key, to the external system, and the item that is identified by the ID will be returned by the ReadItem method in the Return parameter.
When you make changes in any of these task panes—the graphical representation of the entity (known as the ECT designer), the BDC Method Details, the BDC Explorer of the Properties task pane—you are writing XML to BdcModel1.bdcm; you do not need to manually edit the XML in the file. Sometimes it is easier to see what is incorrect in your BDC model and correct the XML yourself. To quickly open the .bdcm file and write XML, in the Solution Explorer, right-click the file to open the shortcut menu, and then click Open With. In the Open With dialog box, select XML (text) Editor.
Tip
INSIDE OUT Importing a BDC solutions file
SharePoint Foundation does not allow importing a SharePoint solutions file (.wsp) that contains BDC models. There are three workarounds:
To publish the BDC Model to SharePoint Foundation with Visual Studio, you need a Feature Event receiver. SharePoint Server 2010 already has the Feature Event receiver. Microsoft has provided the code for the receiver, which you can download from the MSDN code gallery at http://code.msdn.microsoft.com/BDCSPFoundation. Detailed instructions on how to use the code can be found in the blog post, “Deploy a BDC Model project to SharePoint Foundation 2010 using Visual Studio 2010,” which you can find at http://blogs.msdn.com/b/vssharepointtoolsblog/archive/2010/04/02/deploy-a-bdc-model-project-to-sharepoint-foundation-2010-using-visual-studio-2010.aspx. You only need to deploy the event receiver once because it will automatically be called when any BDC model is deployed.
Use PowerShell to upload the BDC model and the compiled assembly to the BDC metadata store. Using this second method, you would also need to manually deploy the assembly to the Global Assembly Cache (GAC).
Install Microsoft SharePoint Search Express (SSE), which, like SharePoint Foundation, is free and supports the importing of .wsp files that contain BDC models.
The project created from the “Business Data Connectivity Model” project template is a fully working example of a BDC model. After you add the Feature Event receiver to enable the deployment of BDC models from within Visual Studio, press F5 to compile, package, and deploy it. This will also check that you have coded the Feature Event receiver correctly.
There are two types of BCS connectors that you will use when creating BDC models with Visual Studio:
.Net Assembly connector Use this to connect to a particular instance of an external system such as your own Exchange system that has all your organization’s configurations and settings. This type of connector is typically developed internally to an organization. The .Net Assembly connector gives you complete control over the operations with the external system with the code you write.
Custom connector Use this to connect to any external system; for example, any Exchange system. Custom connectors are typically developed by third-party companies so that the purchases of the third-party solution can integrate the solution with their SharePoint installation.
Note
You can learn more about the differences between using the .NET Assembly connector and writing a custom connector at http://msdn.microsoft.com/en-us/library/ee554911.aspx.
A BCS solution is a combination of declarative and programmatic elements. This fact is hidden when you create a no-code solution with SharePoint Designer. When you display the External Content Types galley in SharePoint Designer, you can see that the BDC model is a .NET Assembly connector. The BDC model is therefore telling SharePoint that you are using a custom .NET Assembly implementation of the BDC model, thereby tying together the declarative XML with the custom code. Therefore, the “Business Data Connectivity Model” project template should really be named the “BDC .NET Assembly” project template.
When you create an External list from the BDC model that you create with Visual Studio, it contains two columns named Identifier1 and Message, which is defined in Entity1.cs and are called Type Descriptors. Use this file to define the entity and its fields. This file maps to the ECT:
Public partial class Entity1
{
   //TODO: Implement additional properties here.
   public string Identifier1 { get; set; }
   public string Message { get; set; }
}
The External list would display one external content item: 0,Hello World. This is the result of the ReadList method that is defined in the Entity1Service.cs file. Use this file to define how to implement the operations, such as the CRUD operations. When you create methods in the task panes, stubs are created in this file, for which you will need to provide the code. You can therefore develop operations that SharePoint Designer cannot provide:
public static IEnumerable<Entity1> ReadList()
{
  // TODO: This is just a sample. Replace this simple sample with valid code.
  Entity1[] entityList = newEntity1[1];
  Entity1 entity1 = newEntity1();
  entity1.Identifier1 = "0";
  entity1.Message = "Hello World";
  entityList[0] = entity1;
  return entityList;
}
To create an ECT by using Visual Studio, perform the following steps:
In the designer, right-click the entity name to display the shortcut menu, and then click Rename. Type the name of the data type; for example, enter Author.
Repeat the previous step to rename the identifier1, and the two methods, ReadList and ReadItem, to meaningful names, such as Au_id, GetAllAuthors, and GetAuthor. You can also use the Properties task pane to rename these methods.
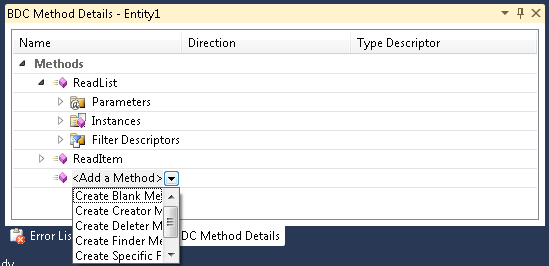
Add new methods by using the Method Details task pane because this will create the correct code stub in the services code file. To create a non-CRUD method, select Create Blank Method.
Using the Properties task pane, change the Type Name to match the data type of your entity’s identifier.
Create the type descriptors for the returnParameter, and set the type name to match the data content in your external systems, using steps similar to the following:
Using the BDC Explorer, navigate to the returnParameter below GetAllAuthors, click Entity1List, and then using the Properties task pane, rename it, for example, AuthorList.
Expand AuthorList, and then using the Properties task pane, rename Entity1 to Author.
Expand Author, and then using the Properties pane, rename Identifier1 to Au_id and the rename Message to au_lname. Use the Properties task pane to amend other properties as needed, such as the Type Name and the Default Display Name.
Add any other type descriptors that your entity requires. Right-click Author to display the shortcut menu, click Add Type Descriptor, and then click TypeDescriptor and rename it using the Properties task pane.
Create type descriptors for the other methods.
If other methods use the same type descriptor, you can copy them from one method and paste them to other methods. For example, right-click Author, and then click Copy. Next, expand GetAuthor, right click returnParameter, and then click Paste. Click Yes to the Replacing Type Descriptor dialog box. The GetAuthor method, also has an ID parameter, its type descriptor needs to be renamed to the appropriate identifier, au_id.
In Solution Explorer, rename Entity1.cs to Author.cs, and then click Yes to rename all references to the code element “Entity1”. Entity1Service.cs was renamed to AuthorService.cs as the result of step 1.
Provide details in the Author.cs that represents the data structure that you described in the preceding steps. Replace the code in the body of the Author class to add properties to map to the type descriptors that you added in the BDC definition.
Your code will look similar to the following example:
Public partial class Author
{
   public string au_id { get; set; }
   public string au_lname { get; set; }
   public string au_fname { get; set; }
   //TODO: Map all your type descriptors
}
Provide details in the AuthorService.cs for the methods that you have defined.
For example, if you were using the pubs database to return content from the authors table, you will need to provide code for the two methods, GetAllAuthors and GetAuthor, for example, by returning the content of the table by using ADO.NET.
Once you have completed all the definitions and code, press F5 and test your solution by creating an External list.

Note
You can see how to programmatically create a SharePoint 2010 ECT at www.toddbaginski.com/blog/how-to-programmatically-create-a-sharepoint-2010-external-content-type.
If you want to extend a BDC model created in SharePoint Designer, or you wish to deploy the BDC model as part of you BCS solution, you will first need to import the BDC model into Visual Studio. To import the BDC model, perform the following steps:
In your Visual Studio project, create a folder for your model.
Right-click the folder, and then select Add Existing Item. From the Add Existing Item dialog box, navigate to where you exported the .bdcm file from SharePoint Designer, and then click Add.
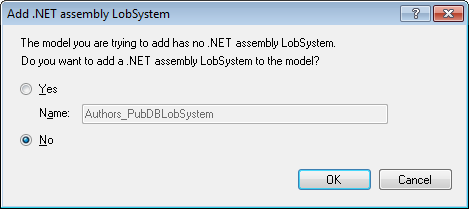
The Add .NET Assembly LobSystem dialog box displays.
The Visual Studio ECT designer only supports .NET Assembly BDC models. The BDC model that you created from SPD is likely to use the SQL server or WCF services connector. If you select the No option in the dialog box, the ECT designer is disabled and you will need to modify the .bdcm file by using the XML editor.
Note
You can find the Microsoft Business Connectivity Services resource center at http://technet.microsoft.com/en-us/sharepoint/ee518675.aspx.