Once an ECT is created, you can create solutions that use the external content. You can use the browser or SharePoint Designer to create these solutions. You can also create custom Web Parts or Windows Forms applications with Visual Studio that can access the data defined in the BDC metadata store.
The External list type is new to SharePoint Foundation 2010, and it is the preferred method of displaying external content. External list types can be created by using the browser, SharePoint Designer or PowerShell. Once created, they are similar to other lists that you use. Depending on the operations that you defined on the ECT, this could include creating, reading, updating, and deleting individual external content data, such as a specific customer, order, or employee from the external system. You can also add an XLV Web Part or Data Form Web Part (DFWP) to a page that displays data from an External list.
However, you cannot use the datasheet view, associate RSS feeds or workflows to an External list, or set item-level permissions. Remember, the external content is not stored in SharePoint content databases, so SharePoint does not have native control over the external content and does not know when data in the external system changes, and therefore, cannot trigger SharePoint workflow events when the external content changes. However, you can use content from an External list in a site workflow or a list workflow associated with a different list type.
To create an External list by using the browser, perform the following steps:
Open the site on which you want to create the External list. Click Site Actions, and then select More Options.
On the Create page, click External list, and then click Create.
If you have a large number of list types, it’s easier to find the External list option by using a Data category filter.
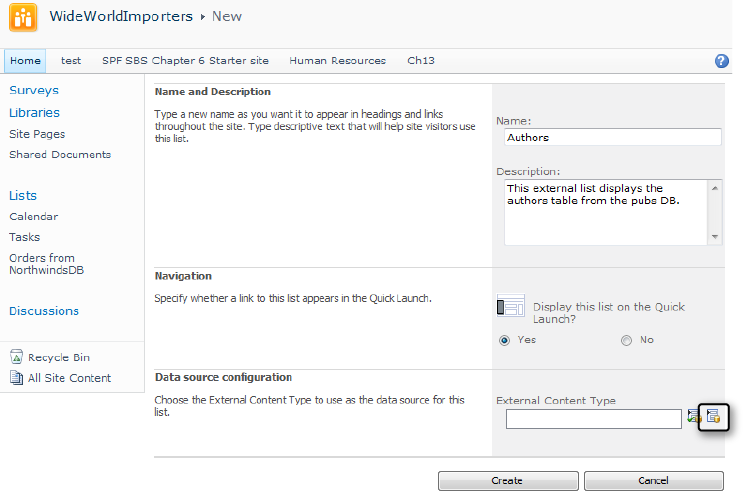
On the New page, enter the name and description for the External list, and then select whether you want a link to this External list on the Quick Launch bar.
To the right of the External Content Type text box, click the Select External Content Type icon.
In the External Content Type Picker dialog box that appears, select the ECT that defines the external content that you want to display in your External list, and then click OK.
The dialog box displays the name of the external system and the display name of the ECT; therefore, it is important that your ECT designers have created a meaningful display name for the ECT so that your end users can quickly identify the desired external content. If you choose the incorrect ECT, you cannot choose a different one once the External list is created. You will need to delete the list and recreate it, choosing the correct ECT. The External list acts as a virtual container, displaying the contents from the external system. Therefore, when you delete an External list or ECT, you are not deleting any content from the external system, just the virtual container and the definition of external content.
The External Content Type Picker dialog box closes and the ECT that you chose is specified in the External Content Type text box.
Click Create.
The External list is displayed using the Real List view, and the content from the external system is displayed.

To create an Office application ECT in SharePoint Designer, you must select an Office item type on the summary view when you first create the ECT. Then, using the Operations wizard you can map the field properties of the external content to Office properties. The office item types are mostly aimed at Outlook. When you connect the External list to Outlook, the external content can be shown in the contacts, calendar, or task pane, as well as in the SharePoint External lists folder. If one of the external content fields is mapped to the Office email property, you can then send an email to a person, whose details are stored in the external system.
External data columns allow you to add external content to a standard SharePoint list or library. You create an external data column as you would any other column; that is, on the List tab, click the Create Column command. Then, on the Create page, enter a column name, and then select External Data as the column type. In the Additional Column Settings section, to the right of the External Content Type text box are two icons, the Check ECT icon, which you use when you type the name of the ECT in the text box, and the Select ECT icon, which when clicked opens the External Content Type Picker dialog box.
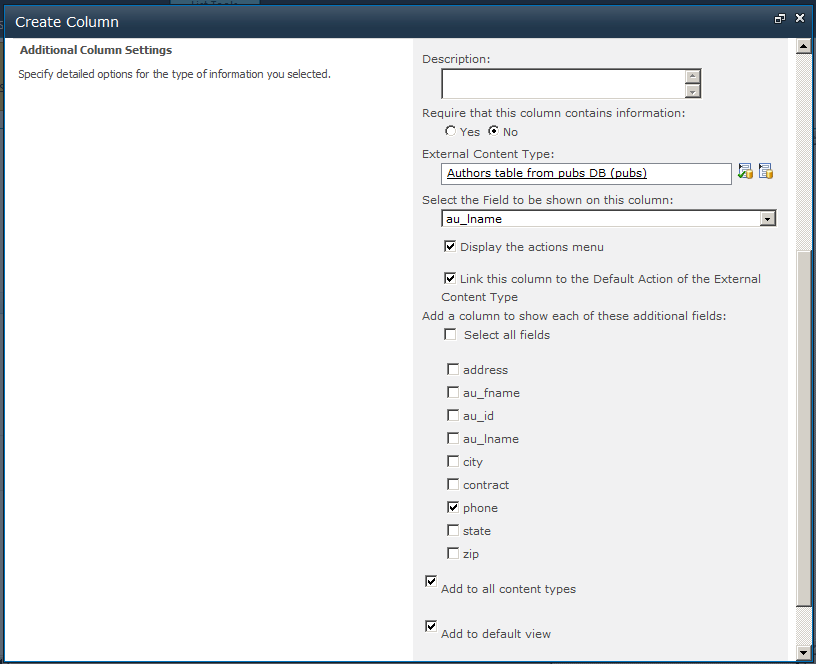
Once an ECT is selected, the Additional Column Settings section contains a list of properties associated with the ECT, as shown in Figure 9-7. In the Select The Field To Be Shown On This Column drop-down list, select the column that your users will usually associate with the external content. If the external content is a CRM system, then this might be the customer name. You can then choose to add one or more fields from the external content to become columns in the list or library, such as the customers email address or phone number. You can then choose to add the fields to all content types as well as add them to the default view.
It is only when you add a new list item and click the Select External Item(s) icon that the BDC server runtime connects to the external system to retrieve data to populate the Choose dialog box. The dialog box only shows those fields that had the external item picker check box selected when you configured the ECT operations. When the external item picker check box is not selected for any field, all fields are displayed in the Choose dialog box. When the new list item is saved, the external content is stored in the list in the SharePoint SQL content database, unlike the External list that only contains a link to the ECT definition. To update the data in the list, you can click the Refresh icon to the right of the external data column name, as shown in Figure 9-8. A webpage appears warning you that this operation could take a long time. If you click OK, the BDC server runtime connects to the external system to return the necessary data. By copying the external content in the list, it has inherited all list type operations, such as views, filters, and the ability to be used to trigger list workflows.

When an external data column is added to a library, the values in the external column can be made available as content controls in Microsoft Word 2010.
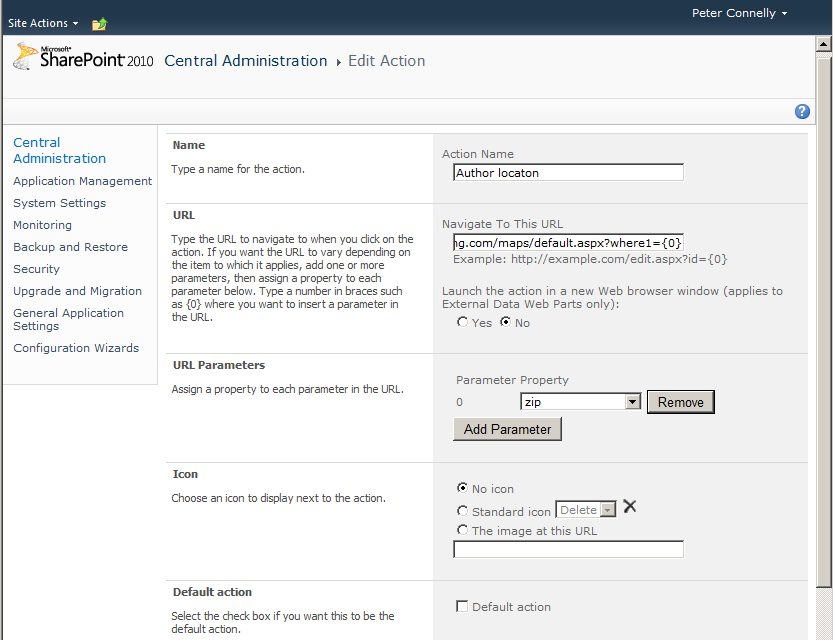
When an external data column is created in a list or library, there is an icon on each list item to the left of the external content. This icon provides a drop-down list of links to pages that display information relevant to the ECT item, such as displaying all the values for all the properties of the ECT item, or by using the postal code property of the ECT item, displaying a map of that location. These links are called Actions, and they can be created by using the Central Administration website, following these steps:
Navigate to the Business Data Connectivity Service where the ECT is defined.
On the Edit tab of the Service Application Information page, in the View group, select External Content Types from the drop-down menu.
Click the ECT to display the External Content Type Information page.
On the Edit tab, click Add in the Actions group.
On the Add Action page that appears, type a name for the action, type the URL, specify whether to launch the action in a new browser window or not (default), add parameters to the URL if required, and then add the icon to display next to the action. You can choose from the Delete, Edit, or New icons, or you can choose your own image.