
The browser is still SharePoint’s main web content editing tool for most users; however, SharePoint Designer 2010 is now “the preferred” tool for designing powerful, no-code solutions and applications in SharePoint 2010. SharePoint Designer 2010 has undergone major improvements over its predecessor, SharePoint Designer 2007. When you open a site in SharePoint Designer 2010, you’ll notice that it uses the Microsoft Office Fluent user interface, which was designed to make it easier for users to use and find features within a product. It incorporates the ribbon and the companion feature—the Backstage view—which can be accessed from the File tab.
As you build your solutions by using SharePoint Designer, it is important to know how to use it to create and modify webpages. Before you can modify any pages, you must open a SharePoint site with SharePoint Designer. Then you can open individual files, whether they are stored within the SharePoint site or outside the site, such as files on your computer’s hard disk. You should never use SharePoint Designer to make changes to files on the SharePoint server’s file system, especially on your production computers. Modifications or the creation of files on SharePoint servers should be tightly managed and deployed with SharePoint solutions files, which you create by using Visual Studio 2010.
Note
For more details about using SharePoint Designer, see Chapter 14.
When you open a SharePoint site with SharePoint Designer, the Navigation pane is displayed. This replaces the Folder List task pane in SharePoint Designer 2007 and focuses on SharePoint objects and not where the objects are stored. Previously in this chapter, you worked with webpages stored in the site objects: Site Pages, Site Assets and Master Pages, which are listed on the Navigation pane.
When you click the first site object in the Navigation pane, the site’s information is displayed in SharePoint Designer’s workspace, as shown in Figure 6-23.
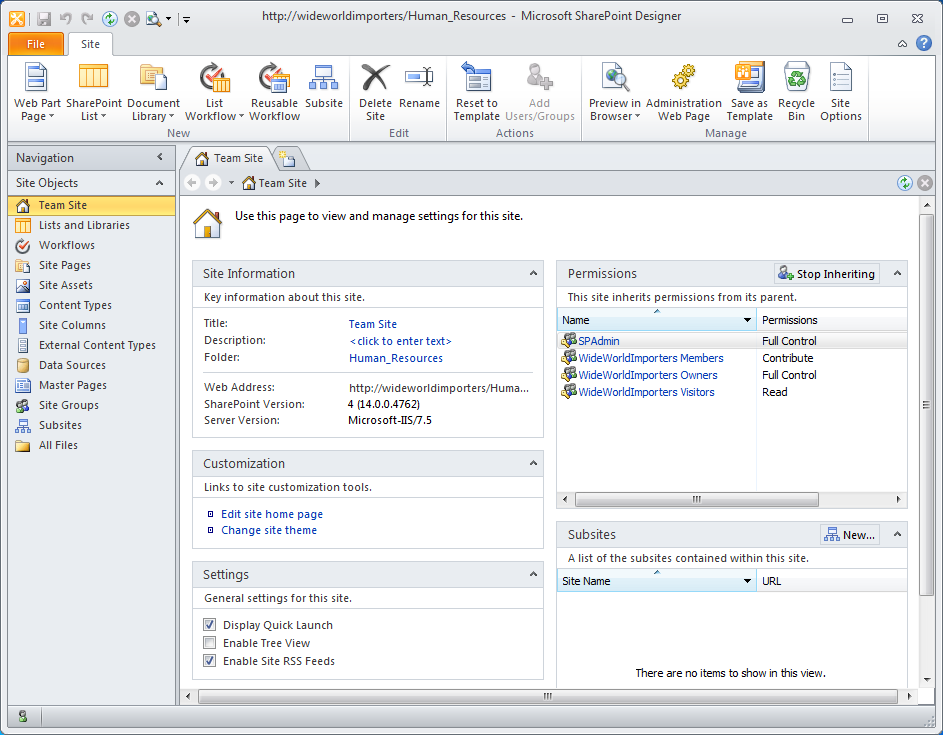
You can then navigate to the Home page of the site by clicking Edit Site Home Page in the Customization area. A new tab opens, displaying the Editor page for the site’s home page (which for a Team Site is the wiki page), Home.aspx, and in the Navigation pane, below the site objects, a mini gallery displays the contents of the Site Pages library. You can also navigate to the Home page by clicking Site Pages in the Navigation pane.
As with the previous version, you can complete similar activities to the browser by using SharePoint Designer in a WYSIWYG environment—the Design view. SharePoint Designer provides two other views of a page:
Code view This displays the HTML tags, client-side code (such as JavaScript), and controls (such as the SharePoint control for the ribbon), SPRibbon, if you had opened a master page, or content controls on webpages, where the content for the page is positioned. The Code view provides you with a number of features that help you to write code, for example:
The Code view uses colors to identify different code elements so that you can quickly identify coding errors.
IntelliSense is also included in Code view. As you type, it detects what you are writing and provides suggestions. The IntelliSense in Code view is not limited to HTML tags but is also provided when writing CSS or selecting parameters.
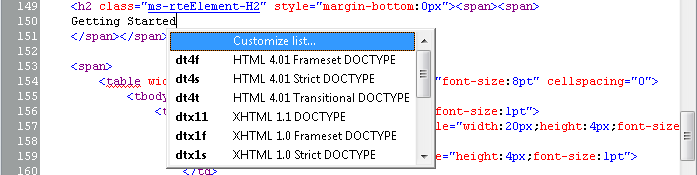
The Code view also offers snippets of code. These snippets are predefined and you can include them in your code, by pressing Ctrl+Enter, which displays a drop-down list of the available code snippets, as shown in Figure 6-24.
Use the Page Editor Options dialog box, which you can open via the Backstage view of SharePoint Designer, to change the default colors of the code elements, disable IntelliSense, or to add your own code snippets.
Split view Use this to divide the workspace horizontally. When set, the Code view displays at the top of the workspace, and the Design view appears at the bottom.
You will use all three views as you edit webpages. When you first open the home.aspx page, you are in Design view, and when you move the pointer over the page, in some areas of the page, the pointer changes to a no-entry icon. This identifies that the area of the page as not within the EmbeddedFormField control.
If you click Split or Code, you will see that some of the code in the home.aspx page is colored yellow (a light-gray shade, as depicted in Figure 6-25). This is the code that resides outside the EmbeddedFormField control, which you cannot modify either in Code view or Design view. This behavior mimics the behavior when editing a page in the browser.
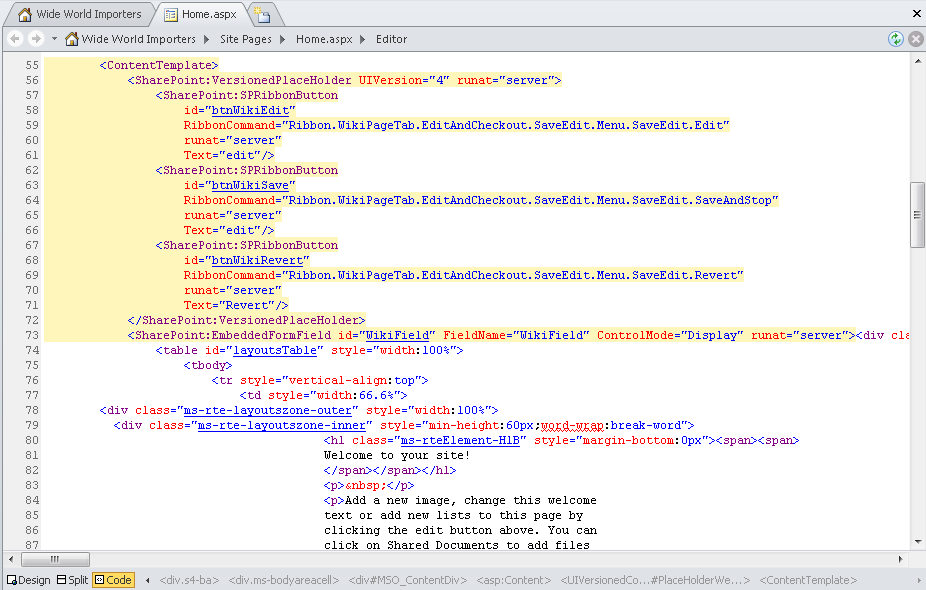
By looking at the code view for home.aspx, you can see that the code that is used to present content on a wiki page is as follows:
<SharePoint:EmbeddedFormField ID="WikiField" FieldName="WikiField"
   ControlMode="Display" runat="server" />
Also note that just above the EmbeddedFormField control, there is reference to UIVersion=“4”. When you upgrade from Windows SharePoint Server 3.0 to SharePoint Foundation, you can separate the upgrade of the content of your sites from the visual changes. Therefore, although the servers are now running SharePoint Foundation, it still looks to the user as if he is using Windows SharePoint Services. By setting the UIVersion attribute to 4, the code is specifying that if the site has visually upgraded, then the contained markup should be used. A UIVersion attribute of 3 represents Windows SharePoint Services 3.0, and any contained markup would only be used if a site was not visually upgraded. This does add a lot of text to pages, including master pages, so if you plan to redesign your pages and you either never upgraded from Windows SharePoint Services 3.0 or all your sites are visually upgraded, you can remove all the UIVersion=“3” tags.
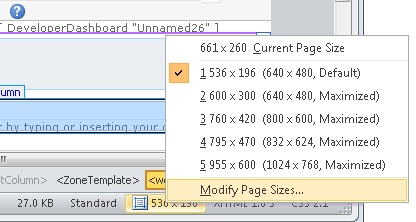
Other features provided by SharePoint Designer to help you with your page modifications are Visual Aids, with which you can see some of the aspects of the underlying code in Design view, and the ability to set Design view to specific dimensions. The current dimensions used to display the page in Design view are shown in the status bar. Click the dimension in the status bar to change the page size, as shown in Figure 6-26. If the dimension that you want to use for your page is not shown, you can create your own dimension by clicking Modify Page Sizes.
Note
You should not rely on how the page looks in SharePoint Designer; you should frequently test your page in the browsers used by visitors to your site. When you have your page in Edit mode, on the Home tab you can use the Preview In Browser command in the Preview group to open the page using one of the browsers installed on your computer as well as the size of the page to match the screen sizes your visitors might have. You can edit the browser list used in the Preview In Browser command to meet your needs. You should never design a page that causes a visitor to your site to scroll to the right to see all the content of the page.
SharePoint Designer includes many of the same commands on its ribbon as you used in the browser when using the SharePoint server ribbon. You can add static text, links, tables, images, and Web Parts by using the Home and Insert tabs, as shown in Figures Figure 6-27 and Figure 6-29.

Other tabs will appear as you click different page objects. For example, if the cursor is within a table object, then the Table Tools tab set will appear and display the Layouts tab. These are known as contextual tabs. The server ribbon for SharePoint sites in the browser behave in a similar manner.
The Home tab provides some additional commands beyond those offered on the server ribbon Format Text tab that you see in the browser, including quick access to editing tools and a spelling checker. You can also quickly open the page that you’re editing in the browser. You use this command to frequently check your modifications, because although the Design view tries to mimic how a page would look in the browser, it does not fully implement all the features of the browser. For example, it does not execute client-side code and posts back to the server to simulate user interaction with the page. Therefore, the hyperlinks on the page do not respond as they would in the browser. Also the process of using wiki links to create new wiki pages or link to existing pages in the Site Pages library does not work.
In the Editing group, there are a number of commands that are not available in the browser: the Advance Mode command, which is discussed in the next section, as well as the Skewer Click and Quick Tag Editor. To use the Skewer Click command to simplify the editing of the page, perform the following steps:
On the Home tab, in the Editing group, click Skewer Click.
The cursor changes to display three overlapping rectangles.
Click an object on the page such as an image.
A drop-down menu displays the HTML that immediately surrounds the object and then lists other parent tags relevant to this object.
Click the tag to select an area of the page.
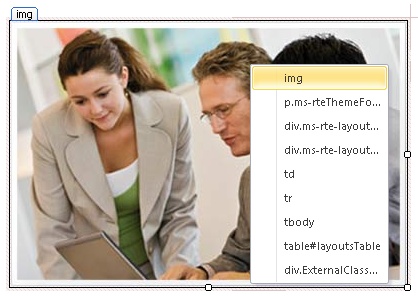
To use the Quick Tag Editor, click the object whose tag you want to modify, and then on the Home tab, in the Editing group, click Quick Tag Editor. The Quick Tag Editor dialog box opens (see Figure 6-28). You can use this dialog box to edit, insert, or wrap the tag selected, without switching to Code view. It also shows you only a portion of the code, making it easier to concentrate on the section of code that you want to edit. Because SharePoint pages contain many objects, some of which are hidden in Design view, to correctly change the correct tag, you might need to use the Skewer Click command or the Quick Tag Select in the status bar below the workspace.

The Insert tab illustrated in Figure 6-29 is similar to the Home tab in that it is always visible when you have a file open for editing. It is also similar to the Insert tab on the server ribbon that you see in the browser, and it allows you to insert tables, images, links, and Web Parts. The addition in the Web Parts group is Web Part zone. You can only add a Web Part zone when the page is in Advanced Edit Mode.

Figure 6-29. Use the Insert tab to place tables, images, links, data views and forms, controls, Web Parts, and symbols.
The Insert tab also contains the ribbon groups, with which you can insert:
The Data View Web Part (DVWP) (also known as the Data Form Web Part [DFWP]) This Web Part can only be created with SharePoint Designer. You cannot create it by using the browser.
Controls SharePoint Designer has a number of task panes, and the Toolbox task pane can be used to insert controls; however, by using the Controls group, you can quickly add HTML, ASP.NET, and SharePoint controls to your page.
Symbols Use this to insert special characters into your page.
Tip
INSIDE OUT Web Part Zones on wiki pages
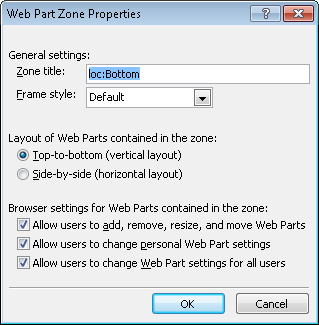
As you look at the controls on the home.aspx page in Code view, you might also discover that the page contains a Web Part zone named Bottom, and although the Web Part zone’s properties are set to allow users with a browser to interact with Web Parts place in the zone, as shown in Figure 6-30, you cannot add Web Parts to this Web Part zone by using the browser. On wiki pages, only content within the EmbeddedFormField can be modified with a browser. With SharePoint Designer, you can add Web Parts to the Bottom Web Part zone. You can add other Web Part zones to a wiki page; however, these and any Web Parts that they contain, like the Bottom Web Part zone, will not be visible when the page is in Edit mode while using the browser.
When you save your webpage, if your page contains an EmbeddedFormField, then a SharePoint Designer dialog box is displays, stating that the content might be changed by the server to remove unsafe content. This is the same sanitization process that occurs when you save a wiki page by using the browser. When you click Yes in the dialog box, the page is reloaded so that you can see the result of the save.
To manage pages by using SharePoint Designer, in the Navigation pane, click Site Pages to display the pages gallery and to display the Pages tab, as shown in Figure 6-31. The Pages tab contains an Edit group, with which you can delete and rename a page, navigate to the page settings, and edit the page in Safe Mode or Advanced Mode. With the Actions group, you can reset a page to its site definition or set a page as the home page for the site.

Use the Manage group to:
Preview the page in the browser.
Open a browser window to display the administration webpage for a page.
Check out, check in, or undo check out.
Import or export files from the Site Pages library.
Open the Site Pages settings page in SharePoint Designer.
With SharePoint Designer, you can create a number of types of different files, including ASPX and Web Part pages. You cannot create a wiki page or site definition files. The browser is the best method for creating wiki pages, and you should use Visual Studio to create and deploy site definition pages. However, if you create new wiki pages in the browser and do not enter any content, the EmbeddedFormField control in SharePoint Designer is displayed as a thin line, and you will need to go into Code view initially to enter content. If you do not do this, then you will accidently enter content into the Bottom Web Part zone.
To create a Web Part page, perform the following steps:
In the Navigation pane, click Site Pages to display the Site Pages gallery.
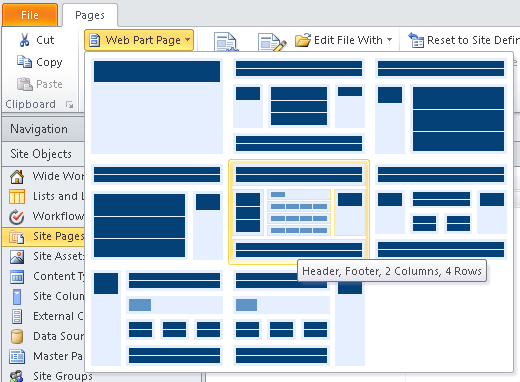
On the Pages tab, click Web Part Page, and then select the Web Part zone layout for the page.
These are the sample template layouts that you used in the browser when you created a Web Part page.
A file, Untitled-1.aspx is created and displayed in the Site Pages gallery, with Untitled_1.aspx selected.
Type the name that you want to use for the page, and then press Enter to rename it.
To edit the page, on the Pages tab, in the Edit group, click Edit File.
To create an ASPX or HTML file, perform the following:
In the Navigation pane, click Site Pages to display the Site Pages gallery.
On the Pages tab, click Page, and then select either ASPX or HTML. The file, Untitled-x.aspx, is created, where x is a number that makes the page name unique.
By using this method, the newly created ASPX or HTML files do not contain any controls; specifically, they do not contain the EmbeddedFormField control or Web Part zones, so they do not contain any regions that are editable in Safe Mode. You will need to edit the pages in Advanced Edit mode; that is, these pages are not associated with a site definition file, and the entire contents of the page is stored in the content database.
To create a file from a master page, perform the following procedure:
In the Navigation pane, click Master Pages to display the Master Pages gallery.
On the Master Pages tab, in the New group, click Page From Master.
The Select A Master Page dialog box opens, in which you can select to create a page from the master page designated as the site’s master page or a specific master page. Custom master pages are used on publishing sites, which is a SharePoint Server feature.
Alternatively, in the Master Page gallery, right-click the appropriate master page, and then in the shortcut menu, click New From Master Page.
Another way to create webpages as well as other file types is as follows:
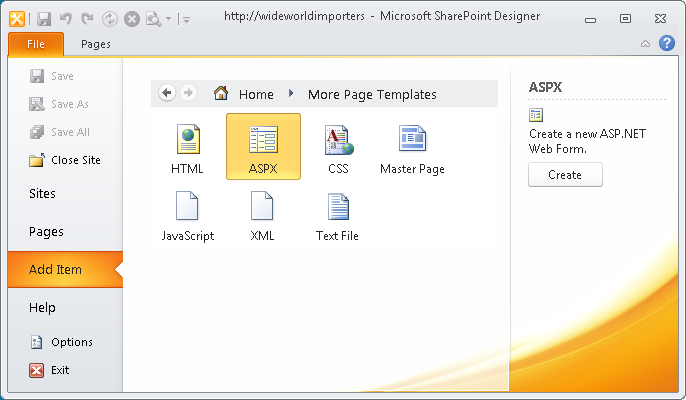
Click the File tab, and then click Add Item.
In the middle pane, you can create a Web Part Page or a New Page From Master. For other file types, click More Pages.
Select the page type that you want to create, and then click Create.
Tip
INSIDE OUT Site definition pages and SharePoint Designer
Using SharePoint Designer, you cannot create a site definition page, but you can create a page from a site definition by copying an existing site definition page. This allows you to have the same performance benefits as the original file. Another benefit is that you can maintain the same look and feel across a set of pages. For example, if you added a completely new page to your original site—for example, if you replaced default.aspx with a different file rather than making changes to the existing default.aspx file—the new page has no site definition association. If for any reason the site definition file changes, such as when your company upgrades to the next version of SharePoint, then the new page might not look like the other pages in the upgraded site, nor can it be reset to look like them.
Up to this point in the chapter, you have opened the webpage in Safe Mode, where you are unable to modify specific areas of the page. In Safe Mode, you can only edit the content in the EmbeddedFormField control or modify and insert Web Parts in Web Part zones. Both of these components are placed into an area of the page called PlaceHolderMain. On the Home tab, in the Editing group, there is a new command for SharePoint Designer 2010 called Advanced Edit Mode, which was not part of SharePoint Designer 2007. In SharePoint Designer 2007, you could only edit files in Advanced Edit Mode.
In Safe Mode, you are changing content that is not stored within the page, but instead is stored in tables in the content databases. In Advanced Edit Mode, you can modify content that is stored in other areas of the page. Therefore, if the page is a site definition page, SharePoint will take a copy of that file from the SharePoint server’s file system—usually the subfolder in the SharePoint root directory—apply your changes, and then store the file in the content database. This process, known as customizing a page, was described earlier in this chapter, in the section Site Template Pages.
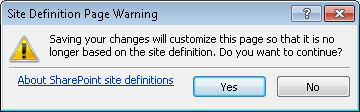
If you edit a site template page in Advanced Edit Mode and modify content outside the EmbeddedFormField or Web Part zones, then the Site Definition Page Warning dialog box is displayed, as shown in Figure 6-32.
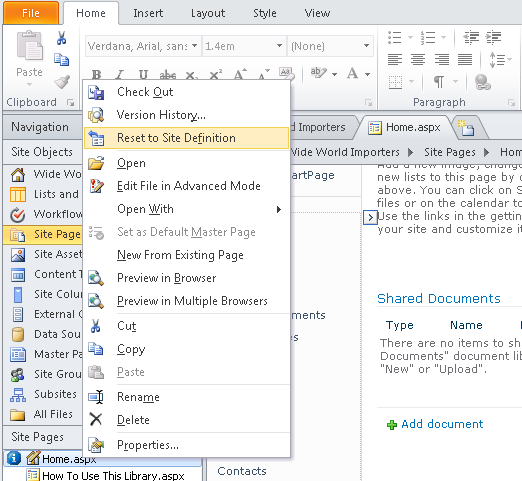
In the Site Pages gallery, a blue circle surrounding a white “i” character is displayed to the left of the page. This indicates that the page is a site definition file that has been customized. To reset the page back to the site definition file, right-click the file, and then in the shortcut menu that appears, click Reset To Site Definition, as shown in Figure 6-33.
When you reset a page back to its site definition page, the contents of the page is replaced with the original contents of the site definition file and a backup copy of the current page is created. However, remember that content in areas of the page, for example, in the Embedded FormField control and Web Part zones, are not stored in the page; therefore, when the page is reset to the site definition file, if the site definition file contains those areas of the page, then the content for those areas is still retrieved from the content database.
If a Web Part zone exists in a customized (unghosted) page but not in the site definition, upon the reset to site definition, the Web Parts from that Web Part zone might have been moved into the bottom zone on the page.
In Advanced Edit Mode, you have the full range of tools to modify the page; for example, tabs are available that normally are not when the page is in Safe Mode, such as the Style and Layout tabs. Unfortunately, there is no ribbon command to switch the editing mode from Advanced to Safe. If you have the page in Advanced Edit Mode, you will need to close the page and then open it again to edit the page in Safe Mode.
SharePoint Designer also provides a number of task panes that help you to create solutions and customize your pages. Some task panes are displayed automatically when you complete a task. To display a task pane, on the View tab, in the Workspace group, click the down-arrow for the Task Panes command. However, most of these task panes can only be used when a page is in Advanced Edit Mode, and then only if you are working with certain components. For example, the Behaviors task pane can only be used to enter small predefined scripts or CSS attribute sections in the page when you are editing the page in Advanced Edit Mode. In Safe Mode, the Insert button in the Behaviors task pane is inactive.