
Creating and Modifying Content Pages by Using a Browser
Using SharePoint Designer to Create and Modify Webpages
Creating Application Pages for SharePoint Sites
In Microsoft SharePoint Foundation 2010, there is a change of emphasis: a SharePoint site is now seen as a collection of webpages. In Microsoft Windows SharePoint Services 3.0, a site was seen as a container for list and library data, and webpages were used to display data held in the lists and libraries. The webpage most commonly used, was the Web Part page where the addition of static text and images was possible only by adding the Content Editor Web Part (CEWP) or the Image Web Part. Such pages can be changed by using the browser, but many users did not find the mechanism for changing these pages to be easy. Wiki sites in Windows SharePoint Services 3.0 used wiki pages stored in a wiki page library. On other sites you could create a wiki page library and use wiki pages.
In SharePoint Foundation, when you create a new Team Site, SharePoint creates a wiki page library, named Site Pages, in which the webpages are stored and new pages are stored when created. These pages have been enhanced and are easy to change. Web Part pages are still used in SharePoint Foundation and are the default type of page on sites such as Group Work sites, Meeting Workspaces, and Blog sites. Web Part pages can also be used on Team Sites, but on such sites, they are usually used for list views, list item edit forms, and list item display forms.
Note
Wiki pages and Web Part pages are known as content pages or site pages because they contain the content that is unique to a site.
Another type of page that you will see on SharePoint Foundation sites are application pages, which are also known as system pages. You can identify these pages by the word “_layouts” in their URL. Application pages cannot be changed by using the browser or SharePoint Designer 2010. They contain the same information or type of links no matter which site you are on and can be shared across all sites on the server. The site settings page is an example of an application page. Application pages are stored on the SharePoint server file system and are never stored in a SharePoint SQL Server content database.
This chapter introduces the basic concepts of content pages and application pages. Using the browser, you will learn how to view content pages in different ways as well as how to change the appearance of these pages by adding and removing static text and images. You will learn how to use SharePoint Designer to create and customize your pages, and then you will learn how to use Microsoft Visual Studio to create application pages.
The first page you see on a Team Site is known as the home page, because as with any website, this is the page on which all site visitors start. As you click the links on the Quick Launch, you are directed to other pages that display the site’s content, such as when you click the Shared Documents link and are taken to the All Documents view. This page dynamically changes as you upload, modify, and delete files in the Shared Document library. You might also have pages that contain static text and images that describe, for example, the company’s expenses policy and contains links to other pages that are related to that information. Your site can comprise pages that contain both static text and dynamic content. This approach of thinking of your site as a number of pages is more natural and in line with websites that are not based on SharePoint, where each site is a collection of webpages, and those webpages are interconnected.
In SharePoint Foundation, you use two types of content pages: wiki pages and Web Part pages. When you display these pages in the browser, it’s hard to differentiate between the two page types. However, when you place the pages in edit mode, then you can tell the difference. You might also be able to differentiate between them, if you know the type of site you are working with. Wiki pages are the default pages when a site is created from the Team Site template. Wiki pages consist of a mix of free-format static text and images as well as Web Parts, whereas you can only add Web Parts to Web Part pages by using the browser. Web Parts are reusable components that can contain any type of web-based information, including analytical, collaborative, and database information.
Note
You can find more details about Web Parts in Chapter 7.
Both wiki pages and Web Part pages are flexible and highly customizable by using three types of tools:
No one tool can do everything, and therefore, it is likely that in any deployment of SharePoint Foundation, all three tools will be used at some point.
Whatever type of content page you display in the browser, the ribbon will display at least the following two tabs:
Browse One of the biggest advances of SharePoint Foundation over previous versions is the incorporation of the ribbon into the user’s browser experience. However, there can be occasions when you prefer that it not be displayed. This is when you should use the Browse tab. To make the ribbon visible again, click one of the other tabs.
Page Use the Page tab to manage the wiki pages on your site. More information on this tab is detailed later in this chapter.
The Composition of a SharePoint Page
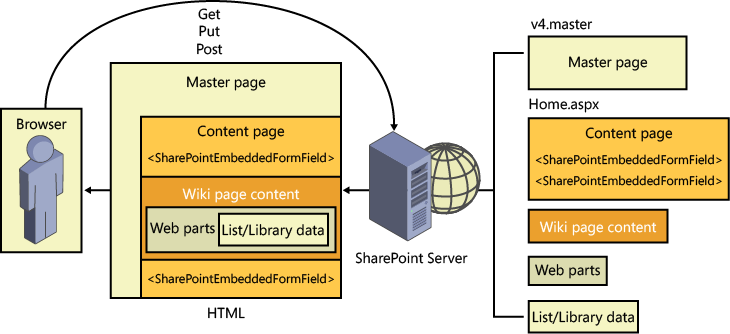
When you enter the URL of a SharePoint site into a browser’s address box, the browser contacts the SharePoint server, which duly responds with a number of components that the browser then uses to present the information to you. These components can include an HTML file that contains content and instructions on the data structure, cascade style sheet (CSS) files that contain format and layout instructions, and JavaScript files that contain client-side code that the browser uses to respond to the interaction you have with the page. On the SharePoint server, the HTML file is created from the combination of two Microsoft ASP.NET pages: a master page and a content page, as well as the wiki page content that you might have entered, such as text and images, Web Part details, and list and library content that you might have included on your page, as shown in Figure 6-1.
A master page is a special ASP.NET 2.0 page that is used to provide a consistent appearance and navigation for each page within one or more sites. A master page cannot be viewed by a browser, but you can view and customize a master page by using SharePoint Designer.
Note
For more information about master pages, see Chapter 14.
On a wiki page, the content that you enter in the browser is placed in an Embedded FormField SharePoint control. A Web Part page is composed using similar components, except that it has no wiki page content; therefore, it has no EmbeddedFormField SharePoint control. When you use the browser and add, delete, or modify Web Parts, those Web Parts are placed in the WebPartPages WebPartZone control. Using SharePoint Designer, you can modify the content within both of these controls, and when you are in Advanced Edit mode, you can also modify content that resides elsewhere on the page (more on this later in the chapter).
Sites are grouped into a Site Collection, and the content for all sites in a Site Collection are stored in one Microsoft SQL Server content database. A content database can contain content from one or more Site Collections. The content database contains a number of tables. For example, the AllDocs table is the main table that contains the information about files, such as webpages and documents that you might attach to list items or upload into libraries. This table contains the contents of the file as well as the file’s properties, such as file size, the person who created the file, and whether the file is checked out, and if so, the name of the person who checked it out. The Sites table stores information about sites, and when you add a Web Part to a page, then that information is stored in another SQL table, AllWebParts. The information for lists and libraries is stored across a number of tables.
When you request a content page, such as the home.aspx page for a Team Site, the following events occur:
The home.aspx page is retrieved as well as any files that the home.aspx page references, such as the master page.
The business logic for controls that the home.aspx and the master page contain is executed, which can produce additional HTML and links to files such as CSS, JavaScript, and image files.
The site properties are retrieved. The properties include the site title, permissions, and the links that should be shown on the Quick Launch bar.
The home.aspx page properties are retrieved, including its title, the information of the data stored in the EmbeddeFormField control, and whether it contains any Web Parts.
If the page contains any Web Part zones, information of the Web Parts they contain is retrieved.
The Web Parts’ properties and any data they contain are retrieved. If the data to be presented in the Web Part is stored in lists and libraries, that data and associated properties, such as permissions is then also retrieved.
The master page, the home.aspx page and all the data retrieved (taking into account the security settings of the user) are merged to form one HTML page.
The merged HTML page together with any other files, such as CSS and JavaScript files, is sent to the browser.
The browser parses and interprets the content of the files it has received, executes any client-side code that might produce additional HTML and page content, and then renders the page.
The logic that is executed on the SharePoint server is called server-side code, and the logic that the browser interprets and executes is called client-side code.
On a Team Site, the default webpages are wiki pages, and the home page of such sites is a wiki page. Wiki pages are stored in a SharePoint Foundation–based wiki library, named Site Pages, which by default inherits its permissions from the site. Therefore, anyone who is mapped to the Contribute permission level at the site level—that is, anyone who is a member of the site’s Members SharePoint group—is allowed to change any wiki page or create new pages. If a page is found to be incomplete or poorly organized, any member of the site can edit it as necessary. Therefore, as users share their information, knowledge, experience, ideas, and views, the content evolves. Site members can work together to change or update information without the need to send emails or attend meetings or conference calls. This is known as open editing. All users are allowed to control and check the content because open editing relies on the assumption that most members of a collaboration site have good intentions.
Tip
INSIDE OUT What happened to the Wiki Site template?
In Windows SharePoint Services 3.0, it was possible to create a site from the Wiki Site template. The default webpages on this site were also wiki pages that were stored in a wiki library, named Wiki Pages. In SharePoint Foundation you can no longer create new sites based on the Wiki Site template. However, you can create new wiki libraries on any site. SharePoint Server 2010 provides a new type of wiki page that is created when you create a site based on the Enterprise Wiki site template, which is built on the SharePoint Server publishing infrastructure Site Collection feature. You can find more information about Enterprise Wikis at http://technet.microsoft.com/en-us/library/ee721055.aspx.
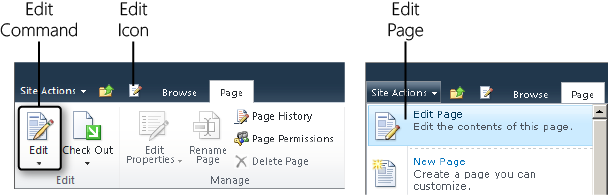
You can edit a wiki page by using one of the three methods described here and shown in Figure 6-2:
When a wiki page is in Edit mode, the Editing Tool contextual tab set appears, which contains two tabs: Format Text and Insert (see Figure 6-3). These tabs appear when you enter content in a CEWP, and just like with the CEWP, you are provided with a What You See Is What You Get (WYSIWYG) environment for adding content to your page. Using these tabs, you can format the text, control the layout of the page, as well as insert tables, images, and hyperlinks.

To format your text, use the Format Text tab. Select the text that you wish to format, and then click the appropriate command in the ribbon. To include new static text on your page, place the insertion point in the area of the page where you want the text to appear and then begin typing. The Format Text tab contains seven ribbon groups: Edit, Clipboard, Font, Paragraph, Styles, Layout, and Markup. Each group is described in the sections that follow.
Use the commands in this group to save and close the page, save and keep editing the page, and stop editing the page, which means any changes you make to the page will be lost. The other two commands in the Save & Close drop-down list—Edit and Edit In SharePoint Designer—are inactive. These commands are available on the Page tab, when the page is not in Edit mode.
The other set of commands in this group can be used to check out the page. Any team member mapped to the contribute permission level, which on most Team Sites is most users, can amend the wiki pages of the site. When you edit a page, you should always check it out before you modify the content. This prevents other users in your team from editing the page at the same time. Once the page is checked out, the Check In, Discard Check Out, and Override Check Out commands are available.
Check Out locks the page so other contributors cannot edit the page; however, while the page is checked out to you and in Edit mode, you will be the only person to see the changes that you’re making to the page.
Use the commands in this group to cut, copy, paste, undo, and redo your modifications. These commands are placed in a group named Clipboard because they use your computers clipboard feature; therefore, you are able to copy and paste content from other applications and websites. The paste command, by default, maintains the formatting from the copy or cut source. To paste the unformatted text, click the down-arrow on the Paste command button, and then click Paste Plaintext. When pasting content from other programs, such as Microsoft Word, the formatting instructions can be verbose and might not generate the most efficient HTML code; therefore, use the Paste Text command, unless you specifically created the text in Word to generate the formatting you required, such as a table.
As with other Microsoft applications, you can use the standard shortcut key combinations to complete these commands; for example, press Ctrl+C to copy selected text, and Ctrl+V to paste the copied text. Use Ctrl+Z (undo an action) and Ctrl+Y (redo an action) to cycle through the history of changes. If you do inadvertently paste content with the format and later decide that you want to remove that format, use the Clear Format (Ctrl+Space) command in the Font group.
Use the set of commands in this group as you would in other Microsoft Office applications to change the font face, font size, font color, as well as formatting text to a specific style—bold, italics, underline, strikethrough, subscript or superscript—just as you would in Word, for example.
Use the commands in this group, which again are similar to those you would find in Word, to arrange the text on the page as bulleted lists, numbered lists, to increase or decrease the indent level, and align a paragraph Left, Center, Right or Justify. You can also choose to display the paragraph for the selected text so that it displays in left to right or right to left reading order. This is primarily used for languages that read right to left.
Use this method of formatting text in preference to the commands in the Font group to consistently apply styles across all wiki pages in your site. Select the text that you wish to format, and then use the Styles drop-down list to select a style. Similar to any Office 2010 application, a preview of the styling is provided when you hover over the style command, as shown in Figure 6-4.
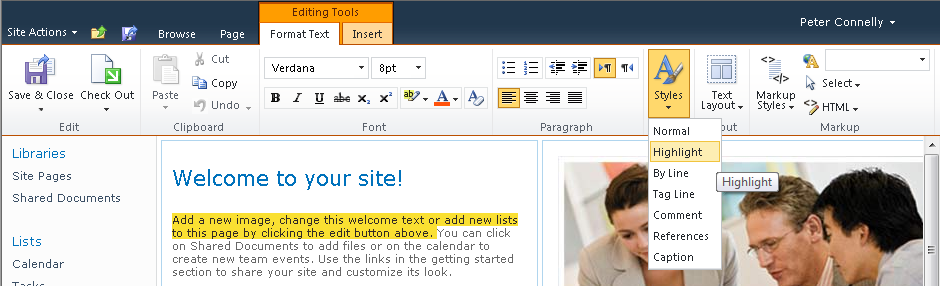
Figure 6-4. You can apply a style to text by using the Styles command. Hovering over an item in the list displays a preview of the text formatting.
The drop-down options for both the Styles command and the Markup Styles command in the Markup group are populated dynamically by client-side code using Microsoft ASP.NET Ajax and the CSS classes that are available for the wiki page when you place it in Edit mode. For each style that appears in the Styles drop-down list, there is a matching CSS class in the corev4.css with a name. ms-rteStyle-SSSS, where SSSS is the style name in the drop-down list; for example, .ms-rteStyte-Highlight. The CSS for this style is shown in the following code sample:
.ms-rteStyle-Highlight
{
  -ms-name:"Highlight";
  /* [ReplaceColor(themeColor:"Dark1-Darker")] */
  color:#312a26;
  /* [ReplaceColor(themeColor:"Accent6")] */
  background-color:#fae032;
}
Tip
INSIDE OUT So what is Ajax?
Ajax is not a programming language. It was originally an acronym for Asynchronous JavaScript and XML. Today, the term used to represent a combination of related web development methods that allows the browser to send and retrieve data asynchronously from the server without the need to reload the webpage. When a user interface (UI) object is selected by a user and the logic for that object is implemented by using Ajax technologies, the user does not have to wait for the page to refresh to see changes on the page. As a result, users experience a more responsive application. An overview of user experience approaches can be found at http://msdn.microsoft.com/en-us/library/ff798414.aspx. The World Wide Web Consortium (W3C) schools site contains a tutorial for Ajax that you can find at www.w3schools.com/ajax/default.asp.
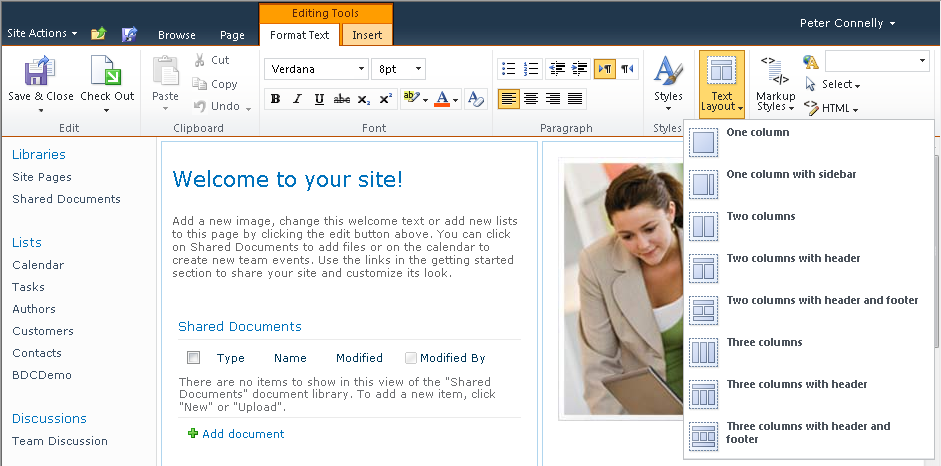
When you create a Team Site, the home page, with the Rich Content area, has two rich text editing areas (also known as divisions) structured as two columns. Use the Text Layout command in the Layout group to create additional editing areas and to change the structure of your page. You can reformat the page by using any of the eight options shown in Figure 6-5. A thumbnail to the left of each option provides a view of the editing areas and structure that will be applied to the Rich Content area when selected.
The Layout group and the Text Layout command are not available when you add content to a CEWP. The Rich Content area of a wiki page is created by using a SharePoint control named EmbeddedFormField, with which you can modify the layout of the wiki page by using the Text Layout command. This command creates the rich text editing areas and the layout you choose by using HTML <TABLE> and <DIV> tags. The rich text editing areas are not Web Part zones.
When you select a layout that has fewer rich text editing areas than the current layout, then the content from the area not included in the layout is combined into an area that is included in the layout.
Note
If you are using SharePoint Server 2010 and working on a publishing or enterprise wiki page, then the Format Text tab you see in the ribbon is very similar to the Format Text tab on wiki pages. However, on publishing and enterprise wiki pages, there is no Text Layouts command but a Page Layout button.
This ribbon group provides four commands:
Markup Styles Use this command to format text by using a markup style, such as Heading 1, Colored Heading 1, or Paragraph. For each style that appears in the Markup Styles drop-down list, there is a matching CSS class with a name .ms-rteElement-SS, where SS, and the –ms-name property of the class is the style name in the drop-down list; for example, the class .H1.ms-rteElement-H1 has a –ms-name property of “Heading 1”. These styles are defined in the corev4.css file.
Languages When a SharePoint site is created, it is defined with a default language. A lang attribute appears in the <HTML> tag for each page of the site—this is the webpage’s primary language. When you incorporate text in your page that is of a different language, select the text, and then use this command to identify the language of the text. This surrounds your text with an HTML <SPAN> tag with the lang attribute. The lang attribute, whether it is applied to a webpage or a portion of a page, is used by search engines to identify pages that include text in specific languages. Therefore, when a user specifies in a search engine to return only pages of a specific language your page would appear in the search results if it meets the search criteria. The lang attribute is also used by some screen reader applications, such as JAWS, so that they can pronounce words correctly when they read them out loud.
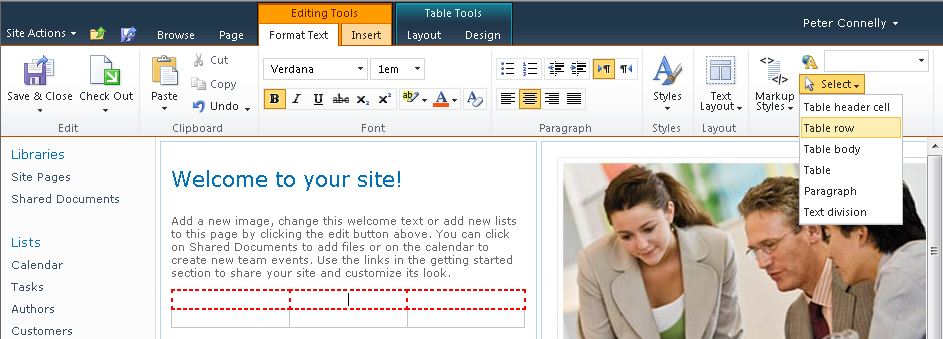
Select Use this command to select all the text of the parent tag; for example, you might have created a table and want to select a specific row in that table. Place the insertion point in a cell in the row, use the Select command to highlight the row, and then format or style the row. A red dotted line surrounds the area related to the HTML tag when you hover over the each tag, as shown in Figure 6-6.
The inner tags are listed at the top of the drop-down list, and the most outer parental HTML tag—Text Division—is listed as the last item on the drop-down list. The Text Division tag represents the column in which the select text appears.
HTML This command provides two options: Edit HTML, and Convert To XHTML. The Edit HTML option opens a plain-text dialog box that displays the HTML code in a fixed-width font. The HTML for the whole wiki page is not displayed, only the HTML that is displayed in the division of the EmbeddedFormField SharePoint control, where you had placed the cursor. For example, if you have a two-column layout and you place the cursor in the left column, only the HTML for the left column is displayed in the dialog. The commands available on the ribbon support only a limited number of features; for example, you cannot format the line type of a table. Unfortunately, no IntelliSense is provided, so it might be easier to use SharePoint Designer to modify the contents of the EmbeddedFormField control if you have limited knowledge of HTML or you have a considerable amount of HTML code to write. The section, Writing Standards-Based Code, later in this chapter, details the code that you can enter in this text box and the validation process that occurs when you save the page.
Note
You can learn more about how to extend the server use experience, including modifying and the addition of tab sets, groups, and the ribbon commands, in Chapter 15.
When the wiki page is in Edit mode, a second Editing Tools tab labeled Insert displays, as shown in Figure 6-7. This presents a number of objects that you can now add to a wiki page that you could not in Windows SharePoint Services 3.0. You can mingle these objects with text anywhere within a wiki page.
The Insert tab contains four ribbon groups: Tables, Media, Links, and Web Parts, which are described in the sections that follow.
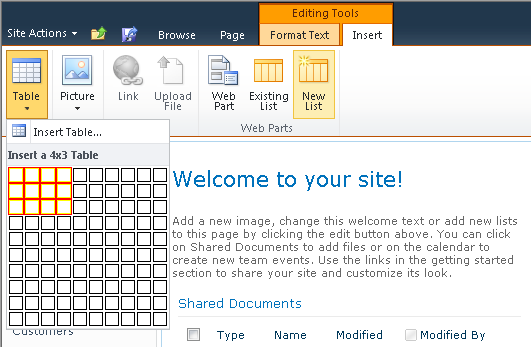
Click the down-arrow on the Table command to add an HTML table. You can use the grid provided to quickly create a table by dragging the mouse across the grid to select the number of columns, and then drag the mouse down the grid to select the number of rows. On the Table drop-down menu, you can also click Insert Table, which displays a dialog in which you can type the number of columns and rows that you need.
Note
The maximum number of cells that a table can contain—that is, the number of rows multiplied by the number of columns—is limited to 625.
Once the table is created, an additional tab set, Table Tools, is added to the ribbon. This contains two tabs, Layout and Design, as shown in Figures Figure 6-8 and Figure 6-9.

The Layout tab consists of four groups:
Table The Show Grid Lines command can be used to display the cell boundaries of the table, when the table is not configured with borders.
Merge Use the commands in this group to combine or split cells. You can only merge two cells to a single cell.
Rows & Columns Use this group to add and remove rows and columns. You can also use the Delete drop-down menu to delete the table.
Width & Height Use the commands in this group to resize your table as well as resize a column or row. You can select a size by using up or down-arrow on the controls, or you can type a specific number followed by % or px to specify the unit of measurement.
Properties This group contains a Summary text box. You can use this to type summary information that will display to site visitors and screen reader applications when the table is not visible.
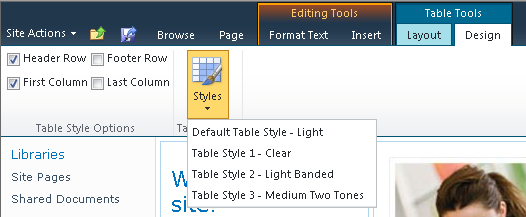
The Design tab contains two groups:
Table Style Options Use the four check boxes to select the table components for which the special formatting selected in the Table Styles group should be applied. For example, select Header Row and Footer Row to apply the special formatting to the first and last rows of your table.
Table Styles Use this command to format the entire table by using one of four preformatted table styles. As you hover your mouse over each style, the style is applied to the table in preview mode. Each preformatted table style is a collection of CSS classes. When you click the style in the Table Styles menu, the CSS classes from the style sheet linked to the page are dynamically applied to the table. The naming standard for these styles are ms-rteTable XXX-NNN, where XXX is the table section, such as, HeaderRow, HeaderFirstCol, OddCol, EvenRow and FooterLastCol, and NNN is the name to identify the table styling. These styles are defined in the corev4.css file. An example of one of the default styles is shown in the following example:
.ms-rteTable-0 {
  -ms-name: "Table Style 1 - Clear";
  border-width:0px;
  border-style:none;
  border-collapse:collapse;
}
Click the Picture command down-arrow to insert a picture from your computer or to reference a web address where a picture is currently stored. No longer do you need to upload your images prior to editing the page. Using the first option, the Select Picture dialog opens in which you can now both upload and add an image to the page with one click of the mouse. Use the Select Picture dialog box to browse to the location on your computer where the picture is stored. You can then select a library on your site where you want to upload the picture. By default the Site Assets library is chosen. The Site Assets library is the location where site supporting files, such as images displayed on pages, CSS files, or JavaScript files should be stored. Do not combine team documentation with files that are needed to brand a site.
If the image is already uploaded into a library, then the Picture, From Address drop-down menu option opens the Select Picture dialog, where you need to manually type or paste the URL of the image. The dialog does not provide any browse button with which to navigate to the library where the picture is stored. To guard against you typing the incorrect URL of the image, which would result in a broken link, it is easier to open another browser window, navigate to the picture and copy the URL, and then paste the URL into the Select Picture, Address text box.
Once an image is added to a page and that image is selected, the Picture Tools contextual tab set appears, as shown in Figure 6-10. When a picture is selected, you can press the Delete key to remove it from the page.

This Picture Tools tab set contains one tab, the Design tab, which contains five ribbon groups:
Select This group contains the Change Picture drop-down menu, with which you can change the image that is displayed on the page. This menu provides you with the same options as the Picture command on the Insert tab.
Properties Use the commands in this group to replace the image on the page and set the alternative text for the image. You can replace an image by typing the URL in the Address text box. Use the Alt Text text box to type text that displays in place of an image if that image does not load. This also provides text for screen reader applications. Append a period to the end of the words you enter so that users listening to screen readers are able to understand your content more easily, especially when two alternate text tags are next to each other.
Styles Use this command to format the borders of the image by using one of five preformatted image styles. As with other style commands described in this chapter, these border image styles are controlled by CSS rules in the corev4.css file. The standard used for these styles are ms-rteImage-x, where x is a number, such as:
.ms-rteImage-0 { -ms-name:"No border";}Arrange Use the Position command drop-down menu to arrange the image on the page. The drop-down provides two Float styles (Left and Right) and three Inline Styles (Top, Middle, and Bottom) that are defined in the corev4.css file, such as:
.ms-rtePosition-1 { -ms-name:"Left";float:left;}Size Use the commands in this group to reduce the size of the image on the page. These commands do not alter the image file, but place width and height attributes on the <IMG> tag. The browser uses these attributes to display the image file differently than the physical size of the image, as stored in the image file. For prototyping purposes this might be adequate. However, the image file still must be stored on the server and requires network bandwidth when it is downloaded from the server to the client computer, even if the browser then displays the picture smaller than its original size. So if users to your site complain that a page takes more time to load than other pages, you might need to look at the size of the image files.
It is good practice to create image files to the correct size before loading them into the Site Assets library. You can use SharePoint Designer, Microsoft Office Picture Manager, Microsoft PowerPoint, or a third-party image editing tool to resize the image as saved in the file. You can find Picture Manager by clicking the Start Menu, and then clicking Microsoft Office Tools. Resizing the image file can affect the picture quality; therefore, if the same file is needed as different sizes on a number of pages you might find using one picture file does not meet your needs. You might need to provide a number of files at different sizes for the same picture. This process of resizing an image to find the right balance between file size and picture quality is called image optimization.
On the Insert tab, in the Links group, two commands are provided: the Link command and the Upload File command.
You use the Link command to associate a hyperlink with text on the page so that when you click the text you are directed to the page associated with the hyperlink.
The Insert Hyperlink dialog does not provide you with any options to configure the hyperlink to open in a new browser window; therefore, when the user clicks the hyperlink, he is redirected from the wiki page and will need to use the browser’s back button to return to it. However, once you add a link to the wiki page, the Format tab within the Link Tools tab set is displayed, which you can use to remove the link, edit the URL, display an icon to the left of the hyperlink and configure the hyperlink so that when a user clicks it, the page that the hyperlink is pointing to is displayed in a new tab, and the user is not redirected from the wiki page. You can also associate a description with the hyperlink which displays when a user hovers over the hyperlink. This is sometimes known as a ScreenTip; you should configure this for accessibility reasons.
Tip
INSIDE OUT Opening a new browser window
If you want a new browser window to open when the user clicks a link, you can use the Edit HTML Source command in the Markup group on the Format Text tab to add a target=“_blank” attribute to the <A> tag. However, before you make any changes, verify that this is permissible; your organization might have a stated policy with regard to opening a new browser window. Generally, you should only open a new browser window in scenarios such as displaying a printable version of a webpage and large images. You can find expert usability references on this topic at www.sitepoint.com/article/beware-opening-links-new-window, and by using the search keywords, opening, new, browser, window, usability.
You can use the second command in the Links group, the Upload File command, to upload a file and store that file by default into the Site Assets library, in one action, and then create a hyperlink pointing to the file that you have just uploaded. An icon appears to the left of the hyperlink, indicating the type of file the hyperlink points to.
If you want to create a link to an existing wiki page, it is easier to use a method known as wiki links or forward links than it is to use either of the two commands on the Links tab. You’ll read more about wiki links in the section Creating Wiki Pages, later in this chapter.
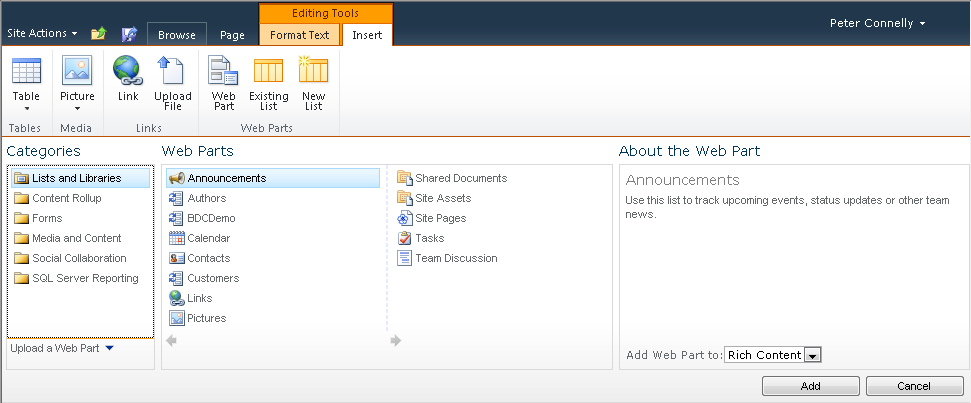
This group provides commands to insert Web Parts into your wiki page. When you click the Web Part or Existing List commands, the Web Parts pane is displayed at the top of the page, below the ribbon, as shown in Figure 6-11.
Web Parts, if not fully tested, can cause a page to not display in the browser. If this occurs, append ?contents=1 to the page’s URL to navigate to the page’s Web Part Page Maintenance page, where you can close, reset, or delete the offending Web Part. You can use this page to delete all Web Parts from the page.
The two most commonly used types of Web Parts via the browser are:
XSLT List View (XLV) Web Parts These are Web Parts that display the contents of lists and libraries. These Web Parts are displayed in the lists and libraries and lists category. Each time that data in the list or library changes, the changes are reflected in the XLV Web Part. SharePoint Foundation introduced this new version of the List View Web Part (LVWP), which uses Extensible Stylesheet Language Transformation (XSLT) to define how to display the data from lists or libraries.
Built-in Web Parts These are Web Parts that display other content. In SharePoint Foundation, there are 13 built-in Web Parts displayed in five categories.
You can use the third command in the Web Parts group, New List, to create a list or library and then insert a Web Part that displays the contents of that list or library, all in one action.
Note
For more information about Web Parts, read Chapter 7.
Out of the box, SharePoint Foundation complies with the Web Content Accessibility Guidelines (WCAG) 2.0 AA and targets standards-based browsers, such as Internet Explorer (IE) 7.0, IE 8.0, and Firefox 3.x, but not IE 6.0. Although SharePoint 2010 sites use master pages that are based on the XHTML Strict Doc Type, SharePoint sites are not XHTML compliant. If you test a sample SharePoint 2010 site against any of the XHTML validators such as Total Validator (www.totalvalidator.com), XHTML errors will occur, but it should pass US Section 508, WCAG v1 A and WCAG v1 AA standards. Of course, if you create your own pages, including your own master pages, then you could create SharePoint sites that comply with W3C XHTML recommendations. This is not a trivial task, and typically, it includes raising a business case to acquire resources such as a developer and web designer. In addition, such a development would involve strict control of the pages and code, and the introduction of a standards base test of the pages and code in your release management process, from the development environment into the production environment. Such an expenditure might only be approved for your organization’s Internet website.
Note
You can find information about application lifecycle management (ALM) and SharePoint 2010 at http://msdn.microsoft.com/en-us/sharepoint/dd552992.aspx.
XHTML is a stricter and cleaner version of HTML and attempts to reduce the need for browsers to correct invalid client-side code. Without standards, a page can look radically different when rendered by different browsers or even different versions of the same browser. You have also seen earlier in this chapter that the functionality of the WYSIWYG editing environment and the commands provided on the ribbon are dynamically created by using HTML, CSS, and JavaScript, known as client-side code. Therefore, new with this version, to prevent the entry of malicious code, SharePoint Foundation now sanitizes user-entered HTML content that is entered in the wiki page content control when you use the browser or SharePoint Designer 2010.
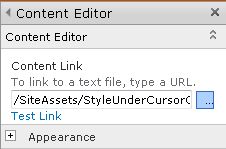
SharePoint validates and changes the code, and if you click the Convert To XHTML in the Markup group on the Format Text tab, it will make the code XHTML compliant. If the user enters JavaScript as well as HTML, then the JavaScript is removed. If you have used a CEWP on your wiki page and entered HTML and JavaScript in the CEWP, SharePoint will sanitize the code in the CEWP, but it will not remove the JavaScript code. However, by sanitizing the HTML code, the JavaScript might not continue to work. This can cause problems, especially with end-users who might not understand the difference between HTML and XHTML, and copy HTML and JavaScript code from samples that they find on the Internet. A workaround is to tell users to copy the JavaScript into a file, which they load into a library such as the Site Assets library, and then within the CEWP, link to the file. Figure 6-12 shows how to reference a file that is stored in the Site Assets library. SharePoint does not follow the link and therefore will not validate the code within the file.
If you do want to incorporate the client-side code within the page, then use the HTML Form Web Part, which you can find in the Forms category of the Web Parts pane. The client-side code you enter into the Text Editor dialog box is not sanitized by SharePoint.
Note
As SharePoint sanitizes the code, extra spaces might appear, this usually occurs when an HTML object is inserted in the middle of <P> and </P> tags, for example, when a table is inserted on the same line as some text. SharePoint tries to modify the code so that the paragraph is added below or above the enclosed HTML object. In the HTML source window, you see the inclusion of  <p> </p> where the spaces are included.
Note
For users who want to learn more about HTML and XHTML, the w3schools website has free tutorials. To check your code against the formal standards, you can use validation services such as those that can be found at www.htmlhelp.com/tools/validator/ or www.w3schools.com/xhtml/xhtml_validate.asp or http://validator.w3.org. You can read details about common errors that are found in HTML code at www.htmlhelp.com/tools/validator/problems.html.en.
There are four methods available for creating a new page by using the browser:
Use wiki links, also known as linking or a forward link.
This is the recommended method for creating new wiki pages because it creates a hyperlink to the new page on an existing wiki page, and users find it easier to find a page when another page is linked to it.
Click Site Actions, and then click New Page.
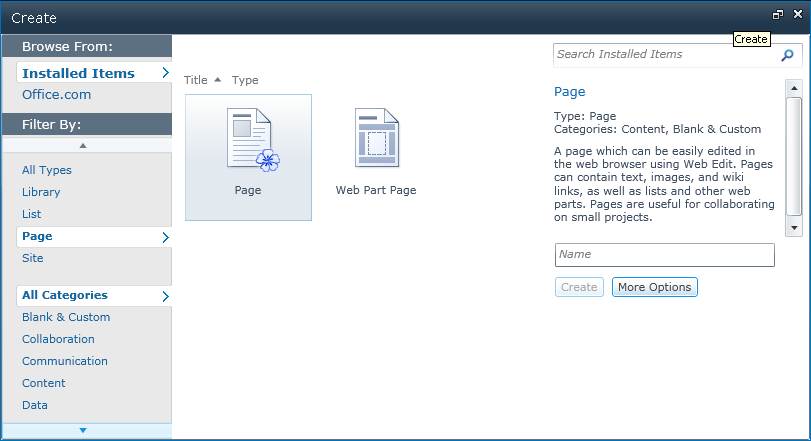
Click Site Actions, and then click More Options. In the Create dialog box, under Filter By, click Page, and then in the middle pane, click Page (see Figure 6-13).
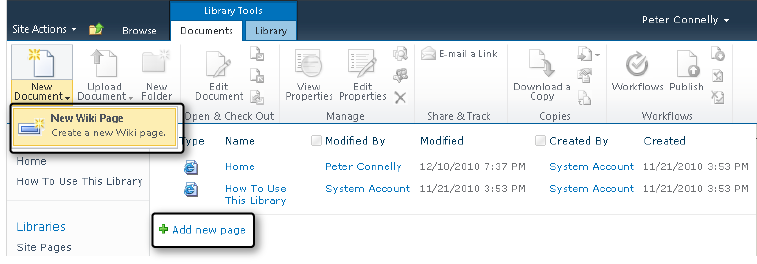
In the All Pages view of the Site Pages library, click New Document on the Documents tab, or below the list of pages, click Add new page, as shown in Figure 6-14.
You might be thinking that you can add a new wiki page template by adding a new content type to the Site Pages library, and then the New Document menu would list two types of pages. Although you cannot do this by using the browser, you can enable the management of content types by using SharePoint Designer, and then associate a content type with the Site Pages library.
Tip
INSIDE OUT Using the Wiki Page Home Page site feature
If you have created a blank site or a site other than a Team Site, and later you decide that you want to have wiki pages as your default pages, you can use a new site feature in SharePoint Foundation called Wiki Page Home Page to enable wiki page functionality. When this feature is activated, it creates a document library with a URL of SitePages that has a name of Site Pages, and then adds a wiki page named default.aspx, which is then set as the home page for your site. You can now create, modify, and delete wiki pages just as you could if the site were created from the Team Site template.
You can create hyperlinks that point to wiki pages by using wiki links. This is a quicker and easier method than using the Links command on the Insert tab. The first wiki site, WikiWikiWeb, was created for the Portland Pattern Repository in 1995 by Ward Cunningham, who devised a system that created webpages quickly—and this method is what is now called wiki links. You can create a wiki link to an existing page or you can create a wiki link to a wiki page that is not created. You can then click on the wiki link to create a new wiki page.
Tip
INSIDE OUT The origins of wiki links
Wiki is the Hawaiian word for quick. To add emphasis in Hawaiian, words are doubled; thus, wiki wiki means very quick. Ward Cunningham used double characters as formatting clues. These formatting clues are standard to many wiki applications. To create a wiki link, you type the name of the page within two set of double square brackets. To display double open or closed square brackets without making a link, type a backslash before the two brackets, such as [[ or ]].
To create a wiki link to an existing page, perform the following:
Open a wiki page in Edit mode and place the insertion point where you would like a hyperlink to the new page to appear.
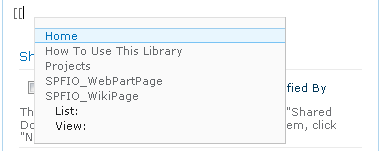
Type [[ to display a list of pages that exist in the Site Pages wiki library.
If the Site Pages library contains a large number of pages, you can filter the list by typing the first few characters of the page name. You can then use your mouse or press the Up and Down keys to select the desired wiki page. You can also type the first characters for the name of the wiki page until only one page remains in the list, and then press Tab. You do not need to type the page name in full; you only need sufficient characters to uniquely identify the page.
Press Enter to close the brackets.
To create a new wiki page by using the forward link method, use the following procedure:
Open a wiki page in Edit mode and place the insertion point where you would like a hyperlink to the new page to appear.
Type [[, and then type the name of the new page. The page name needs to be unique within the Site Pages library, and it will form part of a URL. When you have typed sufficient characters of the page name to make it unique, a message appears stating that the item does not exist.
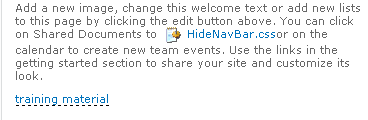
Webpage names are usually short and terse, yet the text on the wiki page that represents the hyperlink are descriptive so that a user who reads the page can make a decision whether to click the link or not. To create descriptive text that is displayed as the text for the link, type | followed by the descriptive text, and then type ]], such as [[TrainingMaterial|training material]].
On the Format Text tab, in the Edit group, click Save & Close. The descriptive text, such as, training material, is underlined with dashes. This indicates that the wiki link points to a nonexistent page.
Click the wiki link.
A New Page dialog appears, stating that the page TrainingMaterial does not exist and asks whether you want to create a new page. Click Create to generate the page in the Site Pages library. In the left navigation pane, above the Quick Launch, a Recently Modified section appears, displaying in modified date order the wiki pages recently modified.
Note
The naming convention for Wiki pages, known as WikiWords or WikiNames, is to concatenate two or more words, where each word is composed of two or more letters, with no spaces between words and where the first letter of each word is capitalized and the remaining letters are in lowercase. This formatting is known as camel case. However you might have your own naming standard for URLs.
Once you have created your pages, to ensure the accuracy of your content, you need to manage them. This is where the Page tab becomes useful. This tab consists of five groups:
Edit When the wiki page is in Edit mode, the two drop-down menus provide the same options that the Format Text tab provides. When the page is not in Edit mode, then you can use the Edit drop-down menu to open the page in SharePoint Designer.
Manage Use the commands in this group to edit the properties of the page, rename the page, view the page history, manage the page’s permission, and delete the page. You cannot rename a site’s home page. The Edit Properties command will be inactive if you have not created any additional columns in the Site Pages library.
A wiki page is just a file in the Site Pages library, and therefore, it can be deleted and have item level permissions, as can any file in any library. Also similar to other files, once a wiki page is deleted, it moves to the site’s recycle bin.
Share & Track This group contains two commands: the E-Mail A Link command, and a split button labeled Alert Me:
The E-Mail A Link command opens a new Mail message, and creates a hyperlink to the wiki page in the body of the email message.
The Alert Me split button allows you to either set an alert on the page or manage your alerts. By setting an alert on a wiki page, you can receive an email or a text message (Short Message Services [SMS]), when the page changes, and you can choose when to receive that message: immediately, daily, or weekly. If at the farm level your SharePoint Foundation installation does not have the outgoing email settings configured, the Alert Me split button is not displayed. If the mobile account settings are not configured, the SMS option cannot be used. Use the SharePoint 2010 Central Administration website to configure outgoing email settings and mobile accounts, which can be found on the System Settings page.
Page Actions This group consists of two commands: Make Homepage and Incoming Links. If a user types the URL of a site and does not specify a webpage, then the home page of the site is displayed. Use this command to replace the site’s current home page with the current wiki page. When you click Incoming Links, you are redirected to a page that displays all pages that link to the current page.
Page Library This group consist of three commands:
Library Settings This redirects you to the list settings page for the Site Pages library. You can use the list settings page as you can other libraries, for example you can use content approval and workflow with the Site Pages library.
Library Permissions This command redirects you to the library permissions page for the Site Pages library, which you can use to restrict the rights with respect to who can create and edit wiki pages.
View All Pages This redirects you to the All Pages view for the Site Pages library.
Note
Lists and libraries are described in Chapter 5.
A SharePoint Foundation—based wiki library has all the features of a document library, such as history and version management. Therefore, no changes or modifications are lost. Major versioning is enabled by default when you create a wiki page library.
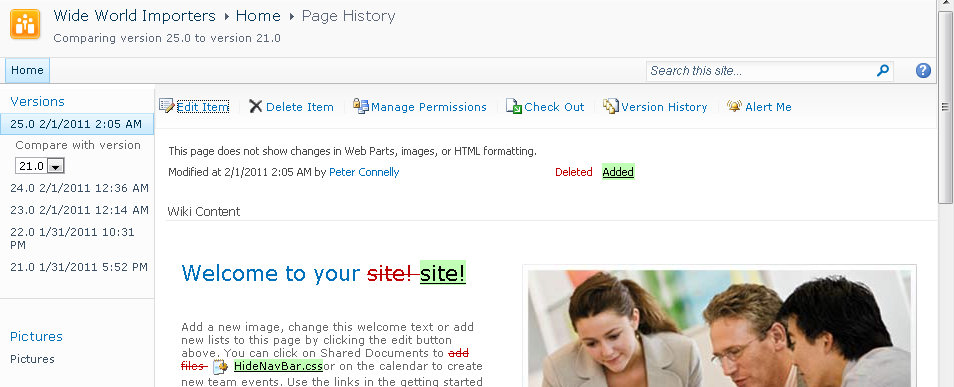
On the Page tab, in the Manage group, click Page History to display the History page. In the left pane, there is a list of all the versions for the page, together with the date and time that the versions were created. Figure 6-15 illustrates how you have the option to choose which two versions of the wiki page to compare. In the content area, content that is deleted from the older of the two versions appears on the page but is displayed with a strikethrough red font. Content that is added after the creation of the older of the two versions appears with a green background. The History Page does not show changes in Web Parts, images, or client-side code, such as changes to HTML tags or their attributes.
The Page History page provides links to edit the properties of the wiki page, delete the wiki page and all its versions, manage its permissions, check out the page, and create an Alert Me for the page. In addition, in the left pane, a link to each version of the wiki page is displayed.
The Versions Saved page is displayed when you click Version History on the Page History page. This page displays as a dialog if you have Silverlight installed and when you use the Version History command in the Manage group on the Documents tab for the All Pages view of the Site Pages library. Similarly the Saved Versions dialog is displayed when you use the Version History command on the list item menu.
You can use the Versions Saved page to replace the current version of a wiki page with the selected version. When the previous version of the page is restored as the current version of the page, a yellow status bar appears, stating that the current page has been customized from its template, as shown in Figure 6-16. This occurs when you restore a previous version of a page by using the browser or when using a program such as SharePoint Designer 2010. Click Revert To Template, and then click OK to revert the page to its template.

For more information about customizing pages, see the section Site Template Pages, later in this chapter.
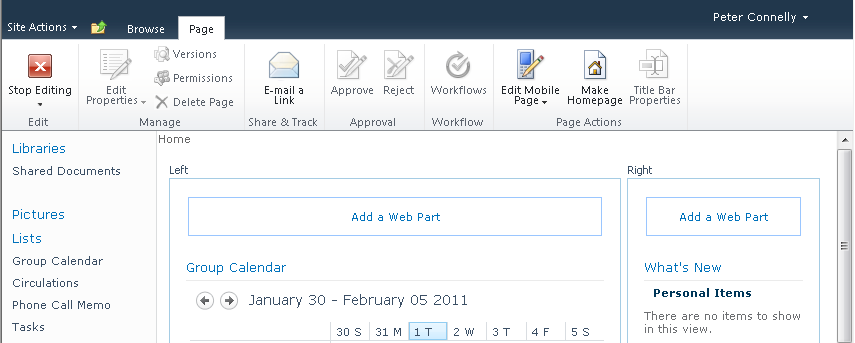
On sites such as the Group Work site, Meeting Workspaces, and Blog sites, Web Part pages are the default type of page. Lists and libraries also use this page type to display their content. Web Part pages consist only of Web Part zones and do not contain the Embedded FormField SharePoint control, as shown in Figure 6-17. Therefore, they cannot use wiki links to quickly and easily create new pages. You cannot mix text and Web Parts anywhere on the page; they can contain only Web Parts. To add static text or images to a Web Part page, you must first add either the CEWP or the Image Web Part, and then use the Web Part tool pane to alter the properties of the Web Part and to add text or images.
Tip
INSIDE OUT Beware—SharePoint Foundation validates the code within a CEWP
Similar to the EmbeddedFormField, when client-side code is added to the CEWP, SharePoint Foundation sanitizes the code. However, unlike with the EmbeddedFormField, SharePoint Foundation does not remove client-side code, such as JavaScript. But be aware that the modifications that SharePoint made to the HTML code could make the JavaScript not work correctly. If you are upgrading from Windows SharePoint Services 3.0, and you have entered non-compliant HTML and JavaScript into a CEWP, when you migrate your SharePoint site to SharePoint Foundation, the HTML and JavaScript will continue to work on the upgraded page as it did in the Windows SharePoint Services environment. However, when you edit the CEWP and save, SharePoint 2010 validates the code and the JavaScript could then fail.
Using the browser, you can only add Web Parts to Web Part zones. Using SharePoint Designer, you can add Web Parts outside of Web Part zones on a Web Part page when the page is opened in Advanced Edit mode. Web Parts added outside Web Part zones and outside the EmbeddedFormField control on wiki pages are called static Web Parts, whereas Web Parts added to Web Part zones or the EmbeddedFormField control are called dynamic Web Parts. The properties of a static Web Part are stored in the page and not in the Web Parts SQL server table. By inserting a static Web Part in a page, users can view the content of the Web Part, but prevent them from using the browser to modify the Web Part or the way that it is displayed on the page.
Note
You can read more about Web Parts in Chapter 7.
There are two types of a Web Part pages: shared and personal versions. All Web Part pages have a shared version, but not all Web Part pages have a personal view. Wiki pages only have a shared version.
The shared version of a Web Part page is displayed for all users who have at least the view permission. To modify the shared version, you must have the following rights, all of which are included in the Design and Full Control permission levels by default:
Manage Lists
Add and Customize Pages
Apply Themes and Borders
Apply Style Sheets
A member of a website’s Site Owners group has Full Control permissions and therefore is able to customize the Shared Version of all Web Part pages. To edit the Shared version of a Web Part page, use the Edit Page option on the Site Actions menu, or on the Page tab, click Edit page. If the Edit Page command is not active, then you do not have permissions to edit the page.
The personal version of a Web Part page is displayed for the person who created the page and cannot be viewed by others. To create a personal version of any Web Part page, the Web Part page must be designed to be personalized. In addition, you must have the following rights, all of which are included in the Contribute, Design, and Full Control permission levels by default:
The site’s Members group is mapped to the Contribute permission levels; therefore, any member of that group is able to customize the personal version of a Web Part page if the pages are designed to be personalized.
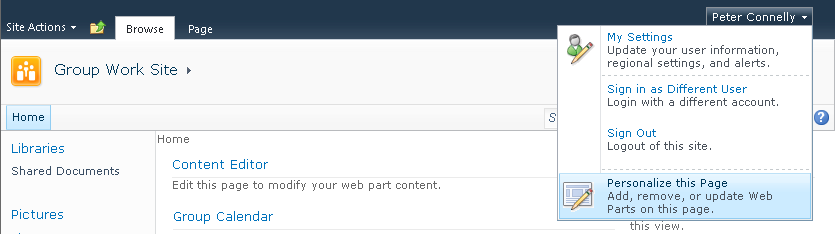
To edit your Personal version of a Web Part page, click the down-arrow to the right of your name in the upper-right corner of the page, and then click Personalize This Page, as shown in Figure 6-18.
A yellow status bar below the ribbon displays, stating that you are editing the Personal Version of this page. This will always display when you are editing the Personal Version of a Web Part page.
Once you have personalized a page, the menu in the upper-right corner will contain two other options: Show Shared View and Reset Page Content. To remove the Personal Version of a Web Part page, use the Reset Page Content option.
When you have a personal view of a Web Part page, it is displayed by default when you first visit the page. This can be confusing to some users, who then do not see the same components on the page as other users. In Windows SharePoint Service 3.0, it was easier for a user to accidently edit their personal view as the edit options for both versions of the page were placed closed together. This is no longer the case.
You can edit a Web Part page, by either using the Edit Page option on the Site Actions menu or by using the Edit Page command in the Edit group on the Page tab. When the Web Part page is in Edit mode, the Format Text and Insert tabs do not display. These only appear when you are typing content into the CEWP. The commands on the Page tab for Web Part pages contain some different groups and commands than the Page tab on wiki pages. It does not contain a Page Library group. The Web Part page Page tab consists of six groups:
Edit Only one drop-down menu is provided, which contains the options Edit Page, Stop Editing, and Edit In SharePoint Designer. In Edit mode, only the Stop Editing command is active. When the page is not in Edit mode, then the other two commands are active. Changes to Web Parts are saved immediately; therefore, the Edit group does not contain commands to Save & Close or Save & Stop Editing, nor can you discard changes. Web Part changes are versioned, so you can restore a previous versions of the page, which will restore all the Web Part changes. You cannot restore the state of only one Web Part on the page.
Manage Use the commands in this group to edit the properties of the page, view versions, manage the page’s permission, and delete the page. Initially, when you create a site, the home Web Part page is stored in the root of the site and not in a library; therefore, these options are not active. When a Web Part page is stored in a document library and versioning is enabled at the library level, all the commands in this group are active.
Share & Track The E-Mail A Link command and the Alert Me split button behave as do the same commands on wiki pages.
Approval The commands Approve and Reject are active if content approval is enabled at the library level.
Workflow The Workflows command is enabled if the Web Part page is stored in a library and a Workflow template has been associated with the library.
Page Actions This group consists of three commands, Make Homepage, which is the same command as on wiki pages, and two other commands, Edit Mobile Page and Title Bar Properties. There is no Incoming Links command.
Using the browser, there are a number of methods available for you to create Web Part pages:
Use the Site Actions and More Options action. In the Create dialog box, under Filter By, click Page. In the middle pane, click Create.
Create a document library and specify Web Part page as the library’s document template. You might need to click More Options to be able to choose a document template for the library. Then, to create a new Web Part page, click New Document on the Documents tab.
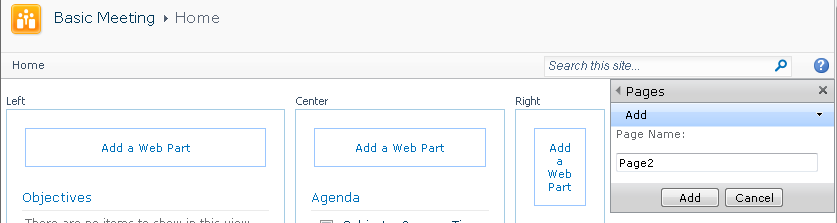
On Meeting Workspaces, from the Site Actions menu, click Add Pages. The current page is open in Edit mode and a Pages task pane displays, as shown in Figure 6-19. In the Page Name text box, type the name of the new page, and then click Add. The three-column Web Part page is created in a hidden library named Workspace Pages, with a URL of pages.
Create a view for any list or library. The page created is a Web Part page.
When you use one of the first two methods, the New Web Part Page window displays, in which you type the name of the new Web Part page, choose a Layout Template and a document library in which to store the new Web Part page, as shown in Figure 6-20.
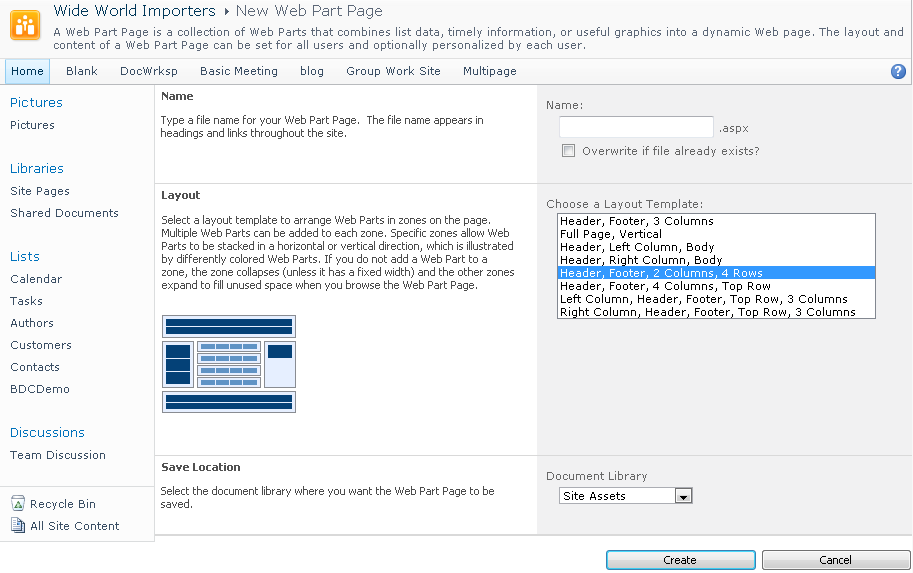
To the left of the Choose A Layout Template list box, when you select a layout template, a thumbnail preview displays, showing the Web Part zones and the organization of the Web Parts within the zones for the layout. For example, the Header, Footer, two Columns, four Rows layout, consists of eight Web Part zones. The four rows of Web Part zones show the Web Parts side by side; therefore, if you insert Web Parts in one of those Web Part zone rows, the Web Parts will not be displayed above and below each other, which is the usual configuration, but to the right or left of each other. These Web Part templates do not provide a left navigation area for the Quick Launch links.
Once you have created a Web Part page from a layout template, you cannot change the layout of Web Part zones on the page by using the browser; to do that you need to use a tool such as SharePoint Designer. You can also use SharePoint Designer on a page-by-page basis to re-establish the Quick Launch in the left pane.
The implementation of the Web Part layout templates has not changed from Windows SharePoint Services 3.0. The eight Web Part page templates are located in the SharePoint root directory (%PROGRAMFILES% Common filesMicrosoft SharedWeb Server Extensions14) in the subfolder TEMPLATE1033STSDOCTEMPSMARTPGS. These files, named spstd1.aspx through spstd8.aspx, cannot be renamed because SharePoint Foundation still uses a page called spcf.aspx to list the Web Part layout templates and owssvr.dll to initiate the page. Therefore, you can use the same technique to change and add your own layout templates to SharePoint Foundation as you might have done when using Windows SharePoint Services 3.0. A good starting point to add your own custom Web Part page templates can be found at www.dontpapanic.com/blog/?p=58 and http://msdn.microsoft.com/en-us/library/ms916835.aspx. However, it does entail updating files provided by Microsoft in the SharePoint root directory for each server in your SharePoint farm, so this method has some severe limitations, such as the possibility that future Service Packs could overwrite the changes.
Tip
INSIDE OUT Using the New Page Site Actions option
The New Page option on the Site Action menu is used to create wiki pages only. It is available on some sites other than a Team Site, such as a site created from the Document Workspace site template. If you use the New Page option on such sites, a dialog box might open stating that in order to create wiki pages on this site, there must be a default wiki page library and a site assets library. It also gives you the option to create them at that time.
Windows SharePoint Services 3.0 supported a number of mobile pages that you could navigate to in your desktop browser by appending /m to the end of the website’s URL. This displayed links to the site’s lists and libraries. SharePoint Foundation includes support for mobile devices by appending ?mobile=1 to the end of the URL of any page. When a mobile device navigates to a page on a SharePoint site, it is automatically redirected to these mobile pages, which restructures the requested page for mobile devices and inserts links at the bottom of every mobile page to View All Pages, All Site Content, and the home page of the site. The pages used to redirect the browser are stored in the _layouts/mobile virtual directory and are listed in Table 6-1.
Note
For more information about creating mobile pages, go to http://msdn.microsoft.com/en-us/library/ms462572.aspx. You can read more about mobile view pages at http://msdn.microsoft.com/en-us/library/ms414170.aspx. And finally, to learn how to create a mobile adapter, which should be created for each Web Part that needs to be accessed by mobile devices, go to http://msdn.microsoft.com/en-us/library/ee539079.aspx.
SharePoint Foundation has a prime focus on meeting accessibility guidelines which makes it much easier than with previous SharePoint versions for you to meet WCAG version 2.0 A, AA, and even AAA guidelines. Some of the improvements include:
A W3C XHTML DOCTYPE reference.
Use of <DIV> tags for page construction, rather than tables.
Correct heading hierarchy; that is, H1, H2, H3.
The UseSimpleRendering property for the <SharePoint:AspMenu> control. When UseSimpleRendering is set to true, the SharePoint navigation menu is rendered by using a cleaner, unordered XHTML list.
Note
You can find information about accessibility and SharePoint 2010 on the Microsoft SharePoint team blog site at http://sharepoint.microsoft.com/blog/Pages/BlogPost.aspx?pID=431.
You should always try to create content so that it conforms to accessibility guidelines. The additional benefit is that it helps to ensure that your website is compatible and interoperable with any assistive technologies that visitors to your site might use. However, do not rely on testing your pages against accessibility guidelines; when possible, enlist the assistance of disabled users to test your pages.
Site Template Pages
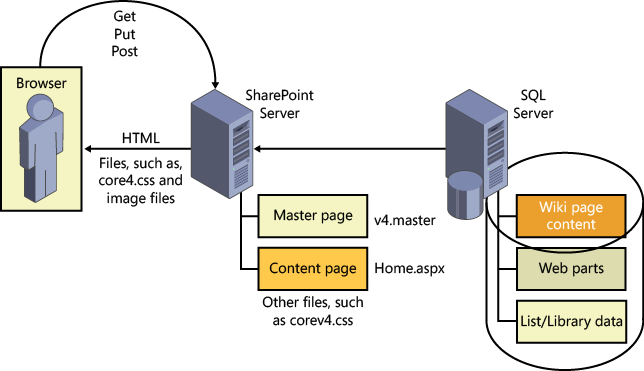
When you create a site from one of the built-in site templates, the pages on the newly created site refer to pages stored in the TEMPLATE subfolder of the SharePoint root directory. No files or pages are created. Instead, table entries are created in a SQL Server content database in the ALLDocs tables, and those table entries point to files in the TEMPLATE folder. Each site appears to have its own pages, but in reality, they all share the same files. The files in the TEMPLATE folder are known as site definitions. Site definition files are cached in memory on the server at process startup. As a result, when a user requests a page, such as home.aspx (which is one of the site definitions files), it is retrieved from the server’s memory. SharePoint retrieves from the SQL server content database the content entered in the EmbeddedFormField control on wiki pages or Web Parts inserted in Web Part zones, because this content is stored separately from the site definition files, as shown in Figure 6-21. Therefore, a relatively small set of files can support a large number of SharePoint sites with many pages, resulting in improved performance.
Similar to the browser, when you use SharePoint Designer to modify the contents of the EmbeddedFormField control and Web Parts in Web Part zones, only the data in the content databases is being modified. This is SharePoint Designer’s default Edit mode. However, with SharePoint Designer, when you open a page in Advance Edit mode, you can modify content that is defined outside the EmbeddedFormField and Web Part zone. You are then modifying content that is defined in the site definition files; therefore, SharePoint Foundation saves a copy of the site definition files from the SharePoint root to the SQL Server, as shown in Figure 6-22. This copy of the site definition file, is specific to the site you are modifying, all other sites continue to use the site definition files stored in the SharePoint root.
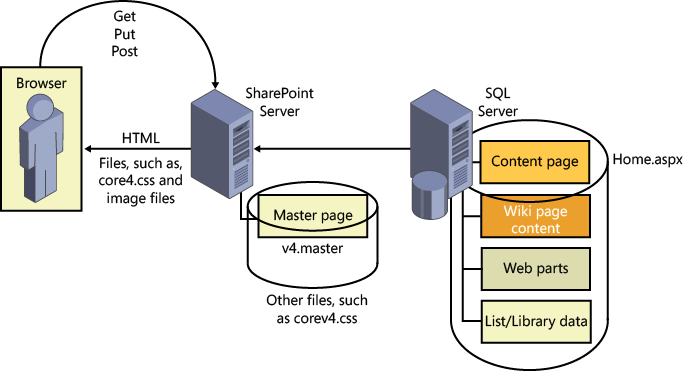
Site definition files that are modified by SharePoint Designer in Advanced Edit mode are known as customized or unghosted pages. Site definition files that have not been customized are known as uncustomized or ghosted files. The master page, v4.master, CSS files (such as corev4.css), JavaScript files, and the Web Part layout template files are all site definition files. Thus, when you edit these files in Advanced Edit mode, you are creating customized pages that are unique to your site.
For a site that is frequently visited and where SharePoint page cache is enabled and available, the customized page introduces little significant overhead when the page is requested. However, if page cache is not available, and if a large number of users request the customized page, the performance level of the customized page could be significantly affected. So, as you plan your solutions, you should take this into account. A common decision is not to customize an organization’s master pages or a site’s home page.
Customizing pages can also make global changes to all your sites difficult. For example, if your organization has deployed its own site definition files, including its own master page, which you customized in SharePoint Designer, and then it subsequently redeploys a new version of that master page, you will not see the changes to the organization’s master page. Using the browser or SharePoint Designer, you can reset your customized page back to the site definition pages.
You can prototype your master page modifications to a specific site by using SharePoint Designer. Once the modifications have been signed off, you can export your customized master page and either store the master page into the site master page gallery that is located at the top level site of a Site Collection, or use Visual Studio 2010, package the master page in a solutions file, and deploy it as a site definition file into the SharePoint root directory. Using the browser to upload the master page into the master page gallery is storing the master page into the SQL Server content database. Any file that is stored in the content database is considered to be customized.
When you deploy files to SharePoint, you deploy them as features. The feature specifies what to do with the file. If the file is to be stored in the SharePoint root directory as an uncustomized file and cached in memory, then you can use the Ghostable or GhostableInLibrary type attribute. If you want to deploy a file, such as a master page, as an uncustomized file, but you want the file to appear as if it is stored in a library (for example, _catalog/masterpage), then use GhostableInLibrary. The user can then see the file in any of the list views and work with the file as she would with any other file. For example, she can check it in, approve, or reject it. If you deploy a file without the type attribute Ghostable or GhostableInLibrary, then the file is customized—Unghostable—and is stored in the content database.