
Creating a Basic Team Site by Using the Browser
Using More Options with a Team Site
Creating and Using a Basic Meeting Workspace
Creating and Using a Multipage Meeting Workspace
Creating and Using the Document Workspaces
Creating and Using a Group Work Site
Creating and Using a Blog Site
BEFORE you can begin to add content and collaborate with others in Microsoft SharePoint Foundation 2010, you need a site or workspace. There are several methods by which a user can accomplish this, but the most straightforward and intuitive way is via the browser. The browser is a tool with which all computer users are acquainted. With the familiarity of the browser and intentional ease-of-use design, you can begin creating sites in no time at all.
Tip
INSIDE OUT Choosing a template
Choosing the appropriate template is an important step. Once you have selected it, you cannot change it. So, be sure that you have determined how the site will be used before you decide upon the template. It will save you a lot of time down the road.
SharePoint Foundation 2010 comes with ten site and workspace templates. Each of these templates is designed to get you started with a basic layout and some predefined libraries and lists. A description of these templates follows:
<Select Template later> Not truly a template, but a placeholder. This is an empty site to which a template can be applied later.
Basic Meeting Workspace A site that has libraries and lists created that can be used to plan, manage, and document a meeting.
Blank Meeting Workspace Similar to the Basic Meeting Workspace but without the libraries and lists. This template is intended for users who want to do their own customization of the site.
Blank Site Similar to the Team Site template but without the libraries and lists.
Decision Meeting Workspace A meeting workspace designed to track decisions as well as provide the functionality in a normal meeting workspace.
Document Workspace A site designed to focus on a single primary document with supporting documents, links, and tasks.
Group Work Site Similar to a Team Site template but with a Group Calendar and other lists and libraries focused on a groupware solution.
Multipage Meeting Workspace Similar to Basic Meeting Workspace but with the addition of paging capabilities. Two additional blank pages are added by default.
Social Meeting Workspace Used for social events, it comes with a photo library, space for providing directions, and a list to show attendees.
Team Site A collaboration site intended for teams within your organization. It comes with several libraries and lists intended to support collaboration, such as the Calendar, Task, and Team Discussion.
Each site or workspace has a distinct URL. The URL can be changed but you should put some thought into choosing an appropriate one. People still tend to bookmark URLs and changing them can result in lost time searching for the new location of a site or workspace.
The template only provides a starting point for the site. New libraries and lists can be added; existing ones can be deleted or changed. The look and feel of the site can be changed as well as the home page. Pretty much everything within the site can be modified. The templates are intended as a starting point, giving users a head start on creating and sharing content with others. As needs change, so can the site and that is the true objective of the site. With that in mind, you still want to choose a template that is as close to your needs as possible. It will save a considerable amount of time that could be more productively spent creating and collaborating on content. The purpose of SharePoint 2010 Foundation is to help users be more productive, not less so.
Let’s begin by using the browser to create a basic Team Site. The Team Site is the most common site created in SharePoint 2010 Foundation. The Team Site comes by default with two libraries and three lists already created. The Site Pages library is normally used for storing webpages (such as the Home page you land on when you create the site). The Shared Documents library is intended as a common repository for all sorts of documents that are to be shared among the users of the Team Site. Documents that you will normally find there include Microsoft Word, Microsoft Excel, and Microsoft PowerPoint files. The first two lists are Calendar and Tasks. A Calendar list is used to place events that are relevant to the primary users of the Team Site. For example, if you create a Team Site for the Human Resources team, then the Calendar list could be used to show vacation days of all the Human Resources employees. This would help them to ensure proper coverage when employees take time off. The Tasks list can be used to assign and keep track of tasks related to the Team Site. A task can be assigned to anyone in your organization but the location of this task list would indicate that tasks be related to usage of the Team site. The third list, Team Discussion, is a specialized type of list referred to as a Discussion Board. It is designed to accommodate the discussion of any topics of concern to the users of the Team Site. It is a threaded discussion, and anyone with rights can post a topic or reply to a topic.
To create a site with Team Site template, perform the following steps:
Browse to the URL where you want the site to be located.
For example, if you wanted a site named Engineering under the top-level Site Collection, then you would type the URL of the top-level Site Collection in your browser (for example http://contoso).
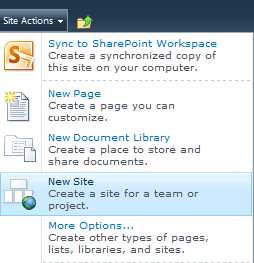
Click Site Actions | New Site, as demonstrated in the following:
If you don’t see New Site, then you probably don’t have proper permissions. You will need to obtain authorization before continuing.
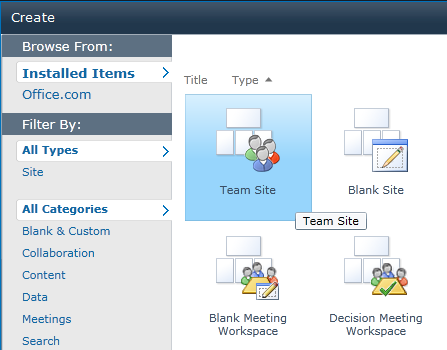
Click Team Site.
This is usually the default, but just in case, go ahead and click it.
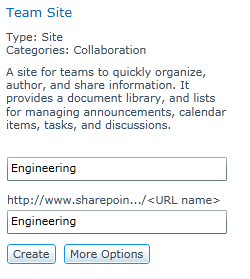
Provide a Title and a URL name.
For this example, enter Engineering for both. You can change both of these in the future, but for actual sites, you want to try to pick a URL that remains consistent to avoid bookmarking issues.
Click Create. We will worry about the More Option button in the next section.
You should see a green spinning wheel with the text “Processing.” Shortly thereafter, you will see your brand new site.
You have now created a site based on the Team Site template. It has document libraries and lists ready to use. You can start adding documents, tasks, calendar events, and discussions without doing anything to customize this site. This is the quickest and easiest way to start using SharePoint 2010 Foundation sites and begin your journey to more collaborative experience. Next, you will look at what’s available under the More Options section.