Programming Objects
Programming in .NET is an object-oriented experience. You write your own classes and leverage those created by Microsoft (forms, controls, and libraries). In fact, every .NET application has at least one class, and more often it has hundreds. You can extend classes with new functionality (inheritance), define classes based on a contract (interface), and override the behavior of existing classes (polymorphism). This section looks at defining objects with .NET code.
Classes
Think of classes as the container for your code. Classes define how you hold data (properties) and perform actions (methods); they communicate how your class works after it’s created (instantiated). When you create an instance of the class, it is an object and can actually maintain its own state and execute code to update and give access to it.
You define a class using the Class keyword. The following shows an example.
C#
public class Employee
{
}
VB
Public Class Employee
End Class
Fields and Properties
You add code to a class to define its data and behavior. Data for your class can be stored in fields or properties. Fields and properties are similar; both define data that is contained in the class. The difference is that properties can provide a means to protect the access (setting and getting) to field data. Fields are typically private variables defined by the class, accessible only from the class code, and defined as follows.
C#
public class Employee
{
private string _name;
}
VB
Public Class Employee
Private _name As String
End Class
You can define public fields on your class to make them accessible from any other class code. However, it is a best practice to encapsulate public data inside a property. This way you can control whether to expose the ability to read or write the value of a property. Properties are typically backed by an internal, private field. This is called data hiding and is implemented with the Private keyword. For example, the previously defined field can be encapsulated into a property as follows.
public class Employee
{
private string _name;
public string Name
{
get { return _name; }
set { _name = value; }
}
}
VB
Public Class Employee
Private _name As String
Public Property Name() As String
Get
Return _name
End Get
Set(ByVal value As String)
_name = value
End Set
End Property
End Class
You can also create read-only properties. This is useful when you want to reserve the writing of the property’s value to code running inside the class. You create a read-only property by not implementing the set statement in the property definition. In Visual Basic, you also have to add the ReadOnly keyword. For example, suppose you want to add an Id property to the Employee class defined previously. This Id can be read by anyone, but its value (backed by _Id) is only set by internal class code. You could implement a read-only property as follows.
C#
private int _id;
public int Id
{
get { return _id; }
}
VB
Private _id As Integer
Public ReadOnly Property Id() As Integer
Get
Return _id
End Get
End Property
Methods
Methods represent the blocks of code in your class that, when called, perform some specific action. This action could be reading or writing from a database, calling other methods, calculating a value, processing some business rules and returning a result, or whatever you need your code to do.
Methods are defined by their names and access levels; see the next section for more details on access levels. In Visual Basic, you also need to add the Sub keyword to define a method that does not return a value. In C#, this is done by indicating the return type of void before the method name. For example, if you were to add a Save method to the Employee class previously defined, the code would look like this.
C#
public void Save()
{
//implementation code goes here
}
VB
Public Sub Save()
'implementation code goes here
End Sub
Methods often return values to the code that called the method. To define a method that returns a value, you must indicate the method’s return type (the class type of the returned data). In Visual Basic, you also use the keyword Function (instead of Sub). You use the Return keyword to indicate the value to return from your code. For example, if you were to add a method to calculate an employee’s remaining sick day, you would do so as follows.
C#
public int GetRemainingSickDays()
{
int _sickDays = 0;
//calculate remaining sick days
return _sickDays;
}
Function GetRemainingSickDays() As Integer
Dim _sickDays As Integer = 0
'code to calculate remaining sick days
Return _sickDays
End Function
In this example, note the return type defined in the method signature (first line of the method). Also note the use of the keyword Return to return a value from the method. In this case, that value is stored inside a variable defined as internal to the method.
Member Accessibility
The properties, fields, and methods in your application are referred to as class members. Each member in your class is defined to have a specific access level. As you’ve seen, if you want other classes to be able to access a member, you must declare that member as public. If you want to reserve the member for accessibility only within the class, you declare it as private. These are two of the member accessibility levels available to you. The full complement of accessibility levels is described in Table 3.1.

In addition to class-member accessibility, classes themselves use the same accessibility levels. You can declare a class as public, private, protected, and so on to define your intended usage. You want to make many classes private or protected to the class and deriving types. The classes you make public define the functionality you want to expose to other code.
Constructors
A constructor is code that is called when a new instance of your class is created. This code is used to define how you want your class instance initialized, typically by setting default values or some related setup code. You create a constructor as you would a method. The difference is that you give the constructor the same name as the class; you also do not need to prefix the method with void in C#. In Visual Basic, you can use the Sub New statement to create a default constructor for the class. This can be useful if you are initializing read-only properties. The following code shows an example for the Employee class.
C#
public Employee()
{
//init default values of an empty employee object
}
VB
Public Sub New()
'init default values of an empty employee object
End Sub
A class can have multiple constructors to change the way in which the object is initialized. In these cases, each constructor is defined with a different set of parameters. In C#, the version of the constructor that does not take parameters is referred to as the default constructor. In Visual Basic, the Sub New construct is used to define the default constructor. The following shows a couple additional constructors added to the Employee class. One initializes an Employee object based on the calling code passing in an id parameter; the other uses the employee’s email address to initialize the object.
C#
public Employee(int id)
{
//init default values for the employee defined by the given ID
}
public Employee(string emailAddress)
{
//init default values for the employee defined by the given email
}
VB
Public Sub Employee(ByVal id As Integer)
'init default values for the employee defined by the given ID
End Sub
Public Sub Employee(ByVal emailAddress As String)
'init default values for the employee defined by the given email
End Sub
Static (Shared in VB) Members and Objects
Sometimes you do not want the full behavior of a class for all your methods. Instead, you might want to define certain methods that are not part of an instance of the class. These methods often retrieve information or calculate values but are not part of a specific object. In these cases, you can create entire classes or just specific methods of a class as static (or shared in Visual Basic).
The Shared and static keywords, when applied to a method, indicate that the method can be called without creating an instance of the class that contains it. Shared and static can also be defined at the class level. In this case, you are indicating that the class only contains shared and static methods, and you cannot create an instance of it. For example, you might add a static helper method to the Employee class to check to see whether an employee is active in the system before you create an instance. This declaration would look like this.
C#
public static bool IsActive(string emailAddress)
{
//check to see if an employee has been added to the system
}
VB
Public Shared Function IsActive(ByVal emailAddress As String) As Boolean
'check to see if an employee has been added to the system
End Function
Enumerations
Enumerations enable you to create a group of named values that help improve your code readability. Each item in an enumeration is a unique numerical value (byte, sbyte, short, ushort, int, uint, long, or ulong). Note that the default is int. You can pass around the enumeration value as a name rather than an actual value. In this way, your code doesn’t rely on arbitrary, “magic” numbers. Instead, the code is sensible and readable.
You create an enumeration using the enum keyword. For example, you might add an enumeration to the Employee class to store the employment status of an employee. This would enable you to make decisions in your code based on the specific status of an employee. To define this enumeration, you add code as follows to the Employee class.
enum EmploymentStatus
{
Salaried,
Hourly,
Contract,
Other
}
VB
Enum EmploymentStatus
Salaried
Hourly
Contract
Other
End Enum
Inheritance
You can define a new class based on an existing class, which is called inheritance. You use inheritance to extend (or add to) the functionality of a base class. Classes that extend a base class are said to derive their functionality from another class. That is, they contain all the functionality of the base class plus any additional functionality added to the new class.
You indicate inheritance in Visual Basic by using the Inherits keyword; in C# you add a colon and the base class name following the name of the new class. For example, suppose you implement a Manager class that derives from Employee. The Manager class contains all the members of an Employee but might add special properties and methods specific to a Manager. You define this new class as follows.
C#
class Manager: Employee
{
}
VB
Public Class Manager
Inherits Employee
End Class
Note that you can actually define a base class that cannot be created. Instead, it only exists to form the basis for a new class. Other classes can derive from it, but you cannot create a direct instance of just the base class. This is done by adding the MustInherit (VB) or abstract (C#) keyword in front of the class definition. The keyword NotInheritable (VB) or sealed (C#) indicates that the class cannot be used as the basis for a new class.
Note
.NET programmers can only derive from a single class. They cannot inherit from multiple base classes. However, they can implement multiple interfaces (as discussed next).
Overriding Behavior
When you design your classes, consider how other developers might extend them. Your classes might serve as the base class for future derived classes. If this is the case, you might also consider which (if any) features of your base class you want to allow a derived class to override. The derived class may then implement a new version of one of your base methods, for example. This process is often referred to as polymorphism in OO programming.
To change the data or behavior of a base class, you can either add to the base class or override an existing member of the base class. Doing the latter gives you alternate behavior for the same function in your new class. You decide which members of your base class are available for override. You do so by marking them as virtual (Overridable in VB) members; this indicates that a derived class may override your base class functionality.
For example, suppose that you want to enable the CalculateYearlyCost method of the Employee class to be overridden when the Employee is used as the base for the Manager class. In this case, the calculation for a Manager is different for that of an Employee. You therefore mark the method inside the Employee class as virtual (C#) or Overridable (VB), as follows.
C#
public class Employee
{
public virtual float CalculateYearlyCost()
{
}
}
VB
Public Class Employee
Public Overridable Function CalculateYearlyCost() As Single
End Function
End Class
You can then override this method in the derived class. You do so using the override (C#) or Overrides (VB) keyword. You can still call the method on the base class if you need to by using the base (C#) or MyBase (VB) keyword. The following shows an example.
C#
class Manager : Employee
{
public override float CalculateYearlyCost()
{
//add new functionality, access underlying method using base keyword
}
}
VB
Public Class Manager
Inherits Employee
Public Overrides Function CalculateYearlyCost() As Single
'add new functionality, access underlying method using MyBase
End Function
End Class
Hiding Members
There is a second way you can override the functionality of a base class. It involves using the keyword new (C#) or Shadows (VB) to redefine the base method. Overriding in this manner hides the base class members. However, the base class member is still called if an instance of the derived class gets downcast to an instance of the base class. This type of overriding is referred to as hiding by name. For example, you could replace the C# keyword override with new or the VB Overrides with Shadows to implement this type of behavior.
You need to be careful about hiding members versus overriding because downcasting can occur often. For example, you might be working with a collection of Employee objects (some of type Manager and some of type Employee). If you iterate over the list using the base class (for each employee), you get a different method called on the Manager class depending on whether you hid the member (in which case, the base class method is called) or overrode the member (in which case, the derived class method is called).
Overloading Members
You can also create multiple versions of the same procedure. All versions of a procedure can be defined inside the same class, or you can have a few versions in a base class and yet other versions in a derived class. This is useful when you need to preserve the name of the procedure but need to create different versions that each take different parameters. Creating multiple versions of a procedure is called overloading or hiding by signature (as in the method’s calling signature).
Overloading a method must follow rules designed to make each overload somehow different from all the others. Of course, each overload has the same name. However, you must change either the number of parameters the method accepts, the data type of one or more of those parameters, or the order of the parameters. You create a valid overload by changing one or more of these items to make the overload signature unique. Note that changing the return type, if the method returns a value, is not sufficient to create an overload; nor is changing just a parameter modifier.
For example, suppose you were creating a method to return the number of vacation days left for an employee. You might allow the users of this method to get the vacation days left for the current year, a supplied month, or a supplied month and year. In this case, the users of your method see a single method with multiple overloads. You implement this overloading similar to the following code.
C#
public short GetVacationUsed()
{
//returns all vacation used in the current year
}
public short GetVacationUsed(short monthNumber)
{
//returns all vacation used in the given month of the current year
}
public short GetVacationUsed(short monthNumber, short year)
{
//returns all vacation used in the given month and year
}
VB
Public Function GetVacationUsed() As Short
'returns all vacation used in the current year
End Function
Public Function GetVacationUsed(ByVal monthNumber As Short) As Short
'returns all vacation used in the given month of the current year
End Function
Public Function GetVacationUsed(ByVal monthNumber As Short, ByVal year As Short) _
As Short
'returns all vacation used in the given month and year
End Function
Defining Interface Contracts
An interface is used to define a class contract. An interface does not contain any actual functioning code. Rather, it indicates a common structure for code that must be implemented by another class. This enables you to create common contracts and use those contracts across multiple objects. You can then trust that each class that implements the interface does so completely, following the outline of the interface.
An interface can define different types of class members, including properties, methods, events, and the like, but not fields or constructors. To create an interface, you use the Interface keyword. For example, suppose you want to define a basic interface for a person. The Employee class might then be required to implement this interface. Other classes (such as User and Customer) might also implement the same interface. The following shows an example of how you might define this interface.
C#
interface IPerson
{
string Name { get; set; }
DateTime DateOfBirth { get; set; }
string EyeColor { get; set; }
short HeightInInches { get; set; }
}
VB
Public Interface IPerson
Property Name As String
Property DateOfBirth As DateTime
Property EyeColor As String
Property HeightInInches As Short
End Interface
You implement the interface by adding the interface to the class definition on the class where you intend to implement the interface. In Visual Basic, this is done by adding the Implements keyword under the class definition (similar to inheritance). In C#, you add the interface to the class definition the same way you would indicate a base class (using a colon). You can separate multiple implemented interfaces by a comma.
Note
You implement an interface when you want to define the structure of a base class but do not intend to implement any base functionality. If you have common base functionality for which you provide for extension, you should consider using inheritance and abstract base class.
Creating Structures
So far we have talked about programming classes. There is another kind of type available to .NET programmers called a structure. Structures are similar to classes; they can contain properties, fields, enumerations, and methods. They can implement interfaces and can have one or more constructors. The main differences lie in how structures are managed by .NET.
Structures are considered value types. This means that when structures are used, the entire class instance is passed around as a value and not a reference. A class is a reference type. When you use a class instance and pass it around your application, you are actually passing a reference to a class instance. Not so with a structure. This also changes how .NET manages the memory used for structures and classes. Structures use stack allocation, and classes are managed on the heap by the Garbage Collector. To put this in perspective for .NET developers, imagine you have an instance of an Employee class. This instance might be created inside one object and passed to another object’s method. If the second object makes a change to the Employee instance, this change is reflected inside all objects that maintain a reference to the instance. If this were a structure, however, there would be copies of that object passed around, and changes would be isolated to each copy.
There are other differences between classes and structures. For one, structures are sealed; that is, they cannot be inherited from. They also have an implicit public constructor that cannot be redefined. For these reasons, structures are best used when you need a lightweight container for data values and do not need the features of a reference type. Structures are often used to define small custom data types, reducing the odds to trigger a garbage collection.
You define a structure much like you define a class. In place of the class keyword, however, you use struct (C#) or Structure (VB). For example, imagine you want to define a data type that represents a paycheck. You could create a structure to hold this information. The following shows an example.
C#
public struct PayCheck
{
private double _amount;
public double Amount
{
get { return _amount; }
}
//add additional structure elements ...
}
Public Structure Paycheck
Private _amount As Double
Public ReadOnly Property Amount() As Double
Get
Return _amount
End Get
End Property
'additional structure elements ...
End Structure
Organizing Your Code with Namespaces
A namespace is used to group code that is specific to a company, an application, or a given library. Namespaces help .NET programmers overcome naming conflicts for classes and methods. For instance, you cannot have two classes with the same name in the same namespace because it would confuse the .NET runtime and developers. Instead, your class names are unique inside your namespace.
You declare a namespace at the top of your code using the keyword namespace. Alternatively, you can set the default namespace inside your project properties. In this way, you do not have to see the outer namespace definition inside each code file. A common practice for defining namespaces includes using your company name followed by the application being written and then perhaps the library to which the code belongs. For example, you might define the namespace grouping for the Employee class as follows.
C#
namespace MyApplication.UserLibrary
{
public class Employee
{
}
}
VB
Namespace MyApplication.UserLibrary
Public Class Employee
End Class
End Namespace
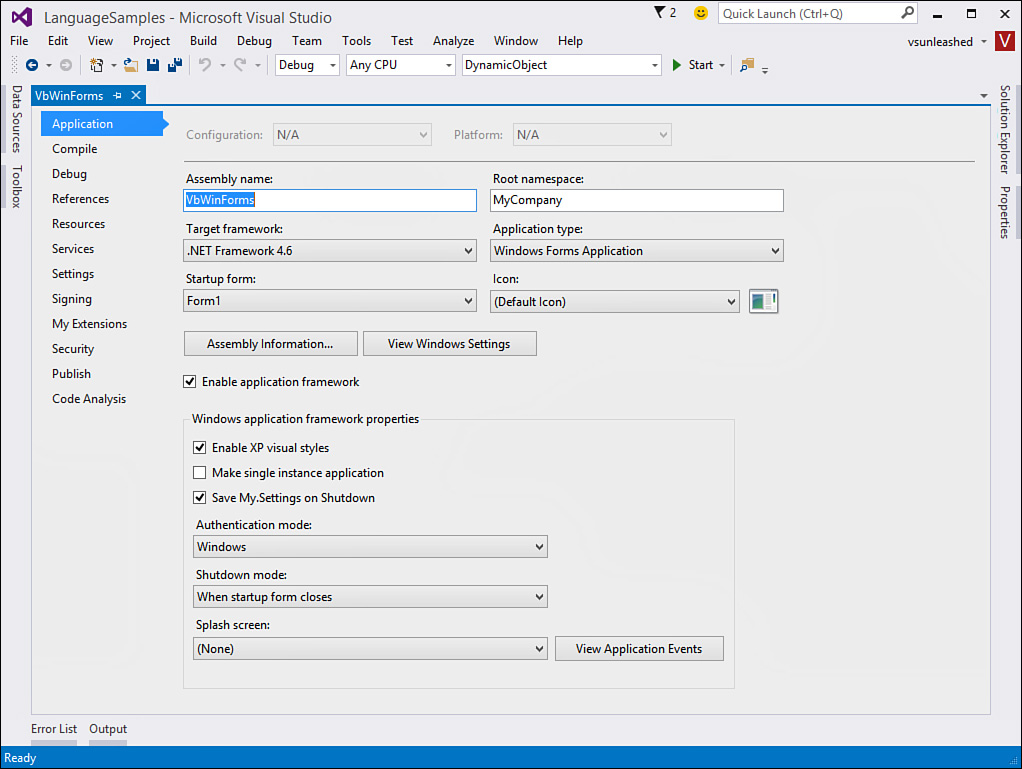
You do not have to add this namespace information at the top of every code file in your project. This can become redundant and is error prone because a developer might forget to include the namespace definition. As an alternative, you can set the root namespace for your entire project using the project properties window. (Right-click the project file and choose Properties.) Figure 3.1 shows an example. This is a similar experience in both C# and VB. Note that you can define a root namespace here and still add additional namespace groupings in your code as necessary. Of course, those additional namespace definitions fall inside the root namespace.
You access code inside a namespace by using the fully qualified definition of the namespace. For example, the .NET root namespace is System. If you were to access the String class, you would do so by using System.String. This is true for your code, too. To access the GetVacationUsed method, you might call out as follows.
MyCompany.MyApplication.UserLibrary.Employee emp =
new MyCompany.MyApplication.UserLibrary.Employee();
short usedVaca = emp.GetVacationUsed();
As you can see, accessing code using the fully qualified namespace can be cumbersome in terms of typing and reading your code. Thankfully, you can import (with the using statement in C#) a namespace inside your code. This frees you from having to fully qualify each type you use. Instead, the compiler resolves class names based on your imported namespaces. Of course, the namespaces themselves are still required to prevent ambiguity in the compiler. Importing namespaces also help trim IntelliSense to those imported libraries.
In most cases, you do not get conflicts with imported namespaces. Type names are typically different enough in a given library that they do not overlap. If names do overlap, you can add qualification to eliminate the conflict.
You import namespaces using the using statement (C#) or Imports (VB) keyword. For example, the following shows namespaces imported into a class file for a Windows Forms application. The code includes the import statements for referencing the Employee class library.
C#
using System;
using System.Collections.Generic;
using System.ComponentModel;
using System.Data;
using System.Drawing;
using System.Linq;
using System.Text;
using System.Threading.Tasks;
using System.Windows.Forms;
using MyCompany.MyApplication.UserLibrary;
namespace TestHarnessCSharp
{
public partial class Form1 : Form
{
public Form1()
{
InitializeComponent();
}
private void Form1_Load(object sender, EventArgs e)
{
Employee emp = new Employee();
//do work
}
}
}
VB
Imports MyCompany.MyApplication.UserLibrary
Public Class Form1
Private Sub Form1_Load(sender As Object, e As EventArgs) _
Handles MyBase.Load
Dim emp As New Employee()
'do work ...
End Sub
End Class
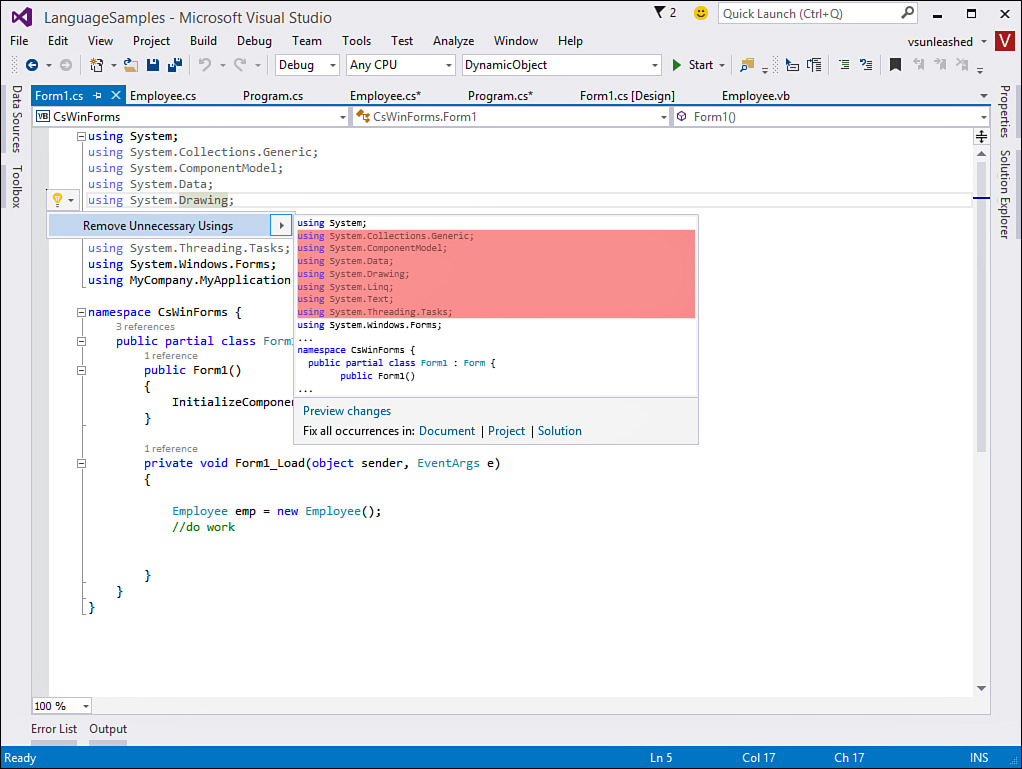
Notice in the preceding example that the C# code has a number of additional using (or imports) statements at the top of the file. This is because VB files automatically import many of the default namespaces in .NET. The latest version of the IDE indicates which using statements are not necessary by fading their color. The IDE also provides a quick action to remove these if you want. Figure 3.2 shows an example.