
Defining Tables
The table designer is the SQL Server data tool you use to define or edit the definition for a table. Using the Server Explorer window, right-click the Tables folder under an existing connection and select Add New Table.
The designer (see Figure 13.5) is implemented with two panes: a design pane that allows you to define the table in a “point and click” fashion, and a script pane that lets you work directly with the T-SQL syntax that defines the table. Within the design pane itself, there is a tabular presentation of the table columns. Adding a table column is as simple as adding a row to this definition matrix and setting the datatype using the in-grid drop-down. There is also a section within the designer that allows you to view, create, and edit the table’s keys, constraints, indexes, and so on.

Setting a Primary Key
Creating a primary key for a table is a simple process: in the design pane, select the column or columns that constitute the key, right click, and then select Set Primary Key from the shortcut menu. A key icon indicates any primary keys defined in the table.
Creating Indexes, Foreign Keys, and Check Constraints
Indexes, foreign keys, and check constraints are all created using the same interface and process. Using the index tree to the right of the table definition, right-click on the type of object you want to create or edit, and then select Add New from the pop-up menu. This will immediately create a placeholder for that object; you can now right-click on the object, select Properties from the context menu, and then edit the properties (including column membership) using the standard property page within Visual Studio.
Let’s put these moving parts together and see how this works end to end by creating a table within our database to hold course content for an online school.
![]() We will start with an existing database residing within a SQL Server 2014 instance. Open the Server Explorer, select the target database, right-click on the Tables node, and select Add Table (see Figure 13.6). Note that, by default, the tool has created a default primary key field for us named
We will start with an existing database residing within a SQL Server 2014 instance. Open the Server Explorer, select the target database, right-click on the Tables node, and select Add Table (see Figure 13.6). Note that, by default, the tool has created a default primary key field for us named Id.

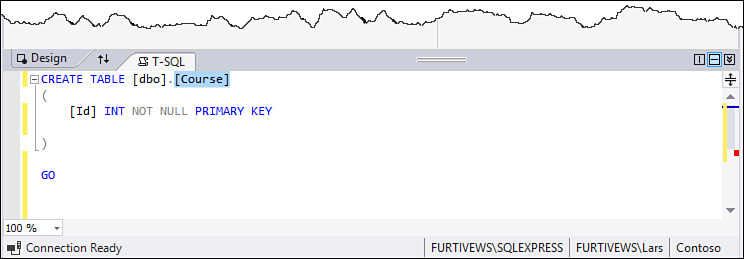
![]() Let’s name the table
Let’s name the table Course, which is best done using the SQL pane. Select the current [Table] name and type the name Course instead (see Figure 13.7).
![]() We now need to add the other columns to the table. Each of these can be added in turn just by typing their name and selecting their datatype within the designer. We’ll add a
We now need to add the other columns to the table. Each of these can be added in turn just by typing their name and selecting their datatype within the designer. We’ll add a CourseCode int, a Title varchar, and a Description varchar column. In the empty table designer row, type the name, select the data type from the drop-down, check the Allow Nulls column as appropriate, and then press the Tab key to create another row for defining your next column. In Figure 13.8, we have already added the CourseCode column and are working on the Title column.

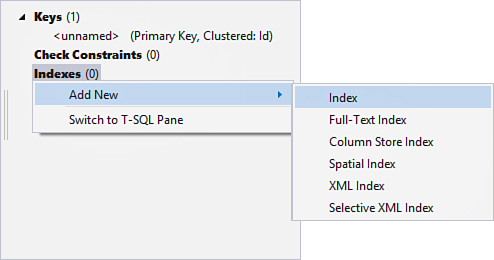
![]() Once the columns are added, we can worry about any check constraints, indexes, foreign keys, or triggers. For this example, we want to make sure that
Once the columns are added, we can worry about any check constraints, indexes, foreign keys, or triggers. For this example, we want to make sure that CourseCode is indexed. To create an index for this column, we will move our attention to the indexes/keys area of the design pane. Right-click on the Indexes node there and select Add New, Index (see Figure 13.9). The index will be created with a default name and will immediately show under the Indexes node. To change the name of the index and to add our column to it, we need to use the property page. Right-click the index and select Properties.
![]() In the Property sheet, use the
In the Property sheet, use the Columns property to add or remove columns to the index. Clicking the ellipses on this property will launch the Index Columns dialog (see Figure 13.10). In this dialog, one or more columns can be selected and added to the index. For our example, we are only interested in adding the CourseCode column. Back on the property sheet, we can change the name of the index and perform other useful actions, such as indicating whether the index is clustered.

![]() Now that we have successfully defined our table, the last step is to update the database with the definition and physically create the table within the database. In the table designer, click on the Update button at the top/left of the designer (see Figure 13.11). We have the option to either generate a script with the table definition or update the database directly. In this case, we’ll update directly. Once we kick off the process, progress and results of the operation will be reported back to us within the IDE (see Figure 13.12).
Now that we have successfully defined our table, the last step is to update the database with the definition and physically create the table within the database. In the table designer, click on the Update button at the top/left of the designer (see Figure 13.11). We have the option to either generate a script with the table definition or update the database directly. In this case, we’ll update directly. Once we kick off the process, progress and results of the operation will be reported back to us within the IDE (see Figure 13.12).
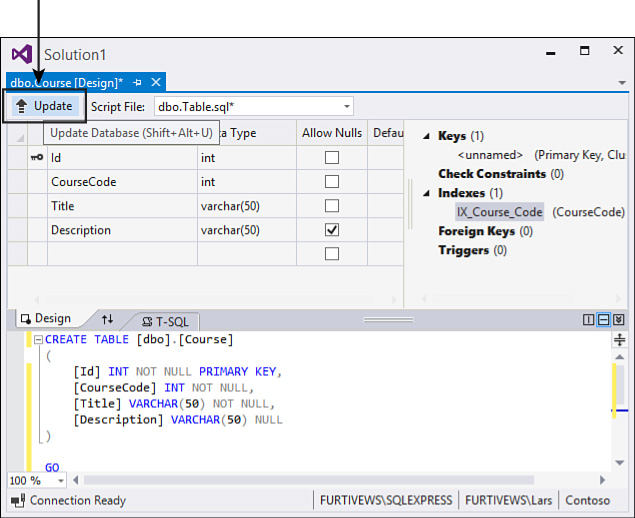

Note that as we have been designing our table, Visual Studio has been keeping pace by writing all the necessary T-SQL in the T-SQL pane. This works the same way that the web page designer and XAML/WPF designers do within the tool. We are free to work with the design surface or write the necessary code directly. The two panes are automatically kept in sync. Therefore, we could create our table’s columns and set the primary key by simply writing the necessary SQL in the SQL pane.
CREATE TABLE [dbo].[Course]
(
[Id] INT NOT NULL PRIMARY KEY,
[CourseCode] INT NOT NULL,
[Title] VARCHAR(50) NOT NULL,
[Description] VARCHAR(50) NULL
)
GO
CREATE INDEX [IX_Course_Code] ON [dbo].[Course] ([CourseCode])
Note
Foreign keys for any given table can also be defined using the Table Designer and the same process we used for adding an index: just click on the Foreign Key entry in the design page and use the property page to edit the actual key values. In prior versions of Visual Studio, table relationships could be easily built using a Database Diagram Designer. This feature was removed from Visual Studio starting with Visual Studio 2013, although the tool is still supported within the SQL Server Management Studio. This is installed as part of SQL Server itself.