
Designing XML Schemas
Visual Studio has made huge strides over the years in its support for XML schema design. This is evident right off the bat when you open an XML schema file (.xsd). A visual design window and an XML Schema Explorer window, working in tandem, quickly allow you to inspect, edit, and build out your schema. Figure 6.31 shows the same schema we just inferred from our simple “product catalog” XML file opened in the Visual Studio IDE. Note the schema explorer to the right and the schema designer to the left. Let’s examine the various views in detail.

Schema Views
Visual Studio provides five different ways to visualize/edit the information in an XML schema, delivered by three different tools. We have already covered the XML editor. Because XML schemas are verbalized using XML, the editor’s functions apply just as well to schema editing as they do to document editing.
That leaves us with four remaining views implemented using two tools: the XML Schema Explorer and the XML Schema Designer. Just as you have come to expect with most explorer/designer pairs in the IDE, these two tools work hand in hand.
The XML Schema Explorer
The Schema Explorer exposes a tree-view representation of schema content (see Figure 6.32). Using this explorer, you can expand any of the schema container elements to view their child elements. The toolbar on this explorer window lets you search for schema elements and change the sort order.

Although this hierarchical view of the schema is useful in its own right, the real purpose of the explorer window is to select items to view/edit in the design window. In fact, the explorer and designer windows are inseparable pairs: closing the designer automatically closes the explorer.
The XML Schema Designer
The schema design window is where all the schema editing takes place. You can edit or view a schema (or set of schemas) by dragging items from the XML Schema Explorer window onto the XML Schema Designer surface.
After you have added the schema to the design surface, the schema design window provides three different views into the schema’s structure and content:
![]() The Start View is the default view. As its name implies, this is a launching page into the other views. The Start View also provides summary statistics for the XML schema (such as a count of the global elements, attributes, and types) and provides a quick and easy way to add these items to the design surface.
The Start View is the default view. As its name implies, this is a launching page into the other views. The Start View also provides summary statistics for the XML schema (such as a count of the global elements, attributes, and types) and provides a quick and easy way to add these items to the design surface.
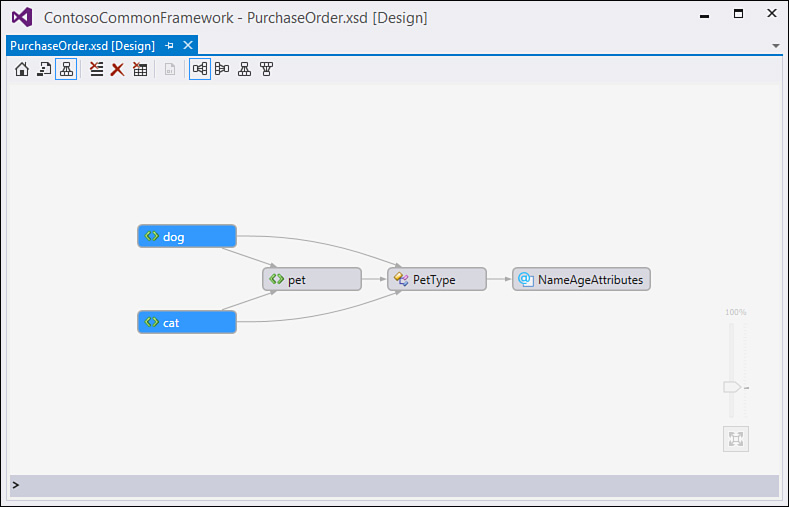
![]() The Graph View is a 2D view of the nodes and node relationships within a schema. The Graph View is primarily useful in visualizing the complexity and types of relationships within a schema. You can’t use this to directly edit the nodes or node relationships. Use the toolbar buttons at the top of the designer to change the way that the graph is displayed: left to right, right to left, top to bottom, or bottom to top. Double-clicking a node opens the schema’s XML in the XML editor, with the XML for that node highlighted. See Figure 6.33 for a picture of the Graph View with a more complex schema file loaded. This schema file represents a data model of pet types. In this example, we have a base pet entity that implements base-level attributes, and we have two other entities, dog and cat, that derive from the base entity. This relationship is clearly depicted in the graph view.
The Graph View is a 2D view of the nodes and node relationships within a schema. The Graph View is primarily useful in visualizing the complexity and types of relationships within a schema. You can’t use this to directly edit the nodes or node relationships. Use the toolbar buttons at the top of the designer to change the way that the graph is displayed: left to right, right to left, top to bottom, or bottom to top. Double-clicking a node opens the schema’s XML in the XML editor, with the XML for that node highlighted. See Figure 6.33 for a picture of the Graph View with a more complex schema file loaded. This schema file represents a data model of pet types. In this example, we have a base pet entity that implements base-level attributes, and we have two other entities, dog and cat, that derive from the base entity. This relationship is clearly depicted in the graph view.
![]() The Content Model View is a graphical, hierarchical view of the nodes and node elements, attributes, types, and groups. This view is particularly useful if you are trying to understand the details of a particular portion of the schema. For instance, by double-clicking a type, you can quickly gain a fairly complete understanding of that type’s schema, including elements, attributes, types, and groups (in addition to any constraints or relationships that are defined in the schema). This view also provides a simple way to select nodes: an A-Z list of all nodes within the schema appears in the list box to the left of the design surface. Clicking the node in this list displays the node details on the design surface (see Figure 6.34).
The Content Model View is a graphical, hierarchical view of the nodes and node elements, attributes, types, and groups. This view is particularly useful if you are trying to understand the details of a particular portion of the schema. For instance, by double-clicking a type, you can quickly gain a fairly complete understanding of that type’s schema, including elements, attributes, types, and groups (in addition to any constraints or relationships that are defined in the schema). This view also provides a simple way to select nodes: an A-Z list of all nodes within the schema appears in the list box to the left of the design surface. Clicking the node in this list displays the node details on the design surface (see Figure 6.34).

You can switch among these views by using the options on the start page or by using the toolbar at the top of the designer window.
Using the Content Model View, it is easy to compare and contrast two or more nodes within a schema. Just select the nodes you want to view in the node list to the left of the design surface (using Ctrl+Left to add additional nodes to your selection). You can then use the design surface’s image scaler to get a high-level view of the nodes or to zoom in on specific details.