 Writing Code in the Code Editor
by Mike Snell, Lars Powers
Microsoft Visual Studio 2015 Unleashed, Third Edition
Writing Code in the Code Editor
by Mike Snell, Lars Powers
Microsoft Visual Studio 2015 Unleashed, Third Edition
- About This eBook
- Title Page
- Copyright Page
- Contents at a Glance
- Table of Contents
- About the Authors
- Dedication
- Acknowledgments
- We Want to Hear from You!
- Reader Services
- Introduction
- Part I: Introducing Visual Studio 2015
- Chapter 1. A Quick Tour of Visual Studio 2015
- Chapter 2. The Visual Studio IDE
- Chapter 3. The .NET Languages
- What’s New in C# 6.0 and VB 14
- Language Primer
- Language Features
- Infer a Variable’s Data Type Based on Assignment
- Create an Object and Initialize Its Values (Object Initializers)
- Define a Collection and Initialize Its Values
- Creating an Instance of a Nonexistent Class
- Add Methods to Existing Classes (Extension Methods)
- Add Business Logic to Generated Code (Partial Methods)
- Access and Query Data Using the .NET Languages
- Write Simple Unnamed Functions Within Your Code (Lambda Expressions)
- Splitting an Assembly Across Multiple Files
- Working with XML Directly Within Your Code (VB Only)
- Removing Unused Arguments from Event Handlers (VB Only)
- Creating an Automatically Implemented Property
- Dropping the Underscore in VB for Line Continuation
- Working with Dynamic Languages/Objects
- Covariance and Contravariance
- Asynchronous Programming
- The .NET Framework
- Summary
- Part II: An In-Depth Look at the IDE
- Chapter 4. Solutions and Projects
- Chapter 5. Browsers and Explorers
- Chapter 6. Introducing the Editors and Designers
- Part III: Working with the Visual Studio Tools
- Chapter 7. Working with Visual Studio’s Productivity Aids
- Chapter 8. Testing Code
- Chapter 9. Refactoring Code
- Chapter 10. Debugging Code
- Chapter 11. Deploying Code
- Chapter 12. Developing Applications in the Cloud with Windows Azure
- Chapter 13. Working with Databases
- Part IV: Extending Visual Studio
- Part V: Building Web Applications
- Chapter 17. Building Modern Websites with ASP.NET 5
- Chapter 18. Using JavaScript and Client-Side Frameworks
- Chapter 19. Building and Consuming Services with Web API and WCF
- Part VI: Building Windows Client Apps
- Chapter 20. Building Windows Forms Applications
- Chapter 21. Building WPF Applications
- Chapter 22. Developing Office Business Applications
- Part VII: Creating Mobile Apps
- Chapter 23. Developing Windows Store Applications
- Chapter 24. Creating Windows Phone Applications
- Chapter 25. Writing Cross-Platform Mobile Applications with Apache Cordova
- Index
- Code Snippets
Writing Code in the Code Editor
Because the code editor’s primary purpose is “word processing” for source code, let’s first look at writing the simplest of routines, a “Hello, World” function, from the ground up using the code editor.
Figure 6.4 shows a code editor with an initial stubbed-out console file. This was produced by creating a new Visual C# Console project using the Solution Explorer. Double-clicking the Program.cs file within that new project displays the source code for this console application.
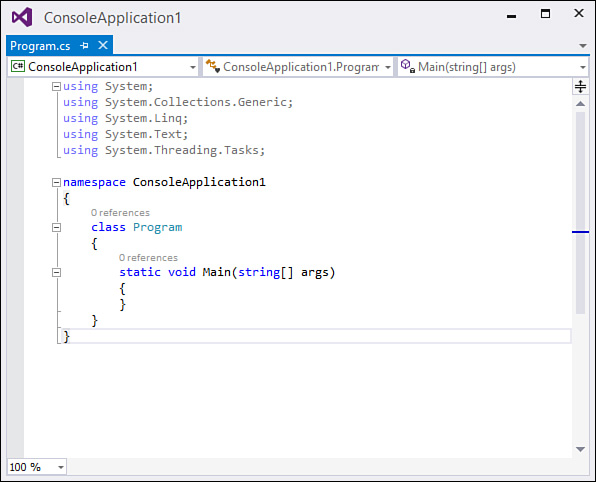
As you can see, Visual Studio, as a result of the template used for creating the project, has already filled in some code.
using System;
using System.Collections.Generic;
using System.Linq;
using System.Text;
using System.Threading.Tasks;
namespace ConsoleApplication1
{
class Program
{
static void Main(string[] args)
{
}
}
}
To demonstrate the code editor in action, write the code that outputs the "Hello, World!" string to the Console window.
Within the Main routine, add the following.
Console.WriteLine("Hello, World!");
To begin writing the code, simply place your cursor in the window by clicking within the Main routine’s braces, press Enter to get some space for the new line of code, and type the Console.WriteLine syntax.
These and other productivity enhancers are discussed at great length in the next chapter. Here, we focus on the basics of editing and writing code in the editor window.
Now that you have seen the code editor in action (albeit for a very simple example), you’re ready to dig more into the constituent components of the editor window.
Tip
Visual Studio supports “zooming” within any open code editor/text editor. Hold down the Ctrl key and then use the mouse scroll wheel to zoom the editor view in or out.
-
No Comment