
Working with Solutions
After you have created a solution, the primary vehicle is in place for interacting with your code base. In essence, this boils down to controlling the way its constituent projects and files are built and deployed. Solutions also provide functionality outside the scope of projects. The primary tool for manipulating solutions and projects is the Solution Explorer. This tool is discussed in depth in Chapter 5. Here, we look at the general procedures used to manage solutions by using the menu system in Visual Studio; keep in mind that most of the commands and actions discussed here can be initiated from the Solution Explorer.
Solution Items
In practice, the content you add most often to a solution is project related. But items can be added directly to a solution as well. Collectively, the term solution items refers to any non-project file that is attached to a solution. Because a solution can’t be compiled (only its projects will), it stands to reason that files added at the solution level serve no practical purpose from a compilation perspective. There are various reasons, however, that you might want to add solution items to your solution. For instance, adding solution items to your solution is a convenient way to store documentation that applies to the solution as a whole. Because you can add any type of file to a solution, this could take the form of documents, notes to other developers, design specifications, or even source code files from other solutions that could have some effect or bearing on the work at hand.
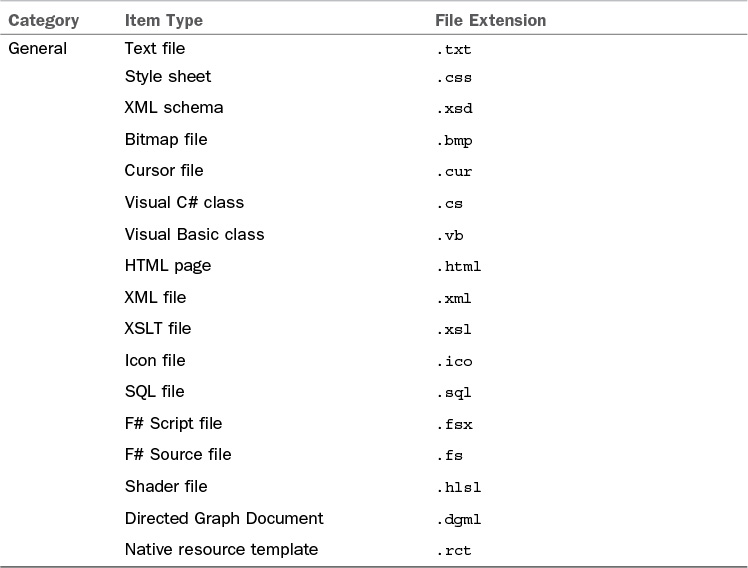
By default, Visual Studio supports a few types of solution items that can be created directly from within the IDE. They are grouped within three categories. Within each category are various file types that can be generated by Visual Studio. Table 4.1 shows the supported General types.
Note
Keep in mind that you are in no way limited as to the type of file you can add to a solution. Even though Visual Studio supports only a limited number of file types that can be created within the IDE, you always have the option of creating a file outside the IDE and then adding it to a solution by using the Add Existing Item command.
Figure 4.5 shows the Add New Item - Solution Items dialog box that appears when you try to add a new item to a solution.

Solution Folders
To assist in organizing the various files in your solution, you can use solution folders. Solution folders are virtual folders implemented entirely within Visual Studio. Creating a solution folder does not cause a physical file folder to be created on disk; these folders exist solely to provide another grouping level within the solution. Solution folders can be nested and are especially useful in large solutions that contain many different projects and miscellaneous files. For example, you might want to group all your web service projects under a single solution folder called Services and group the Windows forms elements of your solution under a user interface (UI) folder. On disk, files added to a virtual folder are physically stored within the root of the solution directory structure.
Note
Visual Studio creates solution folders automatically if you add a nonproject item to a solution. For instance, if we want to add a text file to the current solution, Visual Studio automatically adds a solution folder titled Solution Items to contain the text file. Similarly, you might see a Misc Files folder in some solutions. This is simply a solution folder.
Beyond providing a way to visually group items, solution folders allow you to apply certain commands against all the projects contained within an individual folder. For example, you can “unload” all the projects within a virtual folder by issuing the unload command against the virtual folder. (This makes the projects temporarily unavailable within the solution; they can be useful when trying to isolate build problems or solution problems.) After unloading the projects in a solution folder, another right-click on the same solution folder allows you to reload the projects.
Solution Properties
You can set several solution-level properties from within the IDE. The Solution Property Pages dialog box gives you direct access to these properties and enables you to do the following:
![]() Set the startup project of the solution. (This project runs when you start the debugger.)
Set the startup project of the solution. (This project runs when you start the debugger.)
![]() Manage interproject dependencies.
Manage interproject dependencies.
![]() Specify the location of source files to use when debugging.
Specify the location of source files to use when debugging.
![]() Control static code analysis settings.
Control static code analysis settings.
![]() Modify the solution build configurations.
Modify the solution build configurations.
You launch this dialog box by clicking the solution in the Solution Explorer window and then clicking View, Property Pages, or right-clicking the solution in the Solution Explorer and selecting Properties. On this dialog box, the property page categories are represented in a tree view to the left; expanding a tree node reveals the individual property pages available.
Specifying the Startup Project
Figure 4.6 shows the Startup Project property page. The Startup Project property page indicates whether the startup project should be the currently selected project, a single project, or multiple projects.

The default, and most typically used option, is to specify a single startup project. The project to run is specified in the drop-down box. If Current Selection is selected, the project that currently has focus in the Solution Explorer is considered the startup project. Also note that as soon as you switch from one file of a project to another file of another project, the latter project becomes the current project: no need to click on the project in the Solution Explorer!
You can also launch multiple projects when the debugger is started. Each project currently loaded in the solution appears in the list box with a default action of None. Projects set to None are not executed by the debugger. You can also choose from the actions Start and Start Without Debugging. As their names suggest, the Start action causes the indicated project to run within the debugger; Start Without Debugging causes the project to run, but it is not debugged.
Setting Project Dependencies
If a solution has projects that depend on one another—that is, one project relies on and uses the types exposed by another project—Visual Studio needs to have a build order of precedence established among the projects. For example, consider a Windows application project that consumes types that are exposed by a class library project. The build process fails if the class library is not built first within the build sequence.
Most of the time, Visual Studio is able to determine the correct sequence based on the references added to the different projects. You might need to manually indicate that a project is dependent on other specific projects. For instance, a UI project might depend on another class library project. To supply this information, you use the Project Dependencies property page (see Figure 4.7). By selecting a project in the drop-down, you can indicate which other projects it depends on by placing a check mark on any of the projects shown in the Depends On list.

Code Analysis Settings
Visual Studio has a built-in capability to perform static code analysis. Put simply, this allows the IDE to analyze and report on the health of your code with regard to how well it follows a set of best practices and guidelines. Microsoft provides multiple rules libraries that can be executed against your code. These range from globalization rules to security rules to basic design guideline rules. The Code Analysis Settings property page (see Figure 4.8) is used to specify which rule set should be run against which project in your solution. Chapter 9, “Refactoring Code,” covers more of the features of static code analysis.

Source File Location for Debugging
In certain situations, you might need to explicitly point the Visual Studio debugger at source files to use when the debugger executes. One such scenario occurs when you are trying to debug a solution that references an object on a remote machine. If the source is not available locally for that remote object, you can explicitly point Visual Studio at the source files.
The Debug Source Files property page (see Figure 4.9) has two different list boxes. The top box contains a list of folders that hold source code specific to your debugging scenario. The bottom list box enables you to indicate specific files that the debugger should ignore (that is, should not load) when debugging. This last option is useful when you may not have all the source code files on your local machine; you can simply tell Visual Studio to ignore files that aren’t available to the debugger.
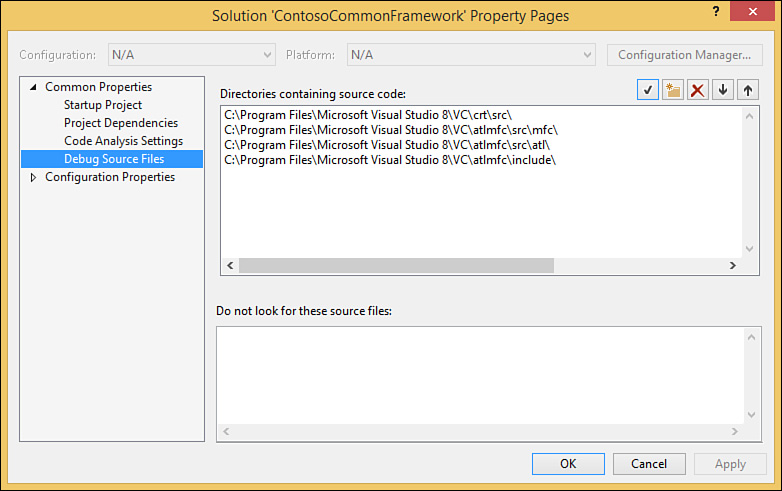
To add an entry to either box, first place your cursor within the box and then click the New Line button (upper right of the dialog box). This allows you to enter a fully qualified path to the desired folder. You remove an entry by selecting the item and then clicking the Cut Line button. The Check Entries button allows you to double-check that all entries point to valid, reachable folder paths.
If the loaded solution has any Visual C++ projects, you probably see several items already added into the Directories Containing Source Code list box.
Build Configuration Properties
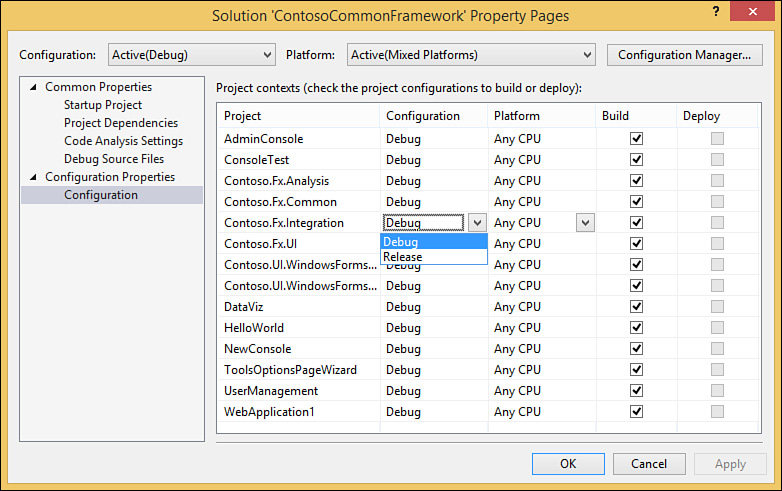
Build configurations are covered in depth in Chapter 10, “Debugging Code.” On the Build Configuration property page (see Figure 4.10), you indicate how Visual Studio builds the projects contained within the solution. For each project, you can set a configuration (Release or Debug by default) and platform (AnyCPU, x86, x64 or any specific target) value. In addition, a check box allows you to indicate whether to build and deploy a particular project.
See Chapter 10 for information on how to effectively use build configurations in your development.
Now that we have covered the concept of a solution in depth, let’s examine the role of projects within Visual Studio.