
Shooting Video
The 3GS was the first iPhone to let you shoot video. Then the iPhone 4 joined the video party. More recently, the iPhone 4S and the iPhone 5 took the device to new heights.
Both the 4S and 5 produce high-definition video at what techies refer to as 1,080p. The iPhone 5’s front-facing camera plays in the high-def league, too, but at the lower 720p video resolution standard. The front camera on the 4S does not do high-def. And neither do either of the cameras on the iPhone 4.
Moreover, the iPhone 5 made further improvements to the video stabilization feature introduced in the 4S. And through a process known as temporal noise reduction, you can shoot terrific video even in dim light.
Here’s how to shoot video on these latest phone models. Note that you can capture video in portrait or landscape mode:
1. Tap the Camera icon on the Home screen.
2. Drag the little on-screen button at the bottom-right corner of the display from the camera position to the video camera position, as shown in Figure 10-3.
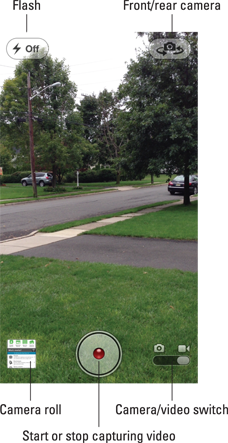
Figure 10-3: Lights, camera, action!
3. Tap the big round button with the smaller red circle at the bottom center to begin shooting a scene.
The red circle blinks and you see a counter timing the length of your video at the bottom left if you hold the phone in portrait mode or bottom right in landscape.
4. When you’re finished, tap the red circle again to stop recording.
Your video is automatically saved to your camera roll, alongside any other saved videos and still pictures.
 You can tap the LED flash button to shine a light while you record video. And, as with taking digital stills, you can switch from the front to the rear camera before starting to shoot video. But you can’t switch from the front to back camera while you’re capturing video. Remember too that the flash is available only with the rear camera.
You can capture still images while you’re shooting video. Tap the camera icon that appears when you’re shooting video.
Editing what you shot
We assume that you captured some really great stuff — as well as some footage that belongs on the cutting room floor. That’s not a problem because you can perform simple edits right on your iPhone. Just do the following:
1. Tap a video recording to display the on-screen controls shown in Figure 10-4.

Figure 10-4: Trimming video.
2. Drag the start and end points along the timeline to select only the video you want to keep.
Hold your finger over the section to expand the timeline to make it easier to apply your edits. You can tap the play button to preview the edit.
3. Tap Trim.
4. Decide what to do with your trimmed clip.
You can tap Trim Original to permanently remove scenes from the original clip. Or tap Save as New Clip to create a newly trimmed video clip; the original video is unaffected and the new clip is stored in the Camera Roll. Or tap Cancel to start over.
If you want to do more ambitious editing, check out iMovie for iPhone, a $4.99 app that resembles an ultralite version of iMovie for Mac computers.
After loading the video clips you’ve shot on the phone, iMovie lets you go Hollywood, within limits. Apple supplies eight custom themes — Modern, Bright, Travel, Playful, Neon, Simple, CNN iReport, and News — for adding titles and transitions to your budding masterpiece. Custom soundtracks are available, though you can also select a tune from your own music library. But what’s really cool are the movie trailers you can make, with a dozen possible styles: Adrenaline, Bollywood, Coming of Age, Expedition, Fairy Tale, Narrative, Retro, Romance, Scary, Superhero, Swashbuckler, and Teen. When you’ve finished editing, you can export the movie in one of three file sizes and send the project to iTunes. Or you can send it to your camera roll, Facebook, Vimeo, CNN iReport, or YouTube.
Sharing video
 Unlike other video on your iPhone, you can play back what you’ve just shot in portrait or landscape mode. And if the video is any good (and why wouldn’t it be), you’re likely going to want to share it with others. To do so, display the playback controls by tapping the screen, and then tap the icon almost all the way to the left of the screen (the icon is shown in the margin). You can e-mail the video, include it in a message, or send it to YouTube. And speaking of YouTube, read on.
Watching video on TV
The Retina display on the iPhone is worth boasting about, but sometimes you want to watch videos on your iPhone on a larger screen television. Apple affords you several ways to do so:
![]() Add a cable: Apple is all too happy to sell you a cable to connect the iPhone to a TV. The cable you choose depends on your TV setup, the available ports, and the iPhone model you own. Wired choices from Apple include a digital A/V adapter and HDMI cable (iPhone 4 or 4S only); a composite A/V cable; and a VGA adapter and VGA cable. The 5 is the first iPhone to use Apple’s new Lightning connector. At press time, no special accessories were available for iPhone 5, but we’re hopeful that Apple and its partners would likely have delivered Lightning versions of these A/V cables by the time you read this.
Add a cable: Apple is all too happy to sell you a cable to connect the iPhone to a TV. The cable you choose depends on your TV setup, the available ports, and the iPhone model you own. Wired choices from Apple include a digital A/V adapter and HDMI cable (iPhone 4 or 4S only); a composite A/V cable; and a VGA adapter and VGA cable. The 5 is the first iPhone to use Apple’s new Lightning connector. At press time, no special accessories were available for iPhone 5, but we’re hopeful that Apple and its partners would likely have delivered Lightning versions of these A/V cables by the time you read this.
![]() Use wireless streaming: You’ve heard us mention AirPlay, a wonderful feature for people who have iPhones and Apple TV boxes. As you’re watching video, tap the AirPlay icon (labeled in Figure 10-2), and then choose an Apple TV unit from the list of AirPlay devices that shows up. If all goes well, the video you’re watching now appears like magic on your TV set. If all doesn’t go well, make sure the Apple TV is tapping into the same wireless network as your phone.
Use wireless streaming: You’ve heard us mention AirPlay, a wonderful feature for people who have iPhones and Apple TV boxes. As you’re watching video, tap the AirPlay icon (labeled in Figure 10-2), and then choose an Apple TV unit from the list of AirPlay devices that shows up. If all goes well, the video you’re watching now appears like magic on your TV set. If all doesn’t go well, make sure the Apple TV is tapping into the same wireless network as your phone.
If you have an iPhone 4S or 5, you can take AirPlay streaming one step further and exploit the new AirPlay Mirroring feature. It lets you share or mirror to a TV anything on the iPhone screen — not just videos or music, but also games, pictures, web pages, and so on. As you rotate the iPhone from portrait to landscape or back, AirPlay Mirroring follows suit on the big screen. We think you’ll agree that the feature is cool and useful, especially if you want to share what you’re watching or doing with a larger audience. Note, however, that the quality of the experience is related to the quality of your Internet connection.
Restricting video (and other) usage
If you’ve given an iPhone to your kid or someone who works for you, you may not want that person spending time watching videos. You want him or her to do something more productive, such as homework or the quarterly budget.
That’s where parental (or might we say “Mean Boss”) restrictions come in. Please note that the use of this iron-fist tool can make you unpopular.
Tap Settings⇒General⇒Restrictions. Then tap Enable Restrictions. You’ll be asked to establish or enter a previously established passcode. Twice. Having done so, in the Allowed Content section, tap Movies, TV Shows, and any other content you want to restrict. Choose the Don’t Allow option for each, or choose a movie or TV show rating (PG or whatever) or both that you feel comfortable having the youngsters watch. If you made any specific app a no-no, the icon for that app is missing in action when you return to the Home screen. Same goes for any other restricted activities. To restore privileges, go back into Restrictions and tap Disable Restrictions. You’ll have to reenter your passcode.
You can apply restrictions also to Safari, the Camera app, FaceTime, iTunes, iBookstore, Siri, and more, as you see when we delve into Settings further (see Chapter 14).
With that, let’s roll the closing credits to this chapter.