Figure 6-10: Leaving a voice memo.
Voice Memos
Consider all the times you’d find it useful to have a voice recorder in your pocket — perhaps when you’re attending a lecture or interviewing an important source (that’s a biggie for us journalist types). Or maybe you just want to leave yourself a quickie reminder about something (“Pick up milk after work”). Well, you’re in luck. Apple includes a built-in digital voice recorder.
 A bunch of third-party apps add voice recording to the iPhone. Ed uses Recorder from Retronyms and Dictation from Dragon, and Bob uses iTalk Recorder from Griffin.
Making a recording
After you have that recorder in your pocket, how do you capture audio? When you tap the Voice Memos icon on the Home screen or in the Utilities folder, where it typically hangs out, up pops the microphone displayed in Figure 6-10. We’d tell you to talk right into that microphone, but it’s mainly for show. The two real microphones on the iPhone 4 and 4S are on the top and bottom of the device and the three microphones on the iPhone 5 are on the front, back, and bottom left (as pictured in Chapter 1).

Tap the red record button in the lower-left part of the screen to start recording. You see the needle in the audio level meter move as Voice Memo detects sounds, even when you pause a recording by tapping the red button a second time. A clock at the top of the screen indicates how long your recording session is lasting. It’s that easy.
The audio meter can help you determine an ideal recording level. Apple recommends that the loudest level on the meter be between –3dB and 0dB. We recommend speaking in a normal voice. To adjust the recording level, simply move the microphone closer or farther from your mouth.
Listening to recordings
After you capture your thoughts or musings, how do you play them back?
You can start playback in a couple of ways, and both involve tapping the same button:
![]() Immediately after recording the memo, tap the button to the right of the audio level meter. A list of all your recordings pops up in chronological order, as shown in Figure 6-11, with the most recent memo on top. That memo is the one you just recorded, of course, and it automatically starts to play.
Immediately after recording the memo, tap the button to the right of the audio level meter. A list of all your recordings pops up in chronological order, as shown in Figure 6-11, with the most recent memo on top. That memo is the one you just recorded, of course, and it automatically starts to play.
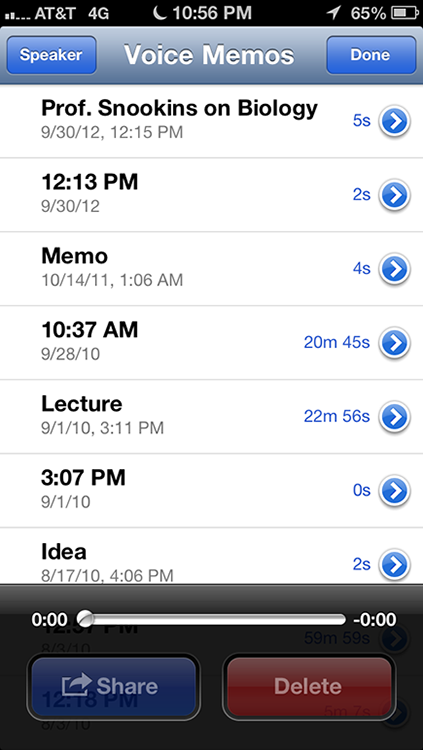
Figure 6-11: Tap the voice memo you want to play.
![]() If you haven’t just recorded something, tapping the button to the right summons the same list of all your recordings. However, nothing plays until you tap a recording in the list and then tap the little play button that appears to the left of the date and time that the recording was made (or to the left of the label you assigned to the recording, as we explain in the “Adding a label to a recording” section, later in this chapter).
If you haven’t just recorded something, tapping the button to the right summons the same list of all your recordings. However, nothing plays until you tap a recording in the list and then tap the little play button that appears to the left of the date and time that the recording was made (or to the left of the label you assigned to the recording, as we explain in the “Adding a label to a recording” section, later in this chapter).
You can drag the playhead along the scrubber bar to move ahead to any point in the memo.
If you don’t hear anything after tapping play, tap the Speaker button in the upper-left corner of the screen. Sound will pump through the built-in iPhone speaker.
Trimming recordings
Maybe the person who left the recording rambled on and on. You just want to cut to the chase, for goodness’ sake. Fortunately, you can trim the audio directly on the iPhone.
Tap the right-pointing arrow next to the memo you want to trim, and then tap Trim Memo. A narrow, blue tube representing the recording appears inside a yellow bar, as shown in Figure 6-12. Drag the edges of this audio region to adjust the start and end points of the memo. You can preview your edit before tapping the Trim Voice Memo button by tapping the little play button.
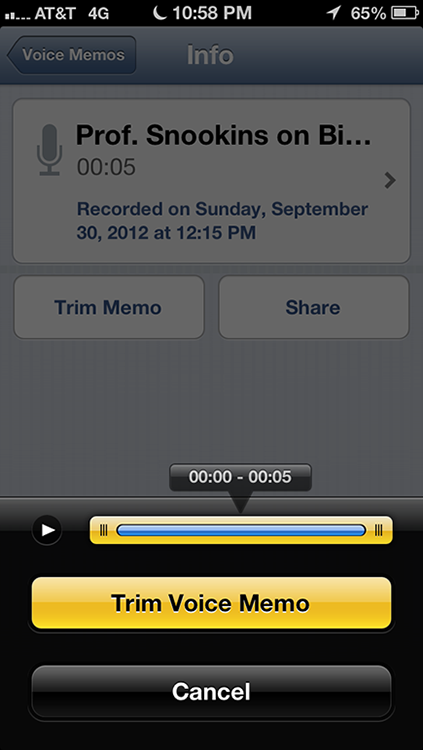
Figure 6-12: Trim a memo when someone says too much.
 Your edits are permanent. Make sure that you’re completely satisfied with your cuts before tapping Trim Voice Memo — or that you’ve synced the original back to iTunes on your computer so that you’re working with a copy.
Adding a label to a recording
When a memo is added to your list of recordings, it just shows up with the date and time of the recording. You see no other identifier. As memos accumulate, you may have a tough time remembering which recording was made for which purpose. You can label a recording with one of the labels Apple has supplied or, better, create a custom label.
Here’s how:
1. From the list of recordings, tap the right-pointing arrow for the memo to which you want to add a label.
The Voice Memo information screen appears.
2. Tap the right-pointing arrow in the box showing the date and time and the length of the video you just recorded.
3. Select a label from the list that appears.
Your choices are None, Podcast, Interview, Lecture, Idea, Meeting, Memo, and Custom.
4. Choose Custom to type your own label (Professor Snookins on Biology, for example).
That’s it. Your recording is duly identified.
You may want to share with others the good professor’s wacky theories. Tap Share from either the main Voice Memos list or the information screen. You then have the option to e-mail the memo or send it as part of a message (an MMS message, text message, or an iMessage).
You can also sync Voice Memos to your Mac or PC by using iTunes, as described in Chapter 3.
When you have no further use for a recording, you can remove it from the Voice Memos app by tapping it in the list and then tapping the Delete button.
Remind me
Apple failed to provide a reminders or to-do app in its early iPhones, but fortunately several decent third-party apps helped fill the bill. With the iPhone 4S, however, Apple came to the realization that having a Reminders app of its own is a good thing. We agree.
The Reminders app isn’t just any ordinary to-do list: Reminders on the iPhone can be tagged to your location, and it also works nicely with Calendar (iCal on older Macs) and Reminders on a Mac running Mountain Lion, and iCloud. iCloud can keep reminders in sync across all your iOS devices and computers.
Consider the power of tying a reminder to your location. You’ll be notified of the items you must pick up at the supermarket at the moment you drive into the grocery parking lot. Or perhaps a reminder to call your spouse will pop up before you open your front door following a business trip.
Reminders are organized in lists, as shown in Figure 6-13. Apple supplies a general Reminders list, and a list that reveals the items you’ve completed. (We love the sense of accomplishment peeking at that list affords us.)

Figure 6-13: Listing your Reminders lists.
You can create your own lists, of course, perhaps one for groceries, another for the tasks you must do for the PTA. Lists show the due date or the location or both. You can swipe to the left or right to quickly jump from one list to another. In addition, tap any of the dates shown at the bottom of the list to reveal reminders due on that particular date.
To add a reminder to a given list, tap the list in question. (For example, we tapped the Groceries list and summoned the list shown in Figure 6-14.) Tap the + button at the upper right, and type the name of the reminder you have in mind. You can also just type the reminder directly in an available space on the list. Tap Edit if you want to remove any items on the list or change their order.

Figure 6-14: Remind me to get coffee.
To add or edit a list itself, tap the icon with the three bars at the upper-left of the Reminders screen to return to the list of lists. From the screen that appears, you can also search through all reminders.
To add or edit reminder details, tap the reminder itself. From the next screens, you’ll be able to choose a date and time to be reminded. You can also request to be reminded at a given location. Choose Remind Me at a Location, select your current whereabouts, and then choose When I Leave or When I Arrive. To specify the location to use for the reminder, tap Current Location⇒Choose Address, and enter a new address or select a name from the iPhone Contacts list that appears. (Remember to turn on Location settings in Settings, if it’s not already on.)
Please note that the location feature doesn’t work with Microsoft Exchange or Outlook accounts or in every locale. And if your phone is locked, you may also experience Reminder delays.
Reminders are a great reason to call on Siri. Ask her to remind you of something and she will do your bidding.
You can view your reminders and see alerts in Notification Center. You can turn on Do Not Disturb in Settings (see Chapters 4 and 14) if you don’t want to be nagged by a Reminder.
..................Content has been hidden....................
You can't read the all page of ebook, please click here login for view all page.