
Creating the Services (Controller)
We will start with an example of coding the service from scratch. For starters, we are going to add a controller class to the project we’ve been working with. The following walks you through this process:
1. Right-click the Controllers folder and choose Add, New Item. From the Add New Item dialog, select Web API Controller Class. Figure 19.5 shows an example. Notice the left side of the dialog that ASP.NET 5 is selected.
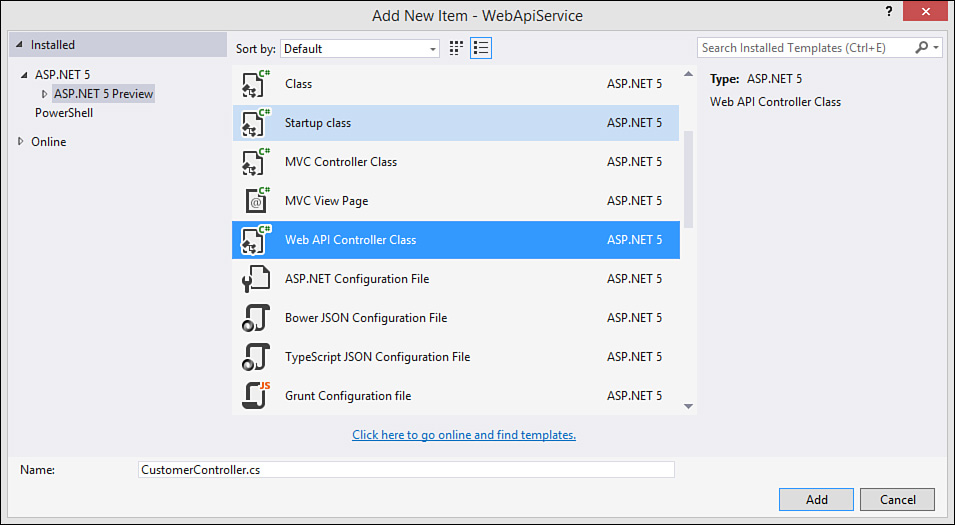
2. Name the file CustomerController and click the Add button.
Visual Studio will then create a controller class on your behalf, specifically configured for the Web API. Listing 19.2 shows an example. There are a few items to note. First, notice this class inherits from the new Microsoft.AspNet.Mvc.Controller (and not the previous namespace, System.Web.Http.ApiController). Also, notice that the class has default methods stubbed out for Get, Post, Put, and Delete. Finally, notice the Route attribute at the top of the class. This controls the way your URLs are routed to the controller and its methods (more on this in a moment).
LISTING 19.2 The Default Web API Controller Template Class
using System;
using System.Collections.Generic;
using System.Linq;
using System.Threading.Tasks;
using Microsoft.AspNet.Mvc;
namespace WebApiService.Controllers
{
[Route("api/[controller]")]
public class CustomerController : Controller
{
//GET: api/values.
[HttpGet]
public IEnumerable<string> Get()
{
return new string[] { "value1", "value2" };
}
//GET api/values/5.
[HttpGet("{id}")]
public string Get(int id)
{
return "value";
}
//POST api/values.
[HttpPost]
public void Post([FromBody]string value)
{
}
//PUT api/values/5.
[HttpPut("{id}")]
public void Put(int id, [FromBody]string value)
{
}
//DELETE api/values/5.
[HttpDelete("{id}")]
public void Delete(int id)
{
}
}
}
The next step is to write code inside these stubbed-out methods to service requests for Customers and return the appropriate results. Just like an MVC application, these methods can be called by addressing a URL and passing parameters in the query string as part of the request. The response will be sent as the body of the HTTP response message (more on all this in a moment). Before writing these methods, it is important to note a little more about our HTTP services written with ASP.NET 5.0.
HTTP web services leverage the standard HTTP verbs of GET, PUT, POST, and DELETE. These HTTP verbs indicate the required HTTP actions. For example, if a user is requesting a page, the browser issues an HTTP GET to the server; if the user posts data to the page, the browser issues an HTTP POST. Services work the same way: the calling client issues an HTTP request (GET, POST, and so on). The request is mapped to your code via a route (more on this in a moment). Your code then returns the HTTP results as a response.
Note
You can get by with just GET and POST for all your web service needs. In fact, there are many proponents of this approach. There was a time when not all browsers and corporate firewalls allowed PUT and DELETE. (All modern browsers do.) This chapter leverages all these HTTP verbs as Microsoft’s template does the same. In fact, you can decorate a method as accepting both verbs (POST and DELETE, for example).
You use attributes to decorate methods in your controller with the appropriate HTTP verb. This allows ASP.NET to route the request appropriately. The following outlines these attributes and their usages:
![]() [HttpGet]—Indicates a request for data and is used to retrieve a single object instance (typically as JSON message) or a list of objects.
[HttpGet]—Indicates a request for data and is used to retrieve a single object instance (typically as JSON message) or a list of objects.
![]() [HttpPost]—Marks a method as
[HttpPost]—Marks a method as HttpPost when you intend to post data to an existing URL/service. The method will receive the submitted data, and you can use it as you see fit within the method (typically adding or updating an item in your model).
![]() [HttpPut]—Can be used like
[HttpPut]—Can be used like POST (to send data to the server). Notice in the template (Listing 19.2) it is being used as the CRUD (create, read, update, and delete) operations. However, the PUT verb is more a part of the HTTP standard than anything else. PUT was meant for accessing a resource that does not exist (think page or image). If not found, the PUT will create the resource on the server (and thus the URL would be formed). If found, PUT simply was to replace the resource. You can still use PUT to do a CRUD update if that makes your code cleaner. However, you can also just use POST.
![]() [HttpDelete]—Used to indicate an item in your model should be deleted.
[HttpDelete]—Used to indicate an item in your model should be deleted.
Note
If you used prior editions of ASP.NET Web API, you recall that methods were mapped to HTTP verbs primarily based on method naming conventions. For example, you would write GetCustomer() or PostCustomer(). Decorating the method with an attribute was optional. With ASP.NET 5.0 Web API, attributes are required to map HTTP verbs to method names (at least in the version used when writing this book).
The use of these HTTP verb-based attributes aligns your services clearly with the HTTP specification and makes the intent of your code clear. This makes the code easier to understand and work with. Let’s look at writing a few of these service methods for accessing our Customer model.
Tip
When you’re building a web service, it is best to group functionality into coarse-grained interfaces. You don’t want web methods that do a number of fine-grained operations, such as setting properties. This chatty nature can be expensive when communicating across the Internet.
Of course, this approach is also contrary to most object-oriented application designs. Therefore, the use of a proxy object to bundle operations around a business object is ideal. The business object is serialized and passed across the wire. On the other side, it can be deserialized and then worked with in an in-process manner (in which chatty calls are not expensive).
Get a Customer (HttpGet)
The first method we will add to our service is Get(int id). It will return a customer object and its values based on the id parameter passed on the URL. The customer will be returned from a collection of customers. This allows us to simulate looking up the customer from a database and thus extract that complexity. The following walks you through this first step:
1. Open CustomerController.cs.
2. Add a using statement to the top of the class for your model as follows: using WebApiService.Models;
3. Add a static variable as a generic collection of Customer objects to simulate data table results, as in the following:
//Simulate getting customers from a database.
static readonly List<Customer> _customers = new List<Customer>()
{
new Customer { Id = 1, Name = "Customer 1", Email = "[email protected]" },
new Customer { Id = 2, Name = "Customer 2", Email = "[email protected]" },
new Customer { Id = 3, Name = "Customer 3", Email = "[email protected]" }
};
Next up is the method itself. The generated method for GET that takes an id parameter returns a string. In our case, we want to return a Customer object. Therefore, we replace the string return type with IActionResult. We then write some LINQ to look up the customer by ID from the collection class created previously. If we don’t find it, we return an instance of HttpNotFoundResult. Listing 19.3 shows the new web service method. Notice also that we added the type (id:int) to the HttpGet attribute to constrain (strongly type) the parameter passed. Passing a string value for the ID, for instance, would result in a 404 error (resource not found).
LISTING 19.3 The Get Method to Return a Customer from the Collection
[HttpGet("{id:int}")]
public IActionResult Get(int id)
{
var customer = _customers.FirstOrDefault(x => x.Id == id);
if (customer == null)
{
return HttpNotFound();
}
return new ObjectResult(customer);
}
You can now run this basic service and view the results. Before you do, you should configure what happens when Visual Studio launches the browser in debug mode. You can do so by right-clicking the project in Solution Explorer and choose properties. Here you will see the Debug node on the left. One of the configuration settings is Launch Browser. Remember, this is a service and there is no UI to be shown in a browser. However, we will use the browser to call service methods as URLs and view the results. Use this screen to clear the URL for Launch Browser (removing the default, “api/values”) as shown in Figure 19.6.

FIGURE 19.6 Use the project properties to indicate how a service application is launched by Visual Studio in debug mode.
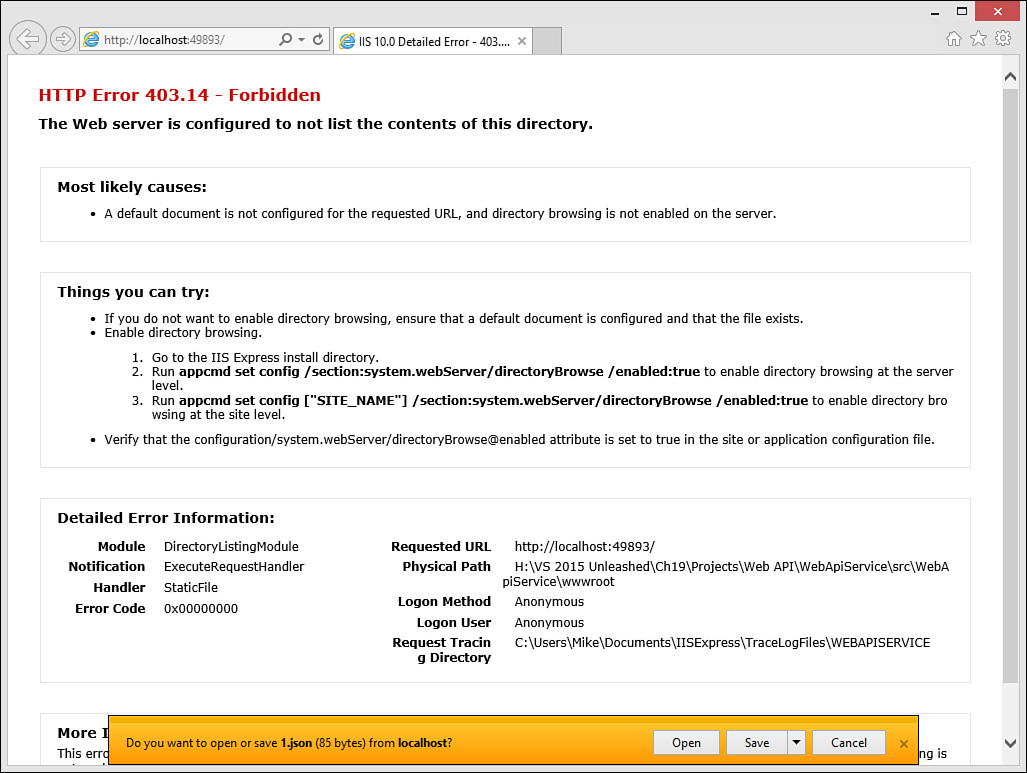
Now, run the web application in debug mode (Start button set to IIS Express). This will launch a web browser pointed at your site (localhost). Again, because we have no pages in the site, a 403 (forbidden) error will display; the server thinks you are trying to list contents of the directory.
To invoke the service, you need to enter a URL that points to it. Recall from Listing 19.2 that comments above each service method actually describe the URL format required to invoke the method. These URL formats, like the rest of MVC, follow a routing convention that we will discuss momentarily.
To access the Get service by ID, you need to enter a URL in the form http://localhost: xxxxx/api/customer/1, where xxxxx is the random port number IIS Express has assigned to your site. The value 1 simply indicates a possible value for the id parameter.
Doing so invokes the service from Internet Explorer (IE). IE then asks you if you want to open or save the JSON result as a file. The lower part of Figure 19.7 shows an example.
Clicking the Open option in Figure 19.7 will open the file inside of Visual Studio. The file contains the customer object as represented by JSON. The following shows the result (formatted with line breaks). You can now use this service from JavaScript, a mobile device, or a similar client.
{"Id":1,"Name":"Customer 1","Email":"[email protected]","OptInEmail":false, "
OptInPhone":false,"Notes":null}
Note that the same request in Firefox and Chrome will, by default, return the message in the browser (versus a separate file). Figure 19.8 shows the result from Chrome.

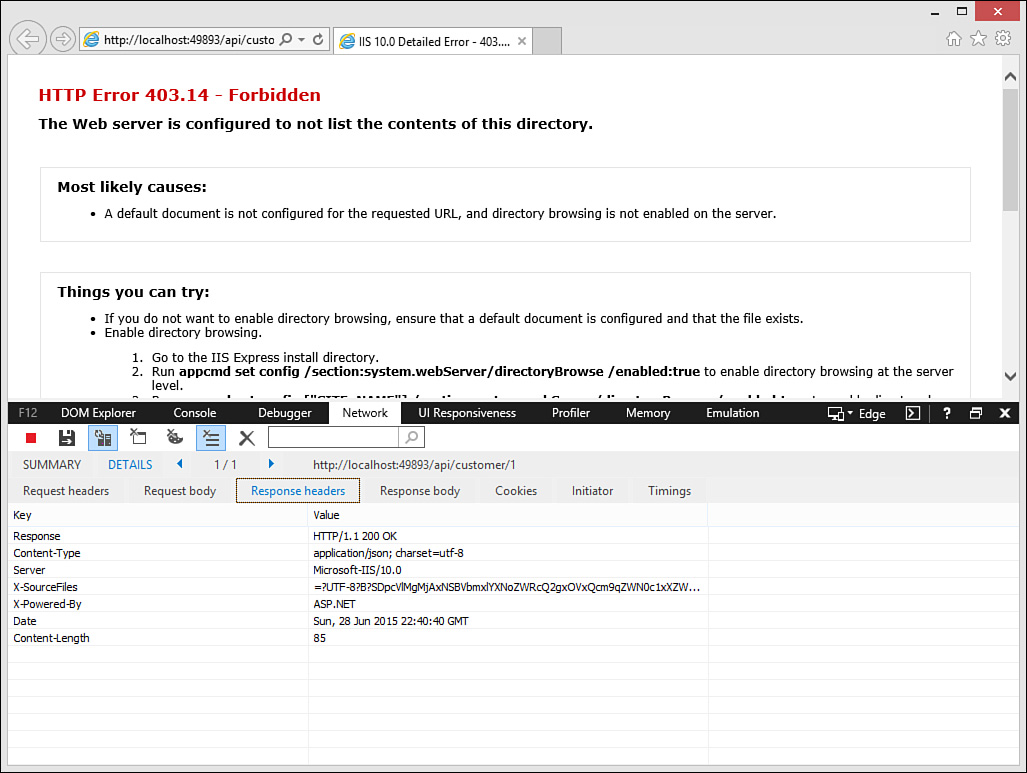
When debugging HTTP services, it is useful to view the HTTP request and response messages sent to and from your service. You can use the F12 tools built in to IE 9 and later to help. Then click the Network tab and click the Enable Network Capturing button (green arrow). You can now call your web service, and IE will capture the messages for you. To view them, find the entry in the list and double-click it. You should now have tabs to view the request and response headers and bodies. Figure 19.9 shows an example.
Get a List of Customers (HttpGet)
To return a list of customers, we simply need to return a collection of customers (in this case, based on the collection class used to simulate a data query). ASP.NET Web API takes care of wrapping this collection into an HTTP service response message format such as JSON or XML.
Recall the simple Get method from Listing 19.2. It returned an IEnumerable generic collection string type. We only need to change this from string to Customer. Listing 19.4 shows the new method code.
LISTING 19.4 The Get() Method to Return a List of Customer Objects
//GET: api/customer
[HttpGet]
public IEnumerable<Customer> Get()
{
return _customers;
}
A call to http://localhost:xxxxx/api/customer now returns the full customer collection. The following shows the results (formatted with line breaks for spacing).
[{"Id":1,"Name":"Customer 1","Email":"[email protected]","OptInEmail":false,
"OptInPhone":false,"Notes":null},
{"Id":2,"Name":"Customer 2",
"Email":"[email protected]",
"OptInEmail":false,"OptInPhone":false,"Notes":null},
{"Id":3,"Name":"Customer 3","Email":"[email protected]","OptInEmail":false,
"OptInPhone":false,"Notes":null}]
Create a New Customer (HttpPost)
The HTTP POST verb is used to post data to a URL as part of a request. Web developers should be used to this because they typically write forms that users submit back to the server for processing. An HTTP service works the same way. You use POST to send data to the service as part of the request body.
To get started, we can leverage the POST method generated by the template (see Listing 19.2). Notice that this method is already decorated with HttpPost. We change the parameter from a string to a Customer instance.
We also remove the cast of Customer to FromBody. The FromBody attribute works great if you are posting data to the service as JSON (as is typical). It basically tells Web API to look in the body of the request message for data that matches the parameter type (Customer). However, as you will see shortly, we are going to post an HTML form to the service from jQuery. The form would need to be converted into JSON (or similar) to comply with the FromBody attribute. Unfortunately, there is no method to convert form data directly to JSON (but you could write one or download one of the many that do exist). So, in this example, we will eliminate FromBody here and serialize the form for posting using jQuery.
Listing 19.5 shows the full method. Notice that the method does not return a value. Instead, it adds a code to the response (either bad request or created).
LISTING 19.5 The Post() Method to Add a New Customer Object
//POST api/customer.
[HttpPost]
public void Post(Customer customer)
{
if (!ModelState.IsValid)
{
//Send 400 - bad request.
Context.Response.StatusCode = 400;
}
else
{
//Get next customer id for collection.
customer.Id = 1 + _customers.Max(x => (int?)x.Id) ?? 0;
_customers.Add(customer);
//Send 201 - created code.
Context.Response.StatusCode = 201;
}
}
The Post method uses the HTTP POST verb; therefore, you need a client capable of sending a POST to the server to call the method. This could be a web page with a form that posts data, JavaScript, a unit test, or a native application capable of sending an HTTP POST. Microsoft has also written a default ASP.NET Web API Help Page that you can use to call and test your service without writing additional code. We look at these client options in an upcoming section.
Update an Existing Customer (HttpPut)
You can send an update request to the server using the PUT verb. In our example, it would be an update to an existing customer record. The Web API Controller template assumes this approach. However, recall that PUT was not meant specifically for this purpose. Instead, the Web API has adopted it as a possible convention. You do not need to use PUT to process an update. In fact, if you were writing a web form, you would use the HTTP POST to update data to the server (and not use PUT).
If you intend to use POST for your Web API (instead of PUT), you could simply change the method signature to include both an ID and a Customer instance (as in the PUT method signature in the template shown in Listing 19.2). Or, you could use the same method created in Listing 19.5 but add logic to check whether a valid ID is passed on the given object; if so, look up the Customer instance from _customers and update; if not, create a new customer.
For our example, we will use PUT. Listing 19.6 shows the method. Later, you will see how to call the PUT method using the HttpClient library.
LISTING 19.6 Use PUT to Send an Update to a Customer
//PUT api/customer/1 to update a customer.
[HttpPut]
public void Put([FromBody]Customer customer)
{
//Get customer to be updated.
var customerToUpdate = _customers.FirstOrDefault(x => x.Id == customer.Id);
if (customerToUpdate == null || !ModelState.IsValid)
{
//Send 400 - bad request.
Context.Response.StatusCode = 400;
}
else
{
//Simulate updating the customer values.
customerToUpdate.Name = customer.Name;
customerToUpdate.Notes = customer.Notes;
customerToUpdate.Email = customer.Email;
customerToUpdate.OptInEmail = customer.OptInEmail;
//Send 201 - created code.
Context.Response.StatusCode = 201;
}
}
Note
You can actually indicate a method that allows multiple HTTP verbs access. To do so, you use the attribute class AcceptVerbs and pass the verbs you want the method to accept. This would enable you to accept both PUT and POST on a single method, for example.
Delete a Customer (HttpDelete)
To delete an item using our service, we will leverage the HTTP DELETE verb. We do so by decorating the method with HttpDelete. The method takes an id parameter to indicate the customer to be deleted. We again constrain the parameter to an int value using the attribute definition at the top of the method. All that is left is to find the customer in the collection and remove it. Listing 19.7 shows the code. Notice that the code does not return anything. Instead, we just add the appropriate HTTP status code to the response. We will look at calling this method (along with POST and PUT) when we create a service client in an upcoming section.
LISTING 19.7 The Delete() Method to Delete a Customer from the Collection
//DELETE api/customer/1.
[HttpDelete("{id:int}")]
public void Delete(int id)
{
var customer = _customers.FirstOrDefault(x => x.Id == id);
if (customer == null)
{
//Send 404 - not found.
Context.Response.StatusCode = 404;
}
else
{
//Remove customer.
_customers.Remove(customer);
//Sent 204 - no content (delete successful).
Context.Response.StatusCode = 204;
}
}