
ASP.NET 5 Dependencies and Package Managers
Visual Studio 2015 and ASP.NET 5 make it easier to manage the many libraries and code packages on which a modern web application depends. This includes compiled server code libraries such as the .NET Framework itself (see the earlier section “The ASP.NET Framework”) using NuGet. Microsoft has also added support for handling client-side libraries using the popular, open source projects Bower, NPM, and Gulp. This section takes you through using each of these package managers to add features and functionality to your site.
Framework Dependencies and References (Using project.json and NuGet)
As discussed in “The ASP.NET Framework,” you can configure your web application to target the full, machine-wide .NET Framework using DNX 4.5.1. Or you can decide to target the more modular, application-specific .NET Core using DNX Core 5.0. The ASP.NET 5 Web Site template is set to dual-compile to both versions by default. This enables you to verify that your application supports both scenarios. Of course, you can change this behavior and only target the framework version (and packages) on which your application is intended to depend.
You manage your .NET Framework configuration using project.json, the References folder in Solution Explorer, project properties, and the NuGet package manager. Let’s start by examining configuration with project.json.
The project.json file replaces assembly references in favor of this new, lightweight approach to managing dependencies through references to NuGet packages. Recall that a NuGet package represents a server-side code library on which your application depends. The packages could be from a third party or created and available directly from Microsoft (EntityFramework and AspNet.WebApi, for example). Figure 17.4 shows an example of the default project.json file inside Visual Studio (for a Web Site set to no authentication).

FIGURE 17.4 The project.json file is used to configure the frameworks, package dependencies, and compile options for your web application.
Package dependencies are defined inside the “dependencies” data element. Notice in Figure 17.4 this section includes dependency references to AspNet.Mvc, the ConfigurationModel.Json, and many others. The project.json file includes many additional configuration sections; the following list provides an overview of many of these:
![]() Dependencies—Used to define the NuGet packages on which your application depends. These are defined by package name : version. You can edit this list, and NuGet will work behind the scenes in Visual Studio to update your installed packages accordingly.
Dependencies—Used to define the NuGet packages on which your application depends. These are defined by package name : version. You can edit this list, and NuGet will work behind the scenes in Visual Studio to update your installed packages accordingly.
![]() Frameworks—Indicates the target frameworks against which your application should be built. By default, this includes both the full, machine-wide .NET Execution Environment (dnx451) and the core version (dnxcore50).
Frameworks—Indicates the target frameworks against which your application should be built. By default, this includes both the full, machine-wide .NET Execution Environment (dnx451) and the core version (dnxcore50).
Note that the dependencies you add to the “dependencies” element discussed earlier apply to both DNX versions. You can also add framework-specific dependencies here. Recall that the core framework is highly modular; therefore, should you target just the core framework, you would then need to add package dependencies for the base class libraries you intend to leverage, such as System.Linq, System.Collections, and the like.
![]() Commands—Used to indicate command-line tasks that should be run when your application executes. This could be a host server for the application, unit tests, or any other commands you need executed to run your application.
Commands—Used to indicate command-line tasks that should be run when your application executes. This could be a host server for the application, unit tests, or any other commands you need executed to run your application.
![]() WebRoot—Indicates the root of the webserver; by default, this is
WebRoot—Indicates the root of the webserver; by default, this is wwwroot.
![]() Scripts—Allows you to run scripts when the project is built. This includes events for pre-build, post-build, pre-pack, post-pack, and more. These events are used by tools such as NPM and Gulp to install client-side packages and execute tasks to prepare these scripts for release.
Scripts—Allows you to run scripts when the project is built. This includes events for pre-build, post-build, pre-pack, post-pack, and more. These events are used by tools such as NPM and Gulp to install client-side packages and execute tasks to prepare these scripts for release.
![]() Exclude—Used to indicate folders for the compiler to ignore when building your application.
Exclude—Used to indicate folders for the compiler to ignore when building your application.
Let’s look at an example of adding a package dependency to project.json. We start with the default ASP.NET 5 Web Site template. In this case, however, we are going to configure project.json to only support DNX Core 5. The following walks you through this process:
1. Create a new web application based on the ASP.NET 5 Web Site template. You can run the application and click around to see how things work by default (including registering as a new user).
2. Inside Solution Explorer, expand the References node and both the DNX 4.5.1 and DNX Core 5.0 folders. Notice that both contain similar references. These are the ones defined at the top of project.json in the Dependencies section.
However, notice that the core reference does not include the system references. That is because the core framework is modular and only needs the portions required for your site. Should you need something inside those frameworks, you would add just it specifically (instead of adding the full framework).
3. Open the project.json file. Find the Frameworks section and remove the dnx451 reference. Save the file; when you do, notice the References node in Solution Explorer. It should now include the text (Restoring...). You will see this a lot as edits to project.json kick off NuGet to update your package. Figure 17.5 shows an example.

FIGURE 17.5 Edits to project.json will kick off NuGet to update your references and installed assemblies accordingly.
When complete, you should now only see DNX Core 5.0 under the References node in Solution Explorer.
4. The last thing you need to do is to set the appropriate runtime version for your application. It will no longer run against the full .NET Framework (because you removed this dependency). Instead, it needs you to select a version of the core runtime.
The .NET runtimes are referred to as a DNX version. By default, the template sets your project to run against the x86 version of the.NET Framework. This is the full version of the .NET Framework and Runtime.
To change the runtime, right-click the project node in Solution Explorer and choose Properties. This will bring up the Properties window for the application, as shown in Figure 17.6. Here you can set the target DNX version to the .NET Core as shown.

FIGURE 17.6 Use project properties to select the target runtime (DNX version) for your application (in this case, the .NET CORE).
5. You can now build and run your application. Notice that, by default, the template code works against the core. Should you need additional libraries, you can add them as you need them (as you will see next).
The application is now ready for cloud deployment. (It targets only the core framework.) Recall that one of the key benefits of the core is that it will install and run along with your application. It does not require your server admins to upgrade and patch a machine (and thus potentially break other things). This includes cloud-ready for Azure.
The dependencies shown in Figure 17.4 may not look like enough to allow your application to execute. However, it is important to note that these are packages (and not namespace imports). A package contains everything required for the package to run. The project.json file does not show these additional dependencies (in order to keep things cleaner). If you expand the packages in Solution Explorer, you will see just how much of the framework you depend on by using these packages. Figure 17.7 shows an example. Note that if you uninstall a given package, the subitems under the package are uninstalled as well (unless another package is also using it).
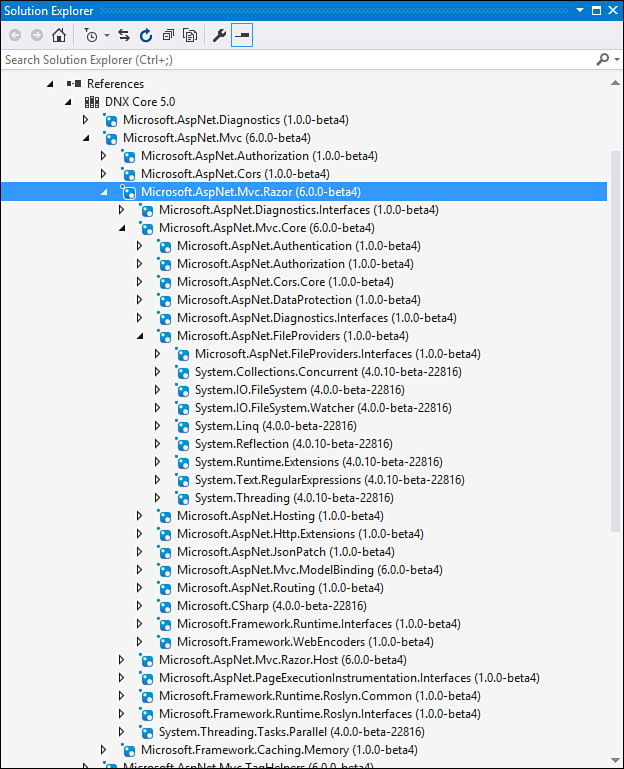
FIGURE 17.7 Each dependent package includes the other portions of the framework on which the package depends.
You can add dependencies directly to the project.json file. This is the equivalent of using NuGet to select a package and install it. Visual Studio provides IntelliSense to make setting these dependencies easier. As an example, suppose you want to add support for the popular SignalR package. (SignalR allows you to push content real-time from your web server to a client using WebSockets.) To add this support, you open project.json and start typing in either the full set of dependencies at the top of the file or the framework-specific dependencies near the middle of the file. Figure 17.8 shows the latter. Notice that you get IntelliSense as you peruse packages. Once you select the package, you get IntelliSense on the various versions available. When you save project.json, NuGet will install the package and add the reference to your project.

You can, of course, still use NuGet. To do so, right-click the References node in Solution Explorer and choose Manage NuGet Packages. This brings up the package manager, as shown in Figure 17.9. Notice that you can search for the package or just browse. Once you’ve selected it, you indicate a version and click either the Install or the Update button. Visual Studio will then add the dependency to your project.json file.

Visual Studio has added a Framework Selection drop-down to the code editor in the event you do need to program against multiple versions of the .NET Framework. Figure 17.10 shows an example. If you select the DNX Core 5.0 framework, for example, any code that would not work under this condition is compiled as an error and shown in the editor. The Debug tab allows you to switch which version of the framework you are targeting.

FIGURE 17.10 The code editor allows you to set a target framework against which your code will be debugged.
Tip: Supporting Multiple Framework Versions
If you do need to target multiple versions of the .NET Framework, each with different dependencies, you can often code around any conflicts or issues. You do so using #if statements in your code to create conditional compilation around code that is different between framework versions. You can use the configuration labels #if DNXCORE50 and #if DNX451.
Add Project Reference
Recall from the early chapters in this book that a Visual Studio solution can support multiple projects. You can reference one project from another. As an example, you may have your web and a shared class library in the same solution. To add a reference from the web project to the shared library, you right-click the References node in Solution Explorer and select Add Reference. This brings up the Reference Manager dialog shown in Figure 17.11. Here, you select the project containing the code you intend to reference.

Visual Studio adds the reference to the References node in Solution Explorer. It also updates your project.json file with the new dependency.
Using Bower for Managing Client Framework Dependencies
Visual Studio and ASP.NET 5 have embraced developing with popular open source client frameworks such as Bootstrap, AngularJS, and jQuery. You can also write your own project-specific JavaScript libraries. These libraries have their own package and task managers: Bower, NPM, and Gulp. Like NuGet, these package managers make the business of installing and updating shared frameworks much easier. The following provides a high-level overview of each:
![]() NPM—NPM stands for Node Package Manager because it was originally designed for Node.js. It is a JavaScript package manager used by Visual Studio for installing Bower and Gulp.
NPM—NPM stands for Node Package Manager because it was originally designed for Node.js. It is a JavaScript package manager used by Visual Studio for installing Bower and Gulp.
![]() Bower—Bower is a package manager for web libraries and client-side frameworks. Visual Studio uses Bower like NuGet for installing client-side frameworks. The
Bower—Bower is a package manager for web libraries and client-side frameworks. Visual Studio uses Bower like NuGet for installing client-side frameworks. The bower.json file works in a similar way to project.json (including IntelliSense).
![]() Gulp—Gulp executes tasks to automate the packaging of your JavaScript code, CSS, and related items for release. Tasks include minification of JavaScript, compilation of CoffeeScript to JavaScript, conversion of Sass to CSS, and many others. Visual Studio provides the Task Runner Explorer for working with Gulp.
Gulp—Gulp executes tasks to automate the packaging of your JavaScript code, CSS, and related items for release. Tasks include minification of JavaScript, compilation of CoffeeScript to JavaScript, conversion of Sass to CSS, and many others. Visual Studio provides the Task Runner Explorer for working with Gulp.
Let’s look at a couple of examples. First, we will add a JavaScript library to our project using Bower. In this example, we will add the CoffeeScript JavaScript library to our project. This library makes writing JavaScript easier. The CoffeeScript code is output as actual JavaScript when sent to a client. Of course, we could use any of the dozens of libraries available through Bower for our example:
1. To get started, open the bower.json file from Solution Explorer.
2. Inside the dependencies group, add a line for coffee-script. Notice that the editor uses IntelliSense to reach out to the Bower library and show you what is available.
3. Once coffee-script is selected, type a colon (:), and you will get a drop-down showing available versions. Figure 17.12 shows an example. Select version ~1.9.3.

Notice that all three versions have the same version number. These versions are marked with upgrade symbol options. The version is written as major.minor.patch. The use of the caret (^) indicates that you want to at least match to the latest major version specified. The use of the tilde (~) indicates that you want to at least match the minor version. Omitting the caret and tilde indicates that you want to use the exact version.
4. Next, save bower.json. This will instruct Bower to reach out and install CoffeeScript. You can verify installation by opening Solution Explorer and navigating to the Dependencies/Bower folder. You should see the new library here. You can also right-click this entire folder and choose Restore Packages. Figure 17.13 shows an example.

FIGURE 17.13 You can open the Bower folder and choose Restore Package to force install of a new package or version.
Note that you can use this same method to remove an installed package (right-click the package and choose Uninstall Package). Also, should you remove a reference from Bower.json, your installed package will now be marked “extraneous” indicating you can uninstall.
You can now work with CoffeeScript in your application.
Note that Visual Studio automatically restores packages when you open the solution. This includes getting updates based on your version numbers. Bower libraries are stored in your website directory under the folder bower_components. This folder is not in your solution because it is updated for you. You would not typically check in Bower components to source code control. Instead, these components are managed for you by Bower via the checked-in file bower.json.
Using Gulp to Manage Client Build Tasks
Let’s take a look at using Gulp for creating and executing an automated build task in our application. These tasks are not about building your server code. Instead, Gulp tasks help you with your client-side code, such as JavaScript and CSS. The following walks you through creating a style sheet using LESS and then creating a Gulp task to output that styles sheet as standard CSS:
1. To get started, we will add a LESS style sheet to our project. Recall that static files like a style sheet should exist inside wwwroot. LESS, however, is a preprocessor language for writing style sheets using variables and other constructs. The LESS file must be processed to a CSS file before being stored in wwwroot. Therefore, we will create a folder in which to store our LESS file until Gulp processes it and outputs it to wwwroot.
Right-click your project in Solution Explorer and choose Add, New Folder. Name the folder Assets.
Right-click the new Assets folder and choose Add, New Item. Select the item template LESS Style Sheet. Name your style sheet site.less.
2. Open site.less in the editor. One of the features of LESS is the ability to define variables and use those variables in your style definitions. The following shows a simple example of declaring the variable @light-gray and using it as the background color for the body tag.
@light-gray: #d5d5d5;
body {
background-color: @light-gray;
}
3. You now need to output this .less file to a .css file so you can use it with your application. This is where Gulp helps. Gulp allows you to create a processing task and bind the task to the Visual Studio build event.
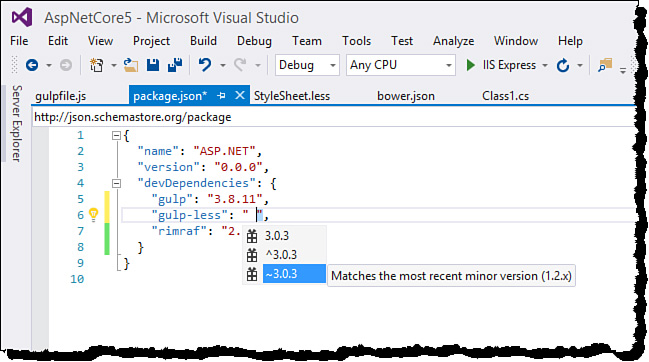
You could write a custom Gulp task. However, there are already Gulp tasks for pre-processing LESS files into CSS. To include the Gulp task, open package.json from Solution Explorer. This file manages the NPM (Node Package Manager) libraries. Under devDependencies, type gulp-less to select the LESS task for Gulp, as shown in Figure 17.14 (current version is 3.0.3).
4. Saving the package.json file will automatically install the gulp-less library under Dependencies/NPM. Like the Bower package folder, you can right-click NPM and select Restore Packages to force an install.
5. The next step is to define the Gulp task. To start, open the file gulpfile.js from Solution Explorer. This is a JavaScript file for defining Gulp task information and Gulp task plug-in options.
To start, add the less definition line to the top of the code. This sets a variable pointing to the gulp-less plugin. The code is as shown below:
var gulp = require("gulp"),
rimraf = require("rimraf"),
fs = require("fs"),
less = require("gulp-less");
Next, you add configuration options to the Gulp task by defining the Gulp task for the less object. Listing 17.1 shows the full contents of gruntfile.js after this addition. Notice the gulp.task('less',... code; it indicates that the file site.less should be output to the wwwroot/css folder as part of the preprocessing of LESS to CSS.
Tip
Listing 17.1 also shows the clean and copy Gulp tasks. These tasks are for cleaning out your wwwroot/lib folder and then copying the appropriate JavaScript files from the bower_components folder to the wwwroot/lib folder. Should your site stop behaving (and looking right) you can execute these tasks in Task Runner Explorer to clean things up and copy over fresh files.
LISTING 17.1 The gulpfile.js Configuration to Use a LESS Preprocessing Task
var gulp = require("gulp"),
rimraf = require("rimraf"),
fs = require("fs"),
less = require("gulp-less");
eval("var project = " + fs.readFileSync("./project.json"));
var paths = {
bower: "./bower_components/",
lib: "./" + project.webroot + "/lib/"
};
gulp.task('less', function () {
return gulp.src('./Assets/site.less')
.pipe(less())
.pipe(gulp.dest('./wwwroot/css'));
});
gulp.task("clean", function (cb) {
rimraf(paths.lib, cb);
});
gulp.task("copy", ["clean"], function () {
var bower = {
"bootstrap": "bootstrap/dist/**/*.{js,map,css,ttf,svg,woff,eot}",
"bootstrap-touch-carousel": "bootstrap-touch-carousel/dist/**/*.{js,css}",
"hammer.js": "hammer.js/hammer*.{js,map}",
"jquery": "jquery/jquery*.{js,map}",
"jquery-validation": "jquery-validation/jquery.validate.js",
"jquery-validation-unobtrusive": "jquery-validation-unobtrusive/jquery.validate.unobtrusive.js"
}
for (var destinationDir in bower) {
gulp.src(paths.bower + bower[destinationDir])
.pipe(gulp.dest(paths.lib + destinationDir));
}
});
6. The next step is to run the Gulp task. Visual Studio provides the Task Runner Explorer for doing so. To access it, right-click gulpfile.js in Solution Explorer and choose Task Runner Explorer. Figure 17.15 shows an example. You may have to use the refresh button on the left side of the window pane to update the Gulp tasks.

Notice that you can right-click the less element defined in gulpfile.js. Here you can choose to run the processor now or bind it to run based on IDE events of Before Build, After Build, and more. Select After Build from the context menu.
7. You can now run your application. When you do so, the Task Runner Explorer shows the output from the various tasks (including our less task).
After running the application, you can open the site.css file under wwwroot/css. The contents of the site.less file is now output to site.css as follows.
body {
background-color: #d5d5d5;
}
You should also see the results by running the application in your browser window. (You may need to refresh if styles were cached.)
This section has illustrated the many features of package management and project settings in ASP.NET 5 applications. As you will see, these skills are useful when building ASP.NET 5/MVC 6 websites, JavaScript SPA clients, and Web API projects. As we discuss these application types in the next sections and chapters, we will point back to configuration items discussed herein.