
Working with the Entity Framework
Like LINQ to SQL, Entity Framework (EF) is a technology that enables you to program against objects that are backed by tables within a relational database. And because they share that same overall goal, most of the concepts we covered with LINQ to SQL apply to EF-based applications as well. The notable difference with EF is the level of abstraction it provides. Whereas LINQ to SQL is a direct map of objects to database tables, EF maps database tables to an Entity Data Model (EDM). From there, you can map objects to the EDM.
Within an EF’s EDM, there are actually two discrete models that are maintained by Visual Studio: the conceptual model (think application objects) and the storage model (the database that stores those application objects).
In Visual Studio, the EF models are used by adding an ADO.NET EDM item to your project. Just like our previous look at the LINQ to SQL Data Classes project item, the EF project item is located under the Data category in the Add New Item dialog box (see Figure 13.54).

When you add an entity model to your project, a wizard launches (see Figure 13.55). There are three primary approaches of development with the entity framework: code first, model first, and database first. In the code first approach, you start your application design by writing code to define your classes. With model first, you start your application design by visually “drawing” the design of your application using Visual Studio. Finally, with database first, you are allowing the EF tools to build out your application structure by creating it based on an existing data model. Regardless of your starting approach, once an application has been initially constructed, EF will keep the code and data models in sync. In our case, we continue our walk-through by selecting the EF Designer from Database option (the database first approach). We will again use the AdventureWorks database.

Editing the Entity Data Model
After the entity model is added to your project, you can make changes to it using the Entity Data Model designer. This is the visual design surface for your model. There are also two other windows displayed in conjunction with the model designer. The Model Browser provides a Solution Explorer-like view of both the conceptual model and the storage model for your entities, and the Mapping Details window shows exactly how objects in the conceptual model are mapped and linked to tables in the storage model. Figure 13.56 shows all three windows open within the IDE. Note that when we added the entity model to our project, we opted to build out the model using every existing table within the AdventureWorks database, under the Human Resources schema. Let’s take a closer look at each of these windows.

The Designer
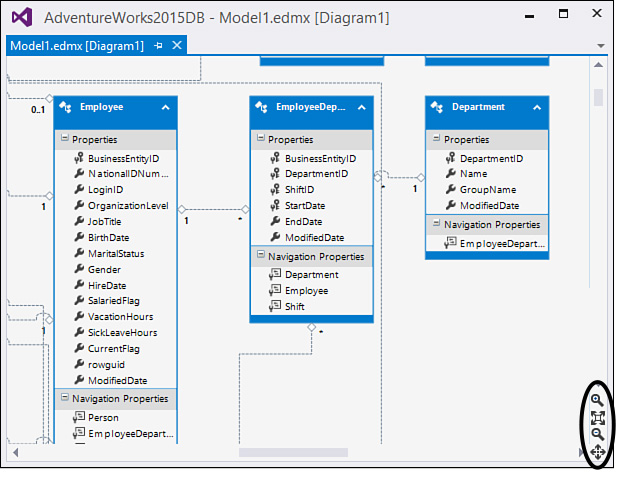
The designer shows a familiar, visual view of the conceptual model. Each object is depicted, along with its properties/fields, and relationships between objects are clearly visible. In Figure 13.56, we see the now familiar Employee to EmployeeDepartment to Department relationships. These relationships were copied directly from the database foreign key relationships. On the design window itself, there is a small set of navigation buttons set just under the vertical scrollbar (highlighted for you in Figure 13.57). Because you might be dealing with hundreds or even thousands of objects within the designer, you need a way to zoom in and out on the design surface. From top to bottom, these buttons enable you to zoom in, zoom the diagram to 100%, zoom out, and zoom the diagram so that all objects are visible at once.
You can move around objects on the design surface, but you can also use the designer to directly make changes to the model. For instance, you can select a property and change its name.
The Model Browser
The model browser window shows you all the elements that are contained within both the conceptual model and the storage model. This includes entities, tables, and relationships. You can use the model browser window to directly delete items from your models or modify their properties. With large models, it is often easier to locate the entity you are looking for with the model browser than try to visually find the object within the Entity Data Model designer pane.
You can immediately show any model element within the designer by right-clicking the element within the Model Browser and selecting Show in Designer.
One of the coolest things about the Model Browser window is its search functionality. By typing a search term into the search box at the top of the window, you can see every instance of that term anywhere within the model. The vertical scrollbar actually graphically depicts everywhere within the models that a search hit was found. If you examine Figure 13.58 closely, you see the results of a search for “Employee”; 74 matches were found. Within the vertical scrollbar, you see “blocks” that represent where the match was found within the model hierarchy. Hovering over those blocks gives you a ToolTip that identifies the exact name that contains the match. This enables you to quickly jump around your search matches within large models.

The Mapping Details Window
We have discussed the idea of the conceptual model and the storage model. But if these models lived in isolation, EF wouldn’t be able to achieve its ultimate goal of linking code objects to database tables because there wouldn’t be a way to map between the two models. The Mapping Details window is the tool within the IDE that lets you view and edit all the conceptual-to-storage model mappings.
Figure 13.59 shows the mapping details for the Employee object. All the mapping properties were preset for us because we chose to build out our conceptual model based on an existing database. When you select an entity with the designer, the mapping window will show an alphabetic list of all of the table columns. To the right of each column is displayed the property that the column maps to on the object.

The Mapping Details window is also used to map an object to your own, custom functions for performing inserts, updates, or deletes. Click the two icons on the top-left border of the Mapping Details window to change between these two modes.
Note
You aren’t limited to performing just a one-to-one map between objects and database tables. You could decide, for instance, that your conceptual model contains two Employee classes: HourlyEmployee and SalariedEmployee. You have the capability to create a function that filters the rows in the underlying Employee table and maps those rows to one or the other of these two objects. This is done quite easily in the Mapping Details window by adding a condition. Click the Add a Condition link within the window, and then specify a condition to apply against the SalariedFlag field on the table.
We have now covered the high-level overview of what the EF platform is and the tools and project items you use within Visual Studio to create EF-based projects. Now let’s dig a bit deeper to see how we would use these tools to perform common EF tasks.