
Code Outlining
Code outlining is used within the code editor; it allows you to collapse or expand regions of code along these container boundaries. A series of grouping lines and expand/collapse boxes are drawn in the selection margin. These expand/collapse boxes are clickable, enabling you to hide or display lines of code based on the logical groupings.
Tip
Both Visual Basic and C# provide a way to manually create named regions of code via a special region keyword. Use #region/#endregion (#Region and #End Region for Visual Basic) to create your own artificial code container that is appropriately parsed by the code outliner. Because each region is named, this is a handy approach for organizing and segregating the logical sections of your code. In fact, to use one example, the code that the Windows Forms Designer generated for you is automatically tucked within a “Windows Forms Designer generated code” region.
One quick way to implement a region is with Surround With. In the editor, highlight the code that you want to sit in a new region, right-click the highlighted text, select Surround With from the context menu, and then select #region (or #Region for VB).
Code outlining is best understood using a simple example. First, refer to Figure 7.1. This is the initial console application code. It contains a routine called Main, a class declaration, a namespace declaration, and several using statements. The code outline groupings that you see in the selection margin visually indicate code regions that can be collapsed or hidden from view.
Because the class declaration is a logical container, the selection margin for that line of code contains a collapse box (a box with a minus sign). A line is drawn from the collapse box to the end of the container. (In this case, because you are dealing with C#, the class declaration is delimited by a curly brace.) If you click the collapse box for the class declaration, Visual Studio hides all the code contained within that declaration.
Figure 7.7 shows how the editor window looks with this code hidden from view. Note that the collapse box has changed to a plus sign, indicating that you can click the box to reshow the now-hidden code and that the first line of code for the class declaration has been altered to include a trailing box with an ellipsis.

The HTML Editor also supports outlining in this fashion. HTML elements can be expanded or collapsed to show or hide their containing elements.
Using the Outlining Menu
Several code outlining commands are available under the Edit, Outlining menu (see Figure 7.8):
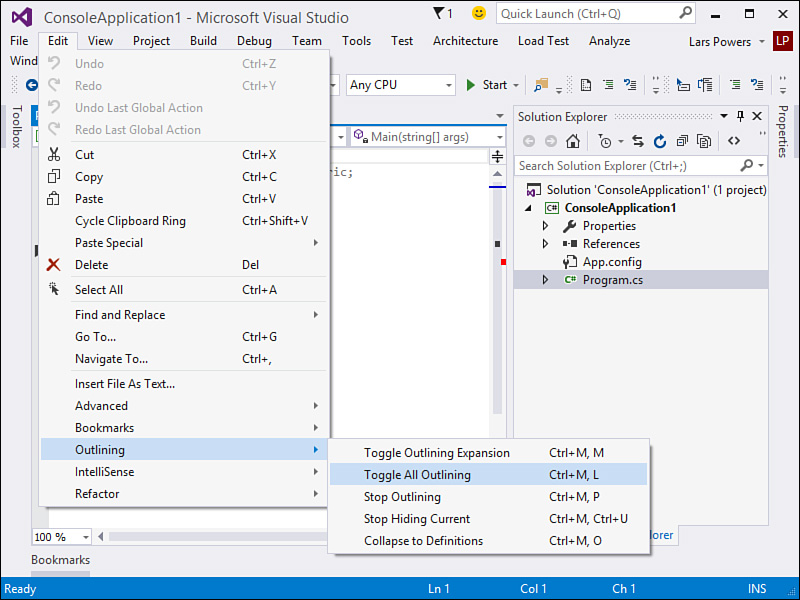
![]() Toggle Outlining Expansion—Based on the current cursor position in the editor window, hides or unhides the outline region.
Toggle Outlining Expansion—Based on the current cursor position in the editor window, hides or unhides the outline region.
![]() Toggle All Outlining—Hides or unhides all outline regions in the editor.
Toggle All Outlining—Hides or unhides all outline regions in the editor.
![]() Stop Outlining—Turns off automatic code outlining (any hidden regions are expanded). This command is available only if automatic outlining is turned on.
Stop Outlining—Turns off automatic code outlining (any hidden regions are expanded). This command is available only if automatic outlining is turned on.
![]() Stop Hiding Current—Removes the outline for the currently selected region. This command is available only if automatic outlining has been turned off.
Stop Hiding Current—Removes the outline for the currently selected region. This command is available only if automatic outlining has been turned off.
![]() Collapse to Definitions—Hides all procedure regions. This command is useful for distilling a type down to single lines of code for all its members.
Collapse to Definitions—Hides all procedure regions. This command is useful for distilling a type down to single lines of code for all its members.
![]() Start Automatic Outlining—Enables the code outlining feature. This command is available only if outlining is currently turned off.
Start Automatic Outlining—Enables the code outlining feature. This command is available only if outlining is currently turned off.
Code outlining is a convenience mechanism: by hiding currently irrelevant sections of code, you decrease the visible surface of the code file and increase code readability. You can pick and choose the specific regions to view based on the task at hand.
Tip
If you place the mouse pointer over the ellipsis box of a hidden code region, the contents of that hidden region are displayed to you in a ToolTip-style box; this is done without having to expand and reshow the code region.