Figure 14-4: Notify the iPhone of your notification intentions.
Settings for What iPhone Looks Like, Sounds Like, and Reports
The next bunch of settings control what the iPhone reports back to you, what the phone sounds like, and what it looks like.
Notifications
One of the biggest additions that came to the iPhone via the iOS 5 upgrade was Notification Center, discussed in Chapter 2. By swiping down from the top of the screen, you can receive a variety of notifications, from missed calls and texts to appointments.
Under Notifications Settings, you can choose which apps report information in Notification Center and choose whether these apps should be sorted manually or by time, that is, the order in which they come in. After you determine which apps belong in Notification Center, tap the app listing in the In Notification Center roster and choose an alert style (a banner that appears at the top of the screen momentarily before it disappears or an alert, which requires you to do something before it goes away).
App developers can send you alerts related to the programs you’ve installed on your iPhone by exploiting the Apple Push Notification service. Such alerts are typically in text form but may include sounds as well. Or they may appear in a little circle affixed to the app icon as numbered badges. You can receive such alerts even when the app isn’t running.
You can turn off notifications for individual apps. Simply tap an app in the In Notification Center list, and turn on or off the app’s sounds, alerts, or badges. Figure 14-4 shows available notification options for the Epicurious app.

 You’ll also find a setting here for the Do Not Disturb feature added in iOS 6. When turned on, the iPhone is respectful of your wishes to not be bothered by needless phone calls or alerts. The moon icon in the status bar reminds you that the feature is turned on. You can schedule the time that the Do Not Disturb edict is in effect and customize it to allow calls from your favorites or designated contacts. You can also turn on a Repeated Calls option that bypasses Do Not Disturb if the same caller rings you twice within three minutes. Read Chapter 4 for more about Do Not Disturb.
Meantime, for more on privacy, read the next section.
Privacy
Location, location, location. The iPhone makes good use of knowing where you are in the Maps app and several other apps and by geotagging photos taken with its camera. The iPhone exploits built-in GPS but can also find your general whereabouts by triangulating signals from Wi-Fi base stations and cellular towers.
If your iPhone knowing your location creeps you out a little, don’t fret. To protect your right to privacy, individual apps pop up quick messages (similar to the one shown in Figure 14-5), asking whether you want them to use your current location. But you can also turn off Location Services by going to Settings⇒Privacy. Not only is your privacy shielded, but you also keep your iPhone battery juiced a little longer.
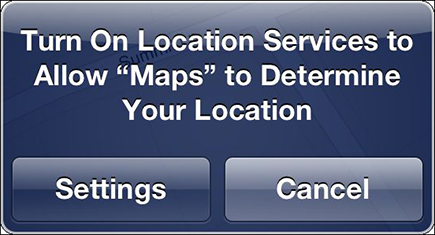
Figure 14-5: The Maps app wants to know where you are.
 You can also allow individual apps to determine your approximate location. Apps that are using location data are listed in Location Services. You can turn these on or off individually. If an app in Settings has a location icon (as shown in the margin), note the icon’s appearance. If the icon is
![]() Purple: The app recently used your location.
Purple: The app recently used your location.
![]() Gray: The app used your location within the past 24 hours.
Gray: The app used your location within the past 24 hours.
![]() Outlined: The app is using a geofence, or virtual perimeter, around a location. The Reminders app, for example, uses geofencing to remind you when you arrive at or leave one of these locations.
Outlined: The app is using a geofence, or virtual perimeter, around a location. The Reminders app, for example, uses geofencing to remind you when you arrive at or leave one of these locations.
If you scroll all the way down Location Settings and tap System Services, you’ll see a bunch of location settings tied to your cell network, your compass calibration, diagnostics and usage, Genius for apps, location-based iAds, time zone settings, and traffic. You can turn any of these on or off as well.
When an app is using your location, you’ll also see the location icon in the status bar at the top of the screen.
If you back out of the Location Services section of Privacy Settings to the main Privacy Settings screen (see Figure 14-6, left) you’ll see a list for Contacts, Calendars, Reminders, Photos, Twitter, Facebook, and, as noted earlier in this chapter, Bluetooth Sharing. Tap any one of the items to see the other apps that have requested access to the selected app. In Figure 14-6, right, for example, you can see the apps requesting access to Photos.
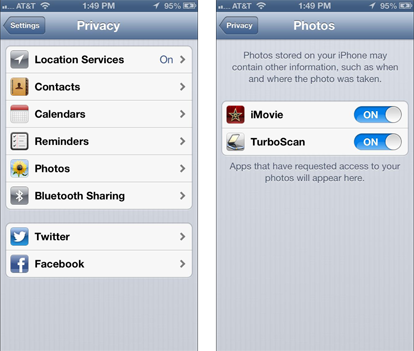
Figure 14-6: Tap an app in the Privacy list to see which apps are accessing it.
Sounds
Consider the Sounds settings area as the iPhone’s soundstage. There, you can turn on or off audio alerts for a variety of functions: new voicemail messages, new text messages, new mail, sent mail, Tweets, Facebook posts, calendar alerts, and reminder alerts. You also set ringtones and text tones here (as described in Chapter 4).
That’s not all. Want to hear lock sounds and keyboard clicks or not? The Sounds settings area is where you make that decision. In addition, you can determine whether the iPhone should vibrate when you receive a call. And you can drag the volume slider to determine the loudness of your ringer and alerts. Note that you can instead use the physical volume buttons on the side of the iPhone to change the volume of the ringer and alerts, as long as you’re not already on a call or using the iPod to listen to music or watch video.
Brightening up your day
Who doesn’t want a bright, vibrant screen? Alas, the brightest screens exact a trade-off: Before you drag the brightness slider shown in Figure 14-7 to the max, remember that brighter screens sap the life from your battery more quickly.

Figure 14-7: Sliding this control adjusts screen brightness.
 We recommend tapping the Auto-Brightness control so that it’s on. This control adjusts the screen according to the lighting conditions around the iPhone while being considerate of your battery.
Wallpaper
Choosing wallpaper is a neat way to dress up the iPhone according to your taste. You can sample the pretty patterns and designs that Apple has already chosen for you by tapping the thumbnails shown in Figure 14-8. But stunning as they are, these images may not hold a candle to the masterpieces in your own photo albums (more about those in Chapter 9). After making a selection, tap the image, and then tap Set. You can set wallpaper for the Home screen, the Lock screen, or both by tapping the appropriate button. The Home and Lock screens can have the same or different images.

Figure 14-8: Choosing a masterpiece background.
..................Content has been hidden....................
You can't read the all page of ebook, please click here login for view all page.