
Keeping Things in Focus
When composing your shot, you can take advantage of the Tap to Focus feature. Normally, the camera focuses on a subject in the center of the display, which you’re reminded of when you momentarily see a square appear in the middle of the screen, as shown in Figure 9-2. But if you tap elsewhere in the frame, perhaps on the face of your kid in the background, the iPhone accordingly shifts its focus there, adjusting the exposure and what photographers refer to as the white balance. For another moment or so, you see a new, smaller square over your dog’s face.
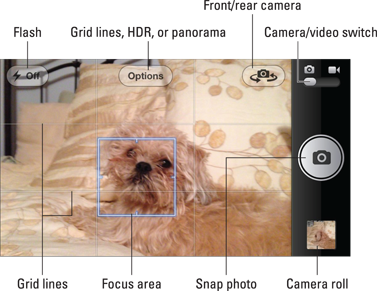
Figure 9-2: Squaring up for a focused photo.
 If you want to lock the focus and exposure settings while taking a picture, press and hold your finger against the screen until the rectangle pulses. AE/AF Lock will appear on the screen. Tap the screen again to make AE/AF Lock disappear.
You can also exploit a feature known as HDR, or high dynamic range, photography. Tap the Options button (labeled in Figure 9-2) to turn on HDR. The HDR feature takes three separate exposures and then blends them into a single image. In Settings (under Photos & Camera), you can choose to keep the “normal” photo along with your HDR result or just hang onto the latter.
From the front to the rear — and back
We figure that most of the time, you’ll use the main rear camera while shooting pictures (or video). But you may want to capture a shot of your own pretty face to post, say, on a social networking site such as Facebook. Not a problem. Just tap the front/rear camera button at the upper-right corner of the screen (labeled in Figure 9-2) to toggle between the front and rear cameras.
Firing up the flash
The iPhone 4, 4S, and 5 are the only models with an LED (light-emitting diode) flash — or any kind of flash — so they’re the only iPhones with a flash button (labeled in Figure 9-2). Because no flash is associated with the front-facing camera, you won’t see the button when you’re using that camera. When the button is available, tap it to change the setting to On, Off, or Auto. We suggest using the Auto setting, which lets the iPhone decide when it’s a good idea to fire up the flash.
Using the digital zoom
In iOS 4, you tap the screen to summon the zoom slider, and drag the slider to the right to get closer to a subject or to the left to zoom back out. In later versions of iOS, you pinch to zoom. So now when you spread your fingers or bring them back closer together, the zoom slider appears. Continuing to pinch or unpinch has the same effect of dragging the slider to the right or left.
 You may not always love the results you get when zooming in close. The iPhone has a digital zoom, not an optical zoom, and the quality distinction is enormous. Using digital zoom, you can get closer to your subject by zooming in up to 5x, but it effectively crops and blows up part of the image, which can result in fuzziness or blurring. Not to sound harsh, but a subject’s imperfections — and any inadequacies on the photographer’s part — may come to light.
Capturing pleasing panoramas
In San Francisco, you want a picture of the magnificent span that is the Golden Gate Bridge. In the Himalayas, you want to record a visual memory of Mt. Everest. For posterity, you want that perfect image of your entire clan at a family reunion.
In these situations, you need the panorama feature in iOS 6 (iPhone 4S and 5 only). This feature lets you shoot up to 240 degrees and stitch together a high-resolution image of up to 28 megapixels.

 Similar panorama features have been available on some point-and-shoot cameras and even rival smartphones. And it was possible to shoot panoramas on the iPhone 4 and 4S too via third-party apps. But now that the feature is baked into the Camera app, shooting panoramas is a veritable pleasure.
To summon a panorama:
1. Tap Camera⇒Options⇒Panorama.
2. Position the phone so that it’s at a proper starting point, and tap the Camera button when you’re ready.
3. Steadily pan in the direction of the arrow, as shown in Figure 9-3, left.
Tap the arrow if you prefer panning in the opposite direction. As you move methodically — if you go too fast, the iPhone will advise you to slow down — try and keep the arrow just above the horizontal line.
4. When the task is complete, tap Done and admire your handiwork (see Figure 9-3, right).
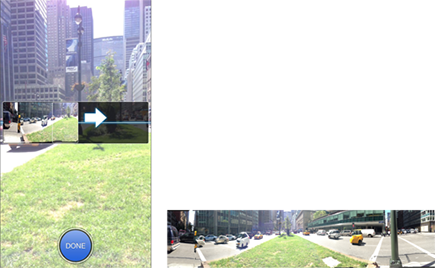
Figure 9-3: Steadily follow the arrow to produce a panorama like this one captured on New York’s Park Avenue.