
Microsoft introduced the ribbon menu in Office 2007. This menu system is adaptive, meaning that it changes its appearance and the items that it presents based on the context of the actions that you are performing within the document (for instance, changing a font).
In the 2010 version of Microsoft Office, the ribbon was joined by another new concept called the Backstage view. The purpose of this view is to give the author of a document the ability to work with items that affect the document rather than the content of the document itself; these items include:
Office Backstage is revealed simply by selecting the File tab on the ribbon, at the top left of any Office 2010 program. Because the various Office programs (Word, Excel, and so on) offer differing functionality, the items shown in Backstage view will also differ, based on the program that you are using. For this section’s examples, we will be using Word, which is one of the core Office programs, and which offers a high level of integration with SharePoint.
To begin working with Backstage view, select the File tab. Immediately located beneath the tabs are four actions: Save, Save As, Open, and Close. We will work with these shortly. Following the actions are six sections: Info, Recent, New, Print, Save & Send, and Help. We are going to be concentrating on the integration capabilities of Office with respect to SharePoint, so we will focus on the Info and Save & Send tabs.
Most new SharePoint users begin working with a Team Site by simply uploading documents to it. Creating documents in this fashion is perfectly acceptable, but it overlooks the true level of integration between Office and SharePoint. What happens if all of your documents are not contained in a single site, and you need to quickly interact with multiple SharePoint document libraries?
There are (at least) three basic ways to connect SharePoint sites with an Office 2010 product: you can click File | Save As, File | Recent, or File | Save & Send.
With the document open in Word, click the File menu, and then select Save As. Place your cursor in the File Name text box and enter the URL (the web address) of the SharePoint site, then click Save, as shown in Figure 11-1.
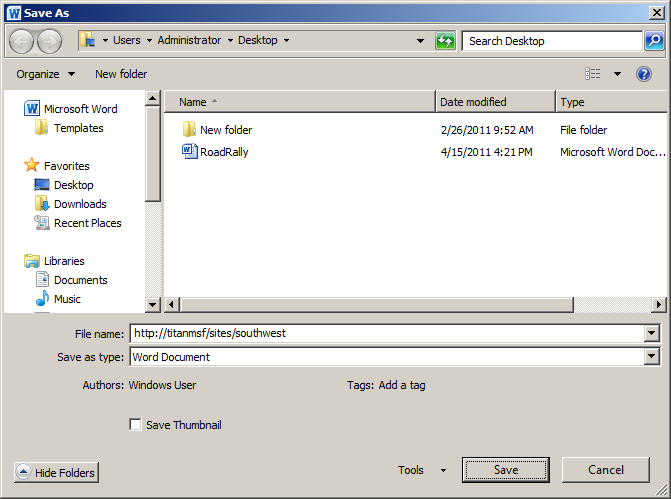
Clicking Save this first time does not actually save the document; instead, it instructs Word 2010 to open the Team Site, showing the document libraries (notice that the original file name has reappeared in Figure 11-2).
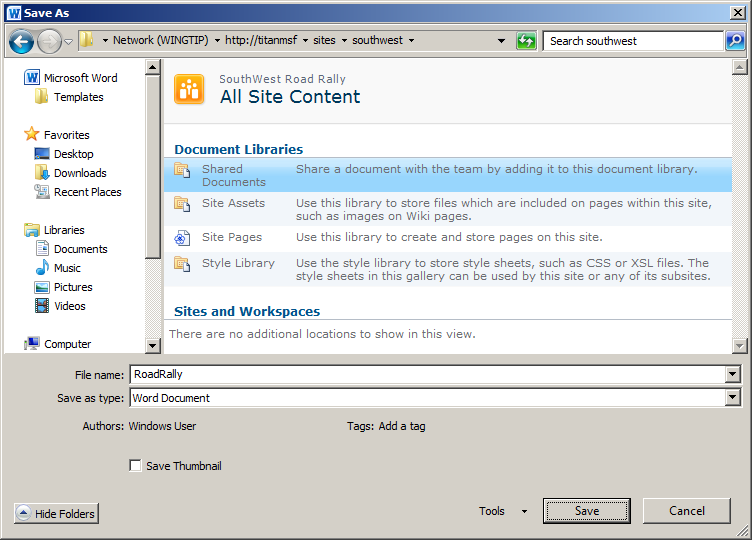
Next, double-click the library name (in this case, the Shared Documents library), and then click Save to store the document in SharePoint.
Continuing from the previous section, at this point, the document has been stored in your SharePoint Document Library; now comes the fun part. Click the File menu, and then select Recent, which shows two columns: Recent Documents and Recent Places.
Figure 11-3 demonstrates that as you interact with Word documents, both of these columns will begin to fill with information about the documents and places (including SharePoint sites) with which you have interacted.

You can pin both documents and document libraries to the Recent menu, which gives you quick access these items. To pin a document or document library, simply click the pushpin image to the right of the desired item.
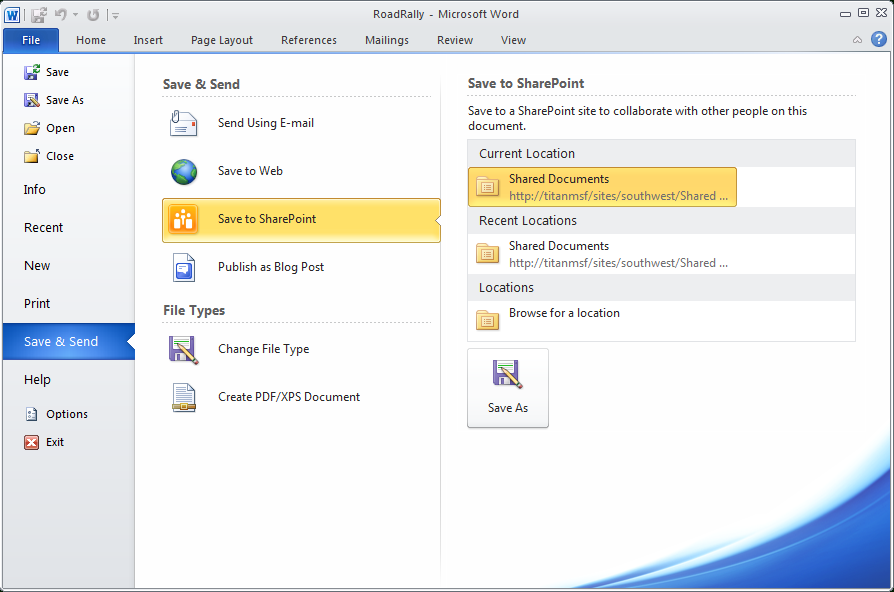
Another way to quickly switch between Sites is to use the Save & Send menu selection. This is located below the Recent selection, and it shows both the current working location and other SharePoint locations, as shown in Figure 11-4.
SharePoint brings the concept of metadata management to documents in the enterprise. Metadata is a useful and practical way to classify documents without the need to resort to folders. Metadata is simply external data that describes a document or its purpose.
Documents can be assigned descriptive text (stored in columns) to help categorize and classify them within a SharePoint document library. Additionally, if these columns have been assigned via a Content Type, documents generated in this manner can be aggregated from multiple document libraries into a single view contained within a Web Part.
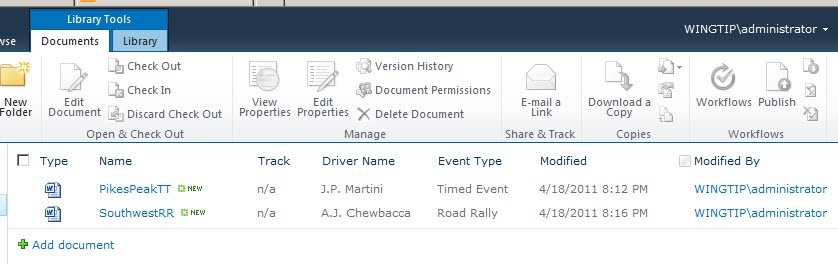
When creating the document library, the owner of the library can choose which columns are required and which are optional. Figure 11-5 illustrates a sample document library in which several fields have been added, including Track, Driver Name, and Event Type.
When a new document is created in this library, the Office client (Word in this case) prompts the user for field values (metadata) that will be associated with the new document. The fields appear in a section above the document called the Document Information Panel (DIP), as shown in Figure 11-6.

When you save the document to the library, one of two scenarios will come into play:
No fields are mandatory (required), and the document is uploaded successfully.
One or more fields are required, and the document cannot be saved to the library until these fields are populated.
If the document is rejected due to missing metadata, then two things will happen. Initially, a message will appear, prompting the user to open the DIP (Figure 11-7).

Figure 11-7. The dialog box that you see if metadata properties are missing when you save a document to the library.
If you press the Go to Document Information Panel button, the DIP appears, as shown in Figure 11-8.
![The DIP shows which properties are required (indicated by the * [asterisk] character).](http://imgdetail.ebookreading.net/software_development/33/9780735647848/9780735647848__microsoft-sharepoint-foundation__9780735647848__httpatomoreillycomsourcemspimages915274.png)
Once the DIP reappears, you are prompted to fill in the required fields; when these are completed, the document can successfully be saved to the document library.