
SharePoint Foundation 2010 lists represent editable, web-based tables that facilitate concurrent, multi-user interactions against a common, centralized, extensible set of columns and rows. You can use lists to provision your own repositories of structured information in which list items behave like rows consisting of self-labeled columns.
Each of these lists starts out with a different assortment of columns, but you can add, remove, and modify the columns in any list by using nothing more than a browser.
SharePoint Foundation 2010 adds features to the list infrastructure that improve user experience when manipulating large lists. Other new features enhance data integrity:
Large Lists Lists in Share Point Foundation can contain up to 30 million items. As you can imagine, displaying 30 million items at one time would be an enormous drain on your SharePoint farm resources, and performance would be adversely affected. Scale limits on lists prevent useful modeling, limiting user experience with respect to organization, exploration, and retrieval of list data. The Large List feature addresses these limitations by optimizing large lists for deployments in cases where, for example, getting a flat view of all the items is not a valid scenario for end users.
List relationships In SharePoint Foundation 2010, a list relationship provides additional functionality so that list items in the parent list are inherently “aware” of related items in the child list and data integrity constraints are enforced on the child items. You can use this to ensure that objects in the child list are not deleted if they are attached to an object in a parent list.
Enforcing unique column constraints SharePoint Foundation 2010 makes it possible to provide a primary key on column fields by using (or “enforcing”) a new feature called unique column constraints. You can use this feature to ensure that a column cannot contain duplicate entries.
External lists SharePoint Foundation 2010 has the ability to access and interact with list information located outside of SharePoint. Now you can access a spreadsheet located on another server and display its contents and interact with the data as if it were in SharePoint.
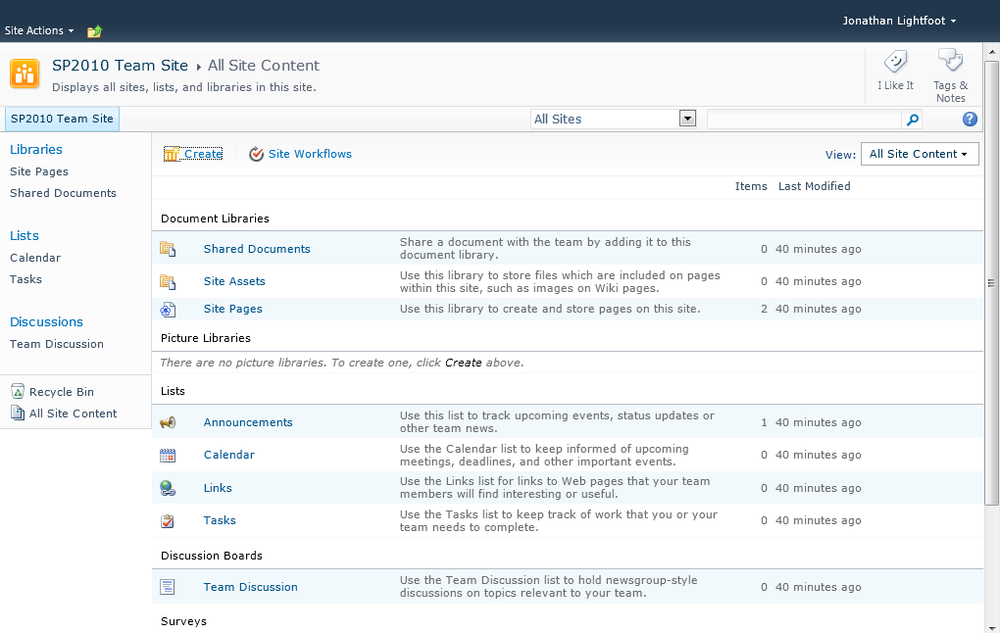
Clicking the Lists link within the Quick Launch of any page displays the All Site Content page with the Lists view applied, as displayed in Figure 3-2. This page not only presents all of the lists that are currently available to the signed-in user but also provides authorized users with the ability to create new lists and display site workflows. Each list contains a different combination of fields, serving different purposes, and also providing different views.
SharePoint Foundation 2010 comes with a number of list templates. You will use different lists for different purposes on your site.
The out-of-the-box list templates available in SharePoint Foundation 2010 are:
Announcements Use an announcements list to share news, status updates, and to provide reminders. Announcements support enhanced formatting with images, hyperlinks, and formatted text.
Calendar Calendar lists are used to display the events relevant to a team (such as meetings, holidays, milestones, social events, and so on). Think of the calendar as the group calendar that you might already be using in your email client. If you are using a calendar program that is compatible with SharePoint 2010 (such as Microsoft Outlook 2010), you can view and update calendar items on your SharePoint 2010 site while working in the other program. In addition, you can view your SharePoint calendar either side-by-side or overlaid on your personal calendar.
Contacts Contact lists hold people, teams, and organizations that you work with, your associates, and your customers. If you are using an email or contact management program such as Outlook 2010, you can create and modify your Outlook contacts from within SharePoint. A contacts list does not manage who the members are on your site, but it can be used to store and share contacts for your organization, such as a list of external vendors.
Discussion boards When you need a central location to record and store team discussions, a discussion board is your solution. Your SharePoint administrator can also set up your list to accept incoming email messages, as well. For example, you can send an email message with either a question or answer to another question from your email client. Discussion boards can accept and store a message like this as if it were typed directly in the list.
Tasks Use a tasks list to track information about projects and other to-do events for your team. You can assign tasks to people as well as track the status and percentage complete of tasks as they progress. If you are using an email or task management program that is compatible with SharePoint 2010, you can view and update the tasks in your SharePoint site from your other program. For example, you can create a task list for office moves within your organization and then view and update it in Outlook 2010, along with your other tasks.
Issue tracking At first glance, issue tracking lists appear to be tasks lists, but they are not. Unlike a tasks list, an issue tracking list is designed to store very specific information on issues such as Help Desk support problems. Issues can be assigned, categorized, and related to other issues. For example, you can create an issue tracking list to monitor Help Desk support calls. You can also comment on the issues (each time you edit them) without altering the original description of the issue, thus creating a history of all of the comments. A Help Desk specialist can record the progress of an issue as it progresses toward resolution. Furthermore, the Three-State workflow can be run on an issue tracking list to help your team with tracking management.
Links These lists contain all of the hyperlinks commonly accessed by your team. For example, you might create a links list for your supplier’s websites.
Project tasks These lists are similar to tasks lists, except they provide a visual (or Gantt) view with progress bars. You can track the status and percentage complete for a task as it progresses toward completion. If you are using an email or task management program that is compatible with SharePoint 2010 (such as Microsoft Office Project 2010), you can also view and update your project tasks from the other program. For example, your events team can create a project tasks list on your SharePoint site to set up for a conference, and then your project management team can track the progress of the tasks from within Project 2010.
Survey You can use survey lists to collect and compile feedback. For example, you can survey a group of software engineers on the feasibility of adding a new programming language to the list that they support. There are many design choices for your questions and answers. You can also see an overview of the feedback received. If you have a database or spreadsheet program that is compatible with SharePoint 2010 (for example Microsoft Access 2010 and Microsoft Excel 2010), you can export your results to that program for detailed analysis of the feedback.
Custom If you want to build a list without any preconfigured columns, you can use a custom list. You can also create a custom list that is based on a spreadsheet or table. For example, you can import a spreadsheet from Excel 2010 or a table from Access 2010 that you created to store customer information.
External lists If you need to work with data that is stored outside of SharePoint, you can use an External list. With External lists, not only can you read the data, you can also update, write, create, and delete items from the data source from within SharePoint Foundation 2010. Unlike a native SharePoint list, an External list uses Business Connectivity Services (BCS) to access data directly from an external system (such as SAP, Siebel, and Microsoft SQL Server), whether that system is a database, web service, or Line-of-Business (LoB) system.
Custom list in Datasheet This template is very similar to a custom list with the primary difference being that is created to display the list in datasheet view by default. In doing so, you can show the data in a grid for viewing and editing data as rows and columns. You can edit and add rows and columns. In addition, you can apply filters and adjust the sort orders, and display calculated values and totals. Datasheet view requires that Office 2010 be installed on a 32-bit client computer, and the browser must support ActiveX controls.
Status list This is used to display and track the goals of your project. This list comes with a set of colored icons that are used to graphically display the degree to which goals are being met.
Think of these preconfigured lists as a good starting point for a list that you might need to create. You can always add, delete, and alter the details and properties of lists as your needs change.
SharePoint Foundation 2010 has built-in features for adding list items, viewing, editing, or deleting them, managing their permissions, and attaching alerts to them. To perform any of these actions, first display the list, and then choose from among the following, as needed:
To add a new item, in the list main view, click the Add New Item link. Additionally, on the ribbon, on the List Tools tab, you can use the Items tab. Click the New Item tab, and then select the list item that you want to add.
To view existing content in a list, hover over the list title, open the drop-down menu that appears, and then choose View Item.
To edit an existing item in a list, hover over the list title, open the drop-down menu that appears, and then choose Edit Item.
To edit permissions for an existing item in a list, hover over the list title, open the drop-down menu that appears, and then choose Manage Permissions.
To delete an existing item in a list, hover over the list title, open the drop-down menu that appears, and then choose Delete Item.
To add an alert to an existing item in a list, hover over the list title, open the drop-down menu that appears, and then choose Alert Me.
If Outgoing message settings have not been configured, Alert Me will not appear in the drop-down menu.
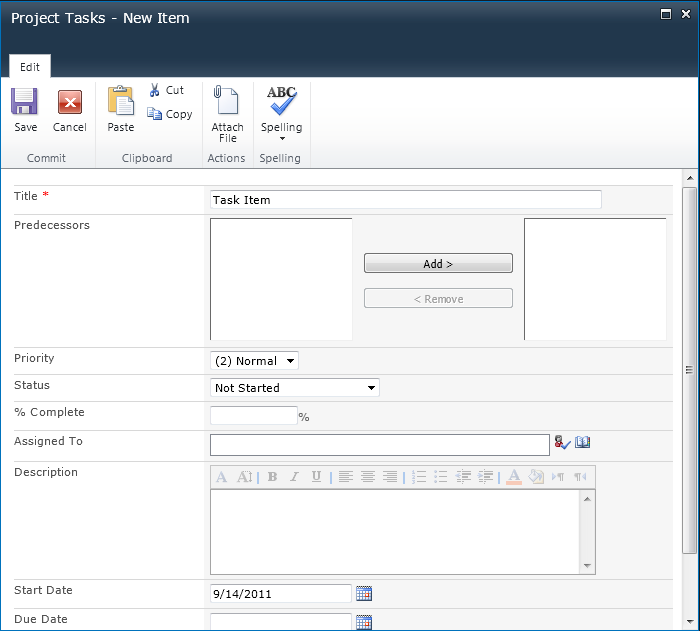
Choosing either New or Edit Item opens a page similar to the one shown in Figure 3-3. For a new item, all of the input fields will be blank or have default values. For an existing item, each input field will contain that item’s current value. There will also be time and date information as well as information about the creation and last-modified times and the identity of the user that performed these actions. If a file is attached to the list item, the name of the attachment with an embedded link will appear along with a delete link next to the attachment.
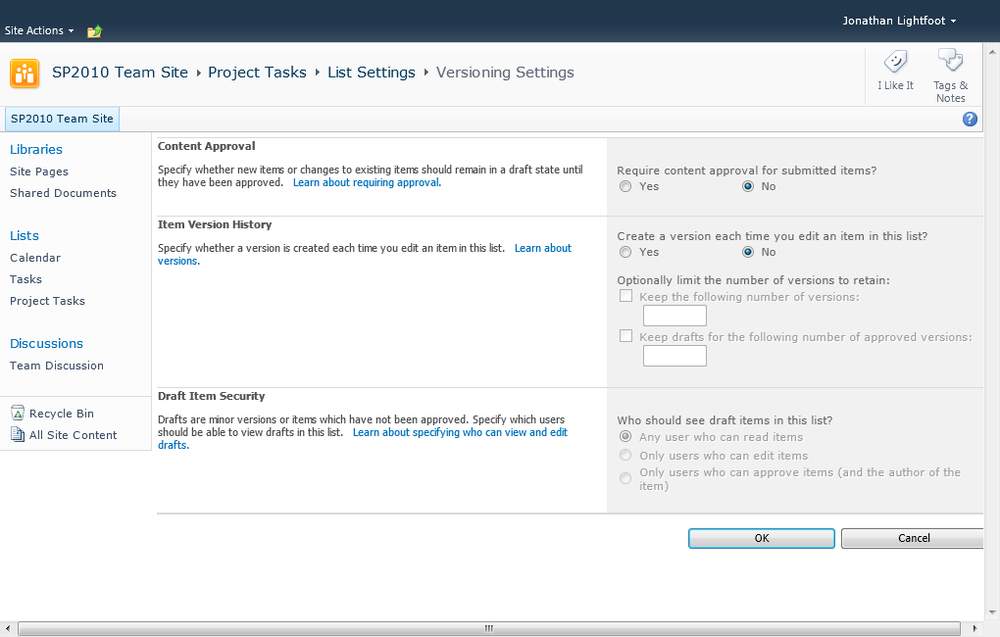
With SharePoint Foundation 2010, you can track versions of list items. Each item’s version is numbered and saved as part of the version history. Versioning is not enabled by default; to enable and configure versioning in a list, on the ribbon, on List Tools tab, select the List menu, and then select Settings. In the drop-down list that opens, select List Settings and then under the General Settings section, select Versioning Settings.
The resulting configuration page (see Figure 3-4) contains the following options:
Content Approval The list administrator selects either Yes or No to require (or not require) content approval for submitted items. Selecting Yes causes new items or changes to existing items to remain in a draft state until they have been approved. When an item is added to the list, it is displayed with a Pending status. During this status, the item is visible only to the user who created it and members with approval permissions.
Item Version History The list administrator selects either Yes or No to determine whether a version is created each time you edit an item in the list. The administrator can choose to limit the number of versions to retain as well as the number of approved version drafts to retain.
Draft Item Security The list administrator selects who can see draft items in the list. The administrator can choose from the following options:
Any User Who Can Read Items
Only Users Who Can Edit Items
Only Users Who Can Approve Items (And The Author Of The Item)
A document library is a file repository that can store many different types of files. Document libraries provide a central location where users can manage, store, and organize documents across their organization. Document libraries are similar to the lists that you find within SharePoint Foundation 2010; however, they are specifically optimized to hold documents as their items. The document library is designed to be a user-friendly, intuitive tool that can be easily customized to meet the changing needs of the user.
In previous sections, you learned that lists are an effective way to work with all types of data; libraries function similarly for documents and forms, such as Microsoft Office Word documents, Excel workbooks and Microsoft InfoPath forms. Using SharePoint Document Libraries, you can filter and group documents as well as view metadata for documents stored in the library.
When you create a new SharePoint site, a generic document library called Shared Documents is created for you. Because this library lacks a descriptive name, you might prefer to create new libraries for your particular business category or subject, instead. Document libraries also display key information about each file and provide many powerful features, including version control, item-level permissions for libraries, documents, folders, and built-in workflows.
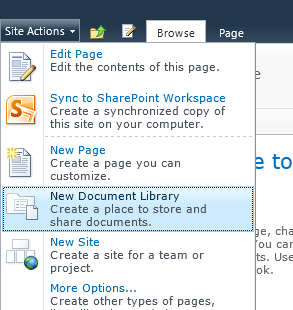
If you have the appropriate permissions, you will see the Site Actions tab in the upper-left corner of your site. Click the Site Actions tab, and then in the drop-down menu that opens, click New Document Library, as shown in Figure 3-5.
The Create New Document Library dialog box opens, in which you provide information to set up your library. The options to create a new document library include:
Name This is the name that you want to appear in the headings and links throughout the site.
Description Although this is not required to set up a document library, the description field can be very beneficial by describing the intended purpose of the library.
Navigation You can specify whether the document library is listed in the Quick Launch bar of the site to make navigation easier. The default selection for this field is Yes.
Document Version History Use this option to specify if you want a new version created each time a file is edited in the library. The default selection for this field is No.
Document Template Use this option to specify which template is opened when the New button is clicked in the library. This is tied to a default content type that the document library uses to create new files.
To view a document stored in a library, you can enter the specific library by either clicking the link to the library on the Quick Launch menu or by going into View All Content and selecting the library from the site contents. Navigating to the selected document library by clicking its name produces a display similar to Figure 3-6.
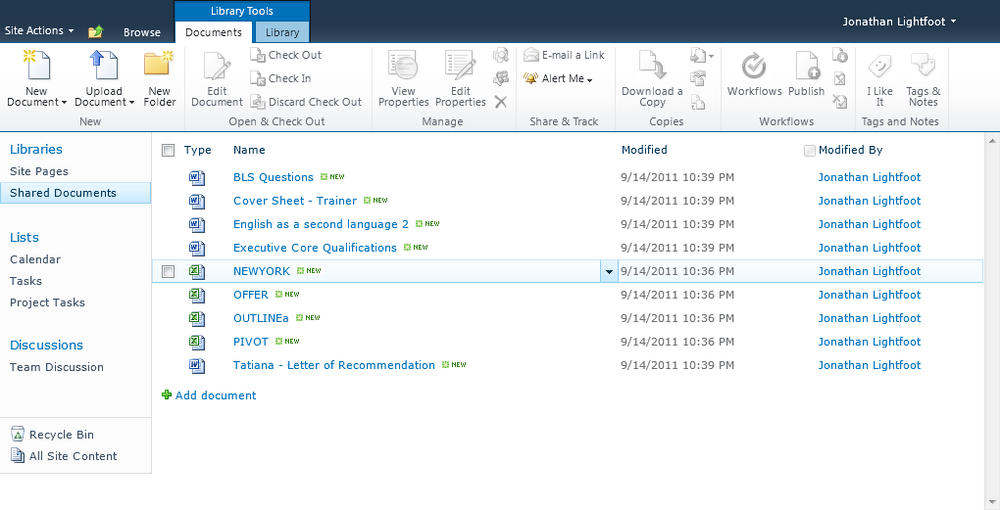
The following four columns are set up when a document library is created:
Here’s how the document library works:
All of the SharePoint Foundation 2010 menu items are located on the ribbon. When you are in the document library, the ribbon consist of three tabs: Browse, Document, and Library. Note that the Document and Library tabs are located within the Library Tools contextual menu group, which contains tools that are related to specific commands with the library in SharePoint Foundation 2010. The following is a description of each of the tabs and the menu items within them:
Browse Select this tab to browse, search, filter, and sort through the document library.
Documents Use the following tools on this tab to manage content in the library:
New Document Creates a new document with the default content type or one that you can select from the drop-down menu by clicking the down-arrow on the button.
Upload Document Uploads a single document into the document library from your computer or other directory.
Upload Multiple Documents Uploads multiple documents all at once into the document library from your computer or other directory.
New Folder Creates container folders to separate and organize content within your library.
Check Out Checks out a document for editing. While the document is checked out, only the person who checked out the document can make changes that are saved back to the library. Other users are able to view the copy of the document that is saved on the server, but cannot make changes and save them back to the library.
Check In Checks a document back in so that changes can be updated and other users can edit the document. Only the user who has the document checked out or someone with Override Checkin permissions can use this option.
View Properties Displays the SharePoint properties of the selected document.
Edit Properties Use this to edit the SharePoint properties of the selected document.
Version History Displays the version history for the selected document.
Document Permissions Displays the permissions for the selected document.
Delete Document Moves the selected documents to the site’s Recycle Bin.
E-mail A Link Use this to email a link to the selected document to others. Outgoing email must be configured on the list and Site Collection before you can do this.
Alert Me Users can set up a notification for changes that have occurred within the library. Clicking this command displays a New Alert page, in which users can specify the title of the alert. If the user has Manage Alerts permission assigned, he can also create an alert for other users of the website. Otherwise, a user can only create alerts for himself. Users can also specify when to receive the alerts (immediately, daily, or weekly summary).
Download A Copy Downloads a local copy of the selected document. The local copy will not remain synchronized to the original file located on the server.
Send To Sends a copy of the selected file to another document library located on the same server, or you can create a new Document Workspace to which to send the file. You can also send a hyperlink of the file to someone else via email.
Manage Copies If the document has been copied to another location by using the Send To command, you can use this command to see locations that contain copies of the document. You can also synchronize all of the copies of the document with the parent document by using this command. Additionally, you can send a new copy of the document to another library located on the same server.
Go To Source If the document is a copy of an original document, this command displays the properties of the document as they appear in the source library.
Workflows Use this to run workflows for content contained within a document library.
Publish This command will be active if the library is set to require documents to be published before others on the site can see it.
Unpublish This command is available in case there is a document that you do not want to check out or delete, but you need to set it so that no one can view that document’s existence. If selected, only the person who published the document and library administrators can see the document listed.
Approve/Reject When Content Approval is activated on the document library, this command is used by those with Approve Item permissions to open the Approve/Reject page to either approve or reject a submission.
Unapprove Reverses a prior approval of a document, changing its status in the library to “pending.” When you click Unapprove, the selected item will not be available for everyone to see. Only the item creator and those members who are on the approvers list will be able to see the item.
I Like It Marks the selected item with an I Like It tag. Post the item to the user’s newsfeed which lets them keep track of content in which they have expressed an interest.
Tags & Notes Tags help you to remember links and selected items. Notes are comments that other users can view; thus, you can share your comments and thoughts on the selected item.
Library This tab focuses on the format and structure of the library itself:
Standard View Shows the document library in the default view.
Datasheet View Shows the document library in Datasheet view.
New Row Within SharePoint 2010, libraries and lists share the same ribbon; as such, you cannot use this command within a library. This command is enabled in Datasheet view only; use this command to create a new row for adding list items.
Show Task Pane This command is enabled in Datasheet view only. Use this to open a task pane in which you can cut, copy, sort, and work with library items in Access and Excel.
Displays Totals This command is enabled in Datasheet view only. Use this to display totals columns underneath each column.
Refresh Data This command is enabled in Datasheet view only. Use this to update the library listing with any changes to the library carried out by other users.
Create View Creates a custom view of the library contents. You can select which columns are displayed, along with setting up filters and other display settings in the document library.
Modify View Modifies a user’s personal view of the library, either within the browser or in SharePoint Designer 2010.
Create Column Create columns to store additional information about items. You must have Manage Lists permission to use this command.
Current View Displays which view is currently being used. Users can select alternate views from the drop-down menu.
Current Page Navigates to other pages when working with large libraries.
E-mail A Link Sends an email containing a document hyperlink to a mail recipient.
Alert Me Displays a New Alert page for which you can specify the alert’s title as well as the list of users to whom the alert’s email notification should be sent when there are changes to a specific item, document, list, or library.
RSS Feed Use this command to keep track of the information via a Really Simple Syndication (RSS) feed. You can use RSS feeds to receive view updates about libraries by using an authenticated RSS feed viewer (for instance, Internet Explorer 9).
Sync To SharePoint Workspace Creates a synchronized copy of the library on a user’s computer. SharePoint Workspace must be installed on the local computer for this to work.
Connect & Export Provides options for connecting to Outlook. This adds a shortcut (under SharePoint Sites) to a user’s computer with which she can connect to the library when creating, opening, and saving documents in Microsoft Office applications such as Word, Excel, and PowerPoint. Users can select Export To Excel, which creates an .iqy file that can be opened in Excel for analysis. Selecting Open With Windows Explorer opens the document library in a Windows Explorer window, thus allowing files to be dragged into the library, along with creating folders, and deleting multiple files at once.
Customize Library This drop-down menu allows user-defined changes for the library structure:
Form Web Parts Use this to modify either the Display or Edit Form dialog boxes by adding or deleting additional Web Parts.
Edit Library Use this command to edit library settings, add or remove columns, and create new views, workflows, and custom actions with SharePoint Designer 2010.
New Quick Step Use this command to create a new button on the Items tab, which executes a custom action on library items.
Settings Controls library and workflow configurations within the library:
Library Settings Opens a page that contains options to manage document library settings such as version settings, permissions, columns, views, workflow, and policies.
Library Permissions Opens a page with which you can add, remove, or modify the permissions for the library.
Workflow Settings Opens a page with which you can modify the settings of workflows associated with the library.
When you click the New Document button on the ribbon, SharePoint Foundation 2010 displays either the default document template or the list of content types that have been associated with the document library. Content types allow for the document library to have multiple item types or document types, of which each can have unique metadata, policies, or behaviors.
After content has been added to the library, SharePoint automatically records your name, the date and time, and the type of document in the item’s properties. If you select a New Item that was associated with a content type, the metadata associated with that document will also be saved into SharePoint.
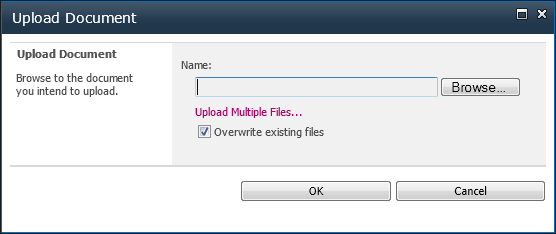
To add a document that already exists on your computer, network share, CD, or other location to a document library, click the Add New Document link in the Standard View, or on the ribbon, click Document Library Tools, and then select the Upload Document menu item. This displays two options: Upload Document or Upload Multiple Documents.
When uploading a single document, you must browse to your local directories for the target file, as shown in Figure 3-7.
When uploading multiple files, you have the option to either browse for files or—new to SharePoint Foundation 2010—drag files and folders directly into the upload dialog box, as shown in Figure 3-8.
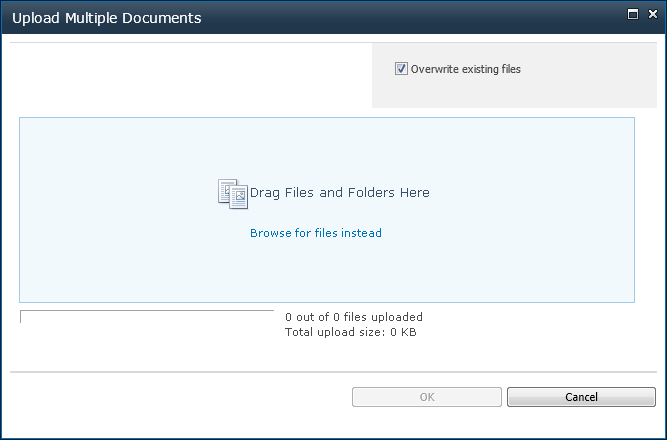
Figure 3-8. New in SharePoint Foundation 2010, you can now drag files and folders into the Upload Multiple Documents Dialog box for uploading.
After you locate the correct document and select OK, a dialog box appears, asking you for any additional data (metadata) about the document. It is important to note that when additional content types or custom columns are created or applied to the document library, you will be prompted to provide data regarding those additional fields.
To delete a library document, perform the following steps:
Hover over the document name of the item that you want to delete, and then click the down-arrow to the right of the document name to open a drop-down list.
Select Delete, and then click OK to confirm the deletion.
Once an item is deleted, it is moved to the First-Stage Recycle Bin, which is located on the site itself. Items that are deleted from the First-Stage Recycle Bin are moved once more into the Site Collection Recycle Bin, which is controlled by the Site Collection Administrator.
Items stored in the First-Stage Recycle Bin are permanently deleted after a fixed period of time (the default is 30 days). Items contained in the Second-Stage Recycle Bin are automatically deleted after a preset period of time (the default is 30 days) or until the allotted Recycle Bin size is exceeded, at which point the oldest items are deleted first.
Note
It is a common misconception that the Recycle Bin retention time is given per stage (for example, 30 days for the First-Stage Recycle Bin and 30 more days for the Second-Stage Recycle Bin). The retention period is applied to the cumulative time that has passed since the file was originally deleted. See “Plan to protect content by using recycle bins and versioning (SharePoint Server 2010)” at http://technet.microsoft.com/en-us/library/cc263011.aspx for detailed information on Recycle Bin configuration.
When versioning is enabled, SharePoint Foundation 2010 creates a separate copy of the document each time it is edited. Although this takes up extra space on the server, it also makes it easy to revert to an older version of the document, if necessary.
Versioning is not enabled by default. To activate it, an administrator or site owner/manager must select Settings | Document Library Settings, and then under the heading General Settings, click Versioning Settings.
Versioning is the method by which SharePoint stores successive iterations of a document in a numbered format. SharePoint Foundation 2010 has three versioning options:
No Versioning Turns off versioning. All previous versions of documents can no longer be retrieved and are discarded.
Create Major Versions This versioning option employs a sequential numbered schema (1, 2, 3, 4, and so on). It is possible to specify the number of major versions that SharePoint will store. Once a document is classified as a major version, all users who have access to the document will be able to view it.
Create Major And Minor (Draft) Versions This versioning option uses numbered versions similar to Create Major Versions, but employs a major/minor numbering schema (1.0, 1.1, 1.2, 2.0, 2.1, 3.0, 3.1, and so on). Versions ending with zero (.0) are major versions; versions ending with non-zero extensions are minor versions. Similar to major versions, it is possible to specify the number of major and minor versions that SharePoint will store. In this versioning scenario, all users with read permissions can view major versions of the documents, and you can specify which users are permitted to view the minor versions.
When you view a document’s version history, you see a list of the occasions when this document was edited and saved as well as the author’s comments on those changes, as illustrated in Figure 3-9.
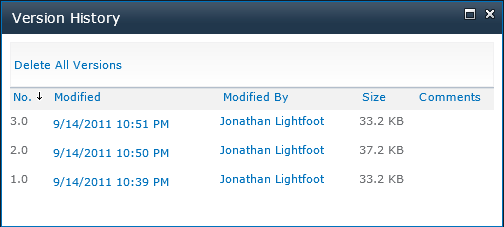
The following information and options are displayed:
No. The current version number.
Modified The date and time at which each version of the document was last modified. You can hover over the Modified field of a version to access a drop-down list that contains the following items:
View Specifies whether to allow the selected version to be viewed.
Restore Restores a previous version as the latest version. This does not delete the replaced version, it only saves the selected view as the latest version with the next sequential version number.
Modified By Identifies the user who last modified the document.
Size Shows the file size of the version.
Note
Keep in mind that versioning saves a complete copy of the document. For example, if a document is 10 MB in size and has 10 versions attached to it, storing that single document (and its versions) could potentially consume 100 MB of space on the server. This space would be counted against your Site Collection storage quota.
In the following sections, you learn about advanced list and library features in SharePoint Foundation 2010. Working closely with Office 2010, using workflows, and taking advantage of the Recycle Bin offer significant improvements over previous versions of SharePoint.
SharePoint Foundation 2010 was designed to work closely with the Office 2010 suite of applications. This means that you can work with content seamlessly between the applications. One example of this is the connection between Outlook 2010 and SharePoint.
Lists and libraries in SharePoint Foundation 2010 can receive and store email messages and attachments, just as they can in SharePoint 2007. This feature can assist team members within the organization when archiving email or uploading the contents of a specific email to a SharePoint list or library. Additionally, external team member can email to the list so that entire teams can review a specific discussion without retrieving the messages from their mailboxes.
Based on your organization’s policies, you might not be able to use this feature, which must be enabled by the SharePoint administrator at the Central Administration site.
RSS feeds deliver new content to you on the topics in which you are interested. RSS provides a convenient way to syndicate information from a variety of sources, including news stories, updates to a website, or important bulletins. Most people take advantage of some form of feed-reader software to monitor updates to RSS feeds.
SharePoint Foundation 2010 can offer RSS feeds from any SharePoint list, including announcements, discussion boards, picture libraries, blogs, document libraries, form libraries, calendars, and surveys; these must be viewed by using an “authenticated” RSS browser (such as Outlook 2010).
SharePoint administrators can enable RSS support within the Central Administration site at the web application level so that RSS feeds can automatically be enabled throughout your SharePoint enterprise.
Workflows in SharePoint Foundation 2010 were introduced and discussed in Chapter 1, and Chapter 2 (and will be further examined in detail in several more chapters, as well). Workflows are basically automated business processes. Workflows in SharePoint Designer 2010 can be made available within lists or libraries.
SharePoint 2010 Foundation comes with several out-of-the-box workflows that can be used as-is or modified to fit your business process. New workflows can also be developed by users without development knowledge (using a “no-code” solution such as SharePoint Designer 2010 or Microsoft Visio Premium) or by .NET architects and developers (Utilizing Windows Workflow Designer in Microsoft Visual Studio 2010). Unlike Windows SharePoint Services 3.0, the architecture of SharePoint Foundation 2010 now allows for an organization to develop the custom workflow solution that is tailored to meet its exact needs.
The Recycle Bin in SharePoint Foundation 2010 gives you an opportunity to easily recover deleted documents without the need to send a request to the SharePoint administrator to have an entire site, list, or library restored. When a document is deleted, it is sent to the site Recycle Bin, similar to how a file is deleted in Windows 7.