

229Sound Design for Virtual Spaces
FIGURE 11.3 Screen grabs from OpenSim showing the initial setup of the game space for the sound-based game
inspired by “Three Billy Goats Gruff.”

230 Virtual World Design
2. Note: Turn on your sound beacons by checking the Sound sources and Beacons boxes in the
World/Show More/Beacons menu. This will enable you to nd the sound emitters when you make
them transparent.
3. From the Script Me autoscript site (http://www.3greeneggs.com/autoscript/) make three kinds of
scripts: (1) a looping sound that plays the sound repeatedly as soon as the object is rezzed from your
inventory and the script starts; (2) one that plays sound when an avatar clicks on (touches) it; and
(3)a script that plays a sound when an avatar gets into proximity. Set the sound in this last one to
play repeatedly, if you wish, and trigger at the proximity distance of 5 meters. If you set it to only
play once, repeat players will not hear these sounds a second time.
a. In the loop_sound sphere, put in the looping script and Test_123.wav sound le from the chapter’s
content les. Check to make sure you can hear the looping sound from your mouse-look position.
b. In the touch_sound sphere, put in the touch start sound script and the Test_123.wav from the
chapter’s content les. Make sure the sound plays once when you touch it.
c. In the proximity_sound sphere, put in the proximity start sound script and Test_123.wav sound
le. Take this sphere back into your inventory, rez it at least 10 meters away, and walk up to it.
Make sure that the script plays the Test_123.wav le when your avatar walks near it.
Please note, you may have to give the server some time to load these sounds; they may not play immediately
at rst.
FIGURE 11.4 Screen grab for OpenSim, showing the process of making the basic sound emitters for looping
sound, touch-activated sound, and proximity-activated sound. Foreground shows how sound beacons can identify the
sound emitters.
231Sound Design for Virtual Spaces
If the scripts are all working as expected, take a copy of the spheres, and put them in 3 folders in your
inventory. Call the folders “Loop,” “Touch,” and “Proximity Sound Emitters” so you can nd them easily.
11.8.3 maKing The sound emiTTers speCifiC To sound and Trigger
1. Now, you should download and import the rest of the sounds provided with this chapter; make sure
you have the following 14 “ready-to-go” sounds:
a. Babbling_Stream.wav
b. Boiling_Stew.wav
c. Campre_loop.wav
d. Goat_help_me.wav
e. Goat_saved_me.wav
f. Goatherd_going_by.wav
g. Herd_of_goats_loop.wav
h. Marketplace_with_vendors_loop.wav
i. Orchard_birds.wav
j. Troll_eat_you.wav
k. Troll_goat_stew.wav
l. Troll_MMM_eat_stew.wav
m. Troll_my_little_goat.wav
n. Wind.wav
2. Drag out seven looping-type sound emitters from your Loop Sound Emitters folder and put in
the sounds “Babbling Stream,” “Boiling_stew,” “Campre,” “Herd_of goats,” “Marketplace with_
vendors,” “Orchard_birds,” and “Wind”, respectively, removing the Test_123.wav le as you do.
Note: The volume setting in these ScriptMe-generated scripts is found in the sound function line
and set at 1 (the loudest) as a default. You may need to change that number when you have several
spheres close together.
3. Now drag out two touch-activated sound emitters and put sounds d and e into their content invento-
ries, one sound in each, removing the Test_123 as you do it. Touch it to make sure it works. Rename
the emitter spheres “Goat_help_me_touch” and “Goat_saved_me_touch,” make them phantom,
and take them back into your inventory in a new folder called “TBG_sound_touch.”
4. Drag out four proximity-activated sound emitters and put sounds j, k, l, and m in each. Put one
sound into the contents of each emitter, removing the Test_123.wav le as you do. Walk away
and then back to it to make sure it works and that the sound activates only once when you are
5meters away from it. Rename the emitter spheres “Troll_eat_you_prox,” “Troll_goat_stew_prox,”
“Troll_MMM_eat_stew_prox,” and “Troll_my_little_goat_prox”; make them phantom; and take
them back into your inventory in a new folder called “TBG_sound_prox.” Note: This script will
have to be reset or the object rezzed again for the emitter to produce the sound again for you to hear
when you approach it, since it’s scripted to play only once.
You will see an inworld view of this step in Figure 11.5; note that the sound emitters have a bright pattern
on them for illustrative purposes only. You can make them any color you wish while you build; eventually
you will make them fully transparent and invisible for game play.
232 Virtual World Design
11.8.4 laying ouT The audio landsCape of The game
Now that you have made all of your sound emitters, it is time to spread them out across the game environment
to make the game soundscape for your players. Figure 11.6 provides an illustrated overview of this section.
Here are ve basic factors to remember while you do this:
1. Anchoring: By using the game board graphic as a guide, locate your audio “anchors” rst. Place the
looping sounds of the marketplace, the goat barn, trolls, and orchard far enough apart and spaced
over the landscape so that the players will have a sense of direction and can be relatively secure in
their location on the game board. It is perfectly legal to put your emitters outside the box, above or
below it, so that the sound is heard less by the players inside. Aim for being able to hear them all
from a distance of 20 meters on a 50% volume setting in your headphones.
2. Emergence: Support the emergent nature of game play by putting sound in surprising locations and
varying the height of the emitter off the plane of the game board so it sometimes coincides with the
location of the default camera position.
3. Layer: You may also decide to layer/trigger a sound in a couple of ways. For instance, having a troll
saying “MMMMM-goat stew” on a loop in the distance creates an atmospheric sound layer with an
underlying threat factor. Placing a loud emitter with a proximity trigger running the same sound can
make your players jump at the unexpected change of position and loudness of the troll’s sound.
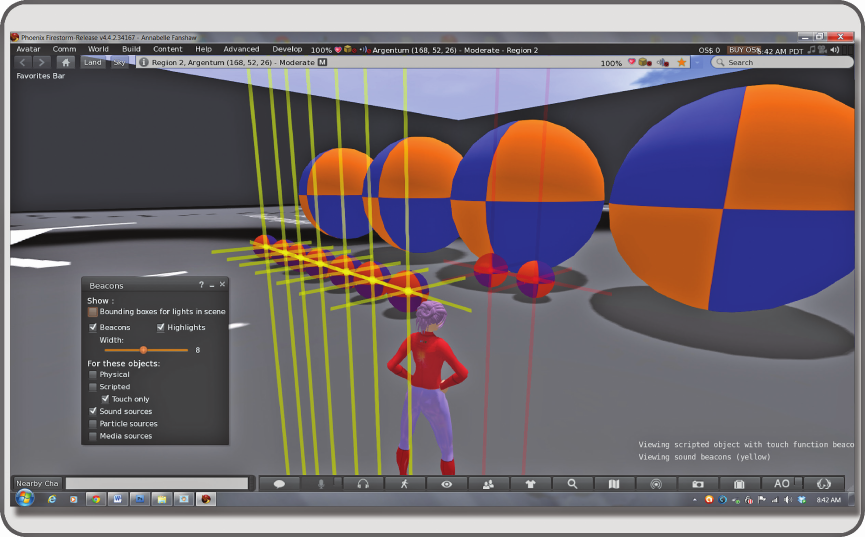
FIGURE 11.5 Screen grab showing the creation of the basic sound emitters for the game. The Beacons are turned
on indicating the center of these touch-activated scripted sound prims, and while the sound script is running, the prim
turns red.

233Sound Design for Virtual Spaces
4. Server load: Be efcient and choose your locations carefully; try to make the space work with 20or
fewer sound emitters so there is time on the server for other kinds of sound in the sim.
5. Testing: Once you have placed your emitters, turn off your computer monitor, raise the volume on
your headset, and try to nd your way across the landscape. You should be able to navigate success-
fully from the goat barn to the orchid if your layout is good. The locations of the sounds should be
clearly heard, and not piling up in one chaotic noise. If not, move the sound emitters around until
you can.
11.8.5 maKing The signage and enTranCe
Figure11.7 has an image of the setup for the signage and entrance. Even though this is a sound-based game, you
will need some visuals for the players to help them orient to the arrangement of the space. It would be a good
idea to show them a map of the game space and to make that map object a “proximity-activated” sound emitter
that describes the space to someone who has limited vision. If you do this with a silly goat voice or a scary troll
voice, your signage will set the mood of the game right away. Each sign that the players walk past should inform
them about the game. To avoid confusion and too much overlap of sound, try to keep your signage to three or
four signs. As you can see in Figure 11.7, the game audio landscape is described along the entrance hall with a
series of talking signs; each one is activated by the proximity of the avatar. The avatar takes about 10 seconds to
walk 30 meters, so by the time the avatar gets to the next sign, the rst clip has ended, and the next one is ready
to go. You can set these signs up for your version of the game by using these three images from the Chapter 11
FIGURE 11.6 Screen grab showing process of laying out the sound emitters on the game board.
..................Content has been hidden....................
You can't read the all page of ebook, please click here login for view all page.