
211Virtual Goods and Design for Virtual Shopping Environments
Continue clockwise around the roof surface, and continue with Lamp_2 on the front right corner
(rotate this one 270 degrees in z), Lamp_3 is on the front left corner (rotated 90 degrees in z), and
Lamp_4 (rotated 270 degrees in z) lands on the back left corner. Note that Lamp 4 has been left
unplugged. You are doing great. The shop is really coming together.
5. Now that you have all of the shop assembled, go ahead and unlink and delete the alignment cubes
from the shop components.
6. Select the whole shop, the big lamps on the roof, and then the foundation prim, and link them. This
should make the foundation prim the key prim of the entire group. It will make the whole structure
much easier to move about, should you need to relocate the shop.
10.7.3 Building ConTenT, seTTing priCes, desCripTions, and lisTings
10.7.3.1 Making a Table Lamp Prototype
Figure10.13 gives a visual demo of the steps for making a table lamp prototype.
The Table lamp prototypes are shown here as giant versions for clarity of illustration in the project.
Infact, it is easier to make things this way, in a giant format, and then scale it down to the correct size once
you have worked out all the details.
1. Create the rst lamp base with a dimpled sphere prim and atten the bottom side with a dimple that
begins at 0.00 and ends at 0.80.
2. Use select/Shift key/drag Copy to drag the two additional prims up from the lamp base, in the same
x,y location, just moving the new prims up on the z axis.
3. Change their forms into (1) a Path-cut Torus prim and (2) Ring prim to make the (1) neck and
(2)shade of the lamp prototype.
4. Change colors, shininess, and transparency to make it look interesting.
5. Turn on the light feature of the lamp shade prim on the lamp and set it for a small radius, like 0.5meters,
so the lamp will light only its surrounding area when it’s reduced to its smaller, realistic size.
6. Link the parts together by Shift selecting them, one at a time, picking the lamp shade last so it
becomes the key prim (it will have a yellow halo, instead of a blue one if it is the key, when the object
is in Edit mode).
7. Name the linked object Lamp Prototype and take it into your inventory to start your lamp stock.
10.7.3.2 Developing the Product Line
Figure10.14 provides a visual of this section on developing the product line.
1. Drag a copy of the original prototype lamp out onto the ground from your inventory.
2. Name the lamp Pop_UP_Shop_Style_1_Lamp and set the description under the General Tab to
“Your Shop Name_Cute Lamp” in various colors.
3. Set the permissions for Copy for the next owner and leave the rest of the Modify boxes blank.
4. Set the price at $1 Linden (if you are in Second Life) or whatever currency for which you think it will sell.
5. Shift/Drag copy 2 more of these lamps and edit the colors of the shade, neck, and base so you have
a variety of colored lamps to display.
6. Name each lamp individually, perhaps by the predominant color at the end of it, such as Pop_UP_Shop_
Style_1_Red. Make a copy of each one, stretch it to a smaller, more realistic size in the Build/Edit
menu and take them back into your inventory in a folder you made called Lamps_Style_1_Final_size.
7. Save the original large prototypes in another folder, for more product development later.

212 Virtual World Design
FIGURE 10.13 Screen grab showing the large scale creation of an initial lamp prototype using three basic prims.

213Virtual Goods and Design for Virtual Shopping Environments
FIGURE 10.14 Screen grab from OpenSim, shown initial creation of prototype lamps for the Pop-up shop.
214 Virtual World Design
10.7.4 seTTing up The shop display
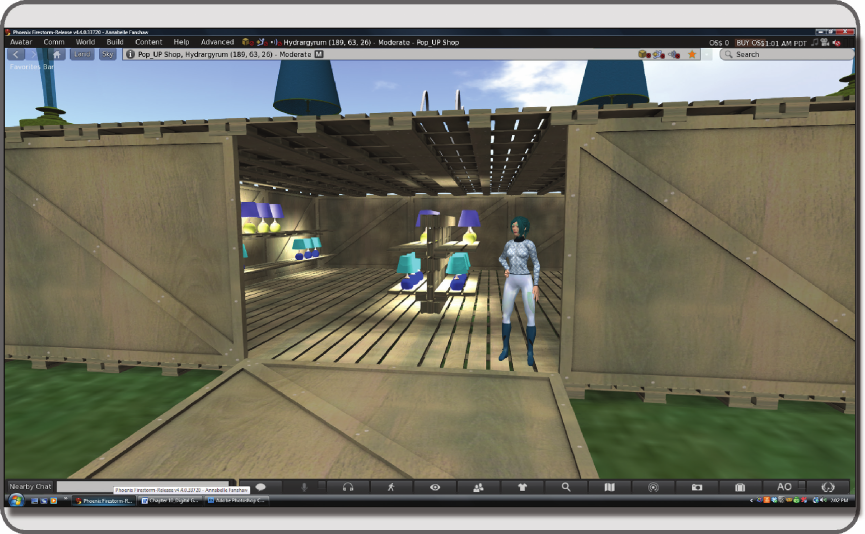
10.7.4.1 Display Layout and Design for Selling
The visual explanation of this section on display layout and design for selling is provided in Figure10.15.
1. Upload and drag out Pop_UP_Shop_Shelf.dae mesh model from your inventory.
2. Reset the alignment prim as key, if necessary, and put the shelves inside the middle of the shop.
3. Display your lamps on them—not too many; leave some blank space.
10.7.5 adding The signage, a simple shop greeTer, and a noTe Card giVer
Now, we are going to put in signage for your shop and add a simple shop greeter and a note card giver.
10.7.5.1 Branding Your Shop Signage with the Logo
Upload the Pop_UP_Shop_Sign, and then drag it from your inventory onto the ground in front of the shop
door. Orient the sign to the front left wall of the shop exterior as shown in Figure 10.16.
10.7.5.2 Making a Note Card for Your Shop
1. Using the inventory “create note card” function, make a new one for use in your shop greeter.
2. Name it “Welcome to the Pop UP Shop.”
FIGURE 10.15 Screen grab from OpenSim showing the Pop-up lamp shop with stocked shelves displaying the
virtual content.

215Virtual Goods and Design for Virtual Shopping Environments
FIGURE 10.16 Screen grab from OpenSim showing the Pop-up shop welcome message in 3 languages with a
landmark link, that will be placed inside the contents of the info cube.
..................Content has been hidden....................
You can't read the all page of ebook, please click here login for view all page.