
78 Virtual World Design
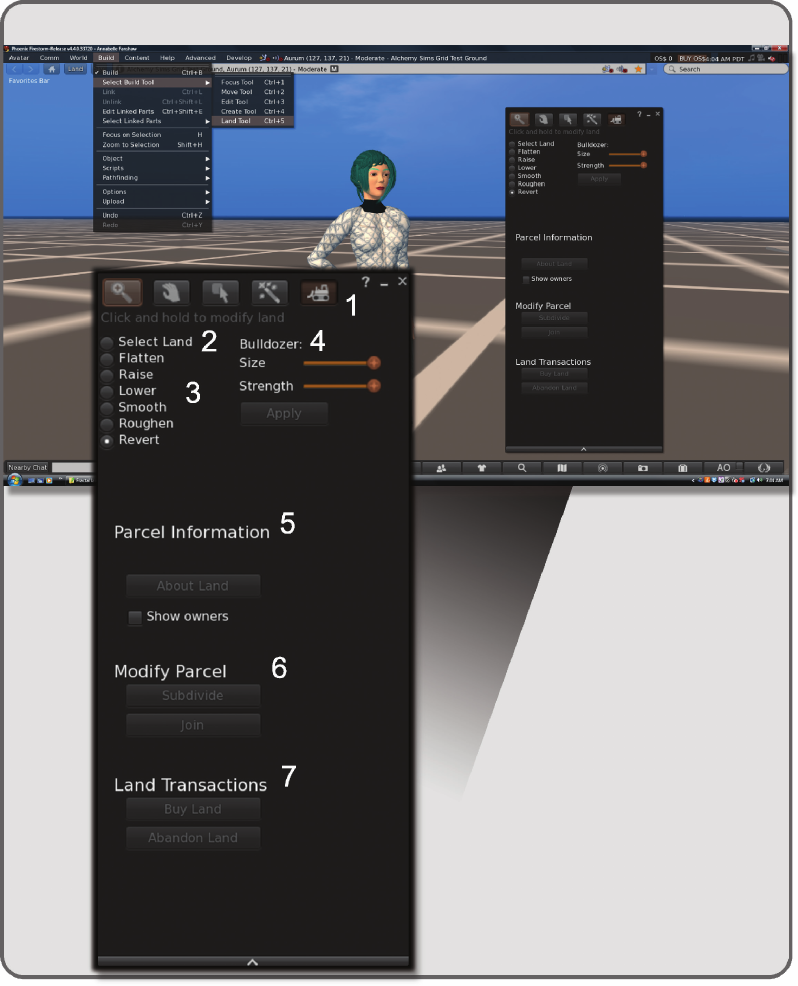
FIGURE 5.4 Screen grab from OpenSim showing aspects of the Build/Land Tool menu: (1) bulldozer icon that opens
the terrain tools from the build menu, (2) the select land button for selective terraforming, (3) the terrain modifying
tools, (4) the bulldozer settings, (5) the parcel information that shows terrain subdivision, (6) the parcel join or subdivide
tools, and (7) the land transactions buttons allowing purchase or abandonment of land.
79Virtual Terrain and Designing Landscapes
strokes to create a prairie or little touches to create a small plateau. The Strength button on the slider
below Size will change the power of the bulldozer and how much the land will move with each
mouse click or the duration of your click-and-drag action.
5. Below this is the Parcel Information, letting you know the land area and who the owners are. Also
included is an About Land button, which is a good reminder to go back to About Land and make
sure the terraforming option is not checked, and no one else can edit the terrain on your parcel.
6. Under that is Modify Parcel, which allows you to Subdivide and to Join selected land parcels. This
tool is very powerful and will allow you to divide land for the purposes of setting music and media
streams, rental properties, group access, and other property-related attributes. When dividing or
joining land, you should always check the About Land settings and the Region/Estate settings to
make sure that they are where you want them to be on that parcel after you have completed the
changes. The resulting combined parcel inherits the properties that were assigned to the last parcel
selected to be joined. Also, these Modify tools may make landmarks and landing points invalid, so
you should also recheck those.
7. And nally, the Land Transactions buttons. Obviously, if you are in a world that uses currency, and
you desire to own the services provided by buying the land, this is where you do it. You can also give
up all ownership to the land, and in Second Life the ownership will go back to Governor Linden.
5.2.2 TesTing The funCTionaliTy of The BuilT-in land Tools
Let’s take the Land Tools out for a test drive so you can get the feel of them. In Second Life, Torley Linden
has provided a terrain testing ground (http://slurl.com/secondlife/Here/173/165/23), or you can try this on
your own land in an OpenSim region.
First, let’s try selecting an area about 20 meters square. You can check your dimensions by laying out a
20m × 20 m × l m box, making it hollow and using it to frame your terraform area.
Practice selecting the terrain inside the box, and practice selecting the terrain outside it. Note: You cannot
select anything but a square shape, so you will have to work section by section around a center area. You will
also see by just clicking on the land that the minimum size of a section is 4 meters square.
When that feels comfortable, select an area. Make the bulldozer about 25% of its full size and set the
strength at 50%. With Raise selected on the Edit tool, hold the left mouse button down and circle the bull-
dozing patch over the selected area. You should see the ground start to move and raise itself. Do not hold
the mouse on it too long if the reaction is slow. Give the server time to make many calculations for you; this
is a complex command for it. When the ground stops moving, use your camera to look at it from all angles
(holding the Alt key down and using the arrow on Page Up and Page Down keys). Note how it changed and
what it felt like to do that change. Good terrain sculpting is a tactile as well as a visual task, so you need to
learn how it feels and how long you should run the bulldozer tool over the land to obtain the effect you want.
Try the rest of the tools and see how they work on that patch of the terrain. You will notice that by chang-
ing the sliders for size and strength of the bulldozer you can greatly affect the look and the speed of the terra-
forming. See Figure5.5 for comparative images of how these tools work.
Another factor to be aware of are regional limits on terrain settings. For instance, on the Second Life
mainland, the land cannot be elevated or lowered more than 4 meters. Elsewhere in the Metaverse, land can
be elevated or lowered plus or minus 100 meters unless the owner has set limits on the terraforming in the
Region/Estate/Terrain menu.
How you design with these parameters in mind is a decision related to the needs of the environment
you are creating. Making really tall mountains over 100 meters high on a relatively small patch of ground
(oneregion or less) will probably not look good. Overly high terrain looks unnatural and disproportionate,

80 Virtual World Design
a
b
c
d
e
f
g
FIGURE 5.5 Screen grab from OpenSim showing use results of the terraforming tools available for manipulating the
land surface in the Land Tool Menu. They are: (a) Select, (b) Flatten, (c) Raise, (d) Lower, (e) Smooth, (f) Roughen, and
(g) Revert. Note the different kind of icons that appear on the ground surface with each tool used.
81Virtual Terrain and Designing Landscapes
and the rock, grass, or dirt textures become stretched and distorted. A good rule of thumb is to keep the
highest peak one-fth of the distance of your longest view, measured from the seabed or lowest terrain point.
Thatis, if you have a parcel 100 meters square, keep your highest peak at 40 meters (20 meters over the stan-
dard sea level of 20 meters). Also, remember that high mountains usually need big bases to look natural; the
land grade should start to rise from some distance away from the peak of the mountain.
5.3 METHODOLOGIES FOR TERRAFORMING USING HEIGHT MAPS
In larger-scale projects such as entire regions or grids, it is more efcient to utilize a height map to create
your landscape design. Height maps, or height eld maps as they are sometimes known, are powerful tools
for quickly creating lots of varied terrain. These are RGB (red, green, blue) images (256 by 256 pixels per
region) that dene the height of the terrain by the color values in the red channel. They are saved in the RAW
le format, and although only 3 of the channels (red, green, and blue) actually affect the landscape now,
they still need to be saved with the legacy 13 channels to be loaded in properly in Second Life and OpenSim
through the viewer interface. Note: if you have your own region or grid in OpenSim with total server access,
then terrain manipulation can be accomplished with a simple 256 × 256 pixel grayscale image installed with
the “terrain load” server command. When you manipulate terrain with your bulldozer tool, you are actually
using “brushes” to change the values on an underlying height map, and those changes are interpreted by the
simulation program into changes in the elevations on your land surface patch.
5.3.1 region ConTrols for Terrain loading and TexTures
Before we load in a dramatic example of how a height map works, let’s look over the Region/Estate/Terrain
menu. You will nd it under World/Region Details in Firestorm.
Here are all the options on that menu; their location on the menu is indicated by number in Figure5.6.
These are available to estate owners and managers:
1. Water Height is the setting that is your “sea level.” This is typically 20 meters from the bottom of
the sea, the lowest point on your land.
2. Terrain Raise Limit is the setting for your highest peak, above the baked default level set on the land.
3. Terrain Lower Limit is the setting for your lowest valley, or ocean bottom, below the baked default level.
4. Terrain Textures for the land surfaces are the dirt, grass, and rock textures applied to the terrain.
5. Texture Elevation Ranges is the location and range covered by these textures on the terrain.
6. Download RAW terrain … will allow you to download a RAW le snapshot of your grayscale
height map onto your computer to be opened in a paint program such as Photoshop or GIMP (GNU
Image Manipulation Program).
7. Upload RAW terrain … will allow you to upload your preformatted RAW le to the server and
install your new terrain. This is one of the most fun things to watch in a virtual world as the terrain
starts to ll in row by row. Note: Again, remember only owners have the rights to upload and
download terrain les.
8. Bake Terrain freezes the present terrain as the middle level for the Terrain Raise and Lower limits.
5.3.2 examining a BenChmarK Terrain for your region
Now, you have a general overview, let’s proceed with the loading of your rst terrain. To prepare for the terrain
tests and projects in this chapter, you should now go to http://www.anncudworthprojects.com, and download

82 Virtual World Design
FIGURE 5.6 Screen grab from OpenSim showing terrain setting options on the World/Region Details/Region-Estate/
Terrain menu screen, such as (1) the Water Height setting, (2) and (3) the Terrain Raise and Lower limits, (4) the palette
of Terrain Textures, (5) the Texture Elevation Ranges, (6) the Download RAW le start button, (7) Upload RAW le start
button, and (8) the Bake terrain start button.
..................Content has been hidden....................
You can't read the all page of ebook, please click here login for view all page.