
1093D Modeling, 2D Graphics, and Data Visualization
menu that allows you to see what the import will cost in Linden dollars for Second Life. This is a no-cost
procedure in OpenSim.
6.4.1 The BasiCs of imporTing a mesh model
Let’s go through the basics of importation in the Firestorm menu. You can activate it by selecting Avatar/
Upload/Mesh Model from the top bar of the viewer menu. This will bring up the rst page of a three-page
menu but do not be put off by the complexity. You really need to know only a few settings to do a basic
import. There are images of this menu in Figures 13.15, 13.16 and 13.17.
Once the menu is up, use the Browse button, open the COLLADA (.dae) le you want to import from your
computer in the top box, next to High and below Source.
Name your model in the top left box and choose a Type that represents its use, such as architecture,
vehicle, and so on. Make sure that the Textures box below the Preview window is checked if you have applied
textures on the model. Now, let’s go on to the Tabs and their various settings. There is a complete list for the
settings on these tabs in Chapter 2, Section 2.3, as well as known problems with uploading to OpenSim and
Second Life.
On the rst tab of the menu, you are given options for importing your model at various levels of detail
(LOD). As you develop building/import skills, this menu will give you the opportunity to “tweak” the LOD
yourself and upload lower-detail models when you need to without sacricing visual quality. Building with
that factor in mind will save you time during the importation process.
Under the Physics tab, you are setting the physics collision “shape” for your object, and since this also has
an impact on server performance, the lowest setting possible is desirable. However, if you need to walk on or
inside the object, you may need a higher physics setting, or make a custom one for the model.
In the third tab, you will set up the Upload options for your model. This is where you can add the
textures to the model for simultaneous importation. Check the box (under the Scaling section) that says
“IncludeTextures.”
Once you have gone through the three tabs, checking the guidelines from Section 2.3, and set up your
model for importation, click calculate weights and fee and review the fees for importation, the resource
weights, and land impact. If this is all acceptable, click Upload.
Shortly afterward, you will see the object appear in your inventory. Drag it out of your inventory to rez it
on the ground and check your results. For more detail and information on uploading meshes, please refer to
the wiki for Firestorm (http://wiki.phoenixviewer.com/fs_mesh_upload).
Sometimes, with a very complex object, such as the motorcycle from Layton Destiny (Figure 6.11),
itwill have to be designed and imported in sections. In Figure6.11, there is a snapshot of this beautiful
work. Layton has also provided special physics les for the content of this book. By utilizing these les
dene the LOD under the Physics/LOD section of the importer, the uploads can be faster and with a lighter
land (server)impact.
6.5 SCULPT MAPS (SCULPTIES) AND HOW THEY LED TO MESH
For those of you who are not familiar with them, a sculpted prim (sculpty) is created when a sculpt map is
applied to the surface of a special prim. Essentially, the rainbow-hued sculpt maps work like a 3D displace-
ment map on the vertices of the prim. Each pixel on the sculpt map image has a specic 3 number color value
relating to the amount of red, green and blue it contains. That numerical value is translated into x,y, and
zcoordinates which are assigned to displace the vertices on the prim, for example, changing a sphere into
an apple-shaped form. For a time, in the years between 2007 and 2011, these sculpt maps were the best way

110 Virtual World Design
to make organic forms such as plants and animals in Second Life, then mesh imports were allowed, and it
all changed. Sculpted prims are not dead, however, there are several programs still available for use that can
make sculpt maps directly, like Sculpty Paint [3] and the Kanae Project suite of tools [4].
In the Build menu, a rezzed prim can be converted into a sculpted one by using the drop-down menu on
the Object tab and selecting Sculpted.
Once the basic sculpty has formed (it looks like a wooden apple), you can drag your new sculpt map into
the loading box, and your prim will take on the sculpty form from the sculpt map you made. Do some experi-
menting with the sculpt map stitching to see how various ways of applying the sculpt map to the prim affect
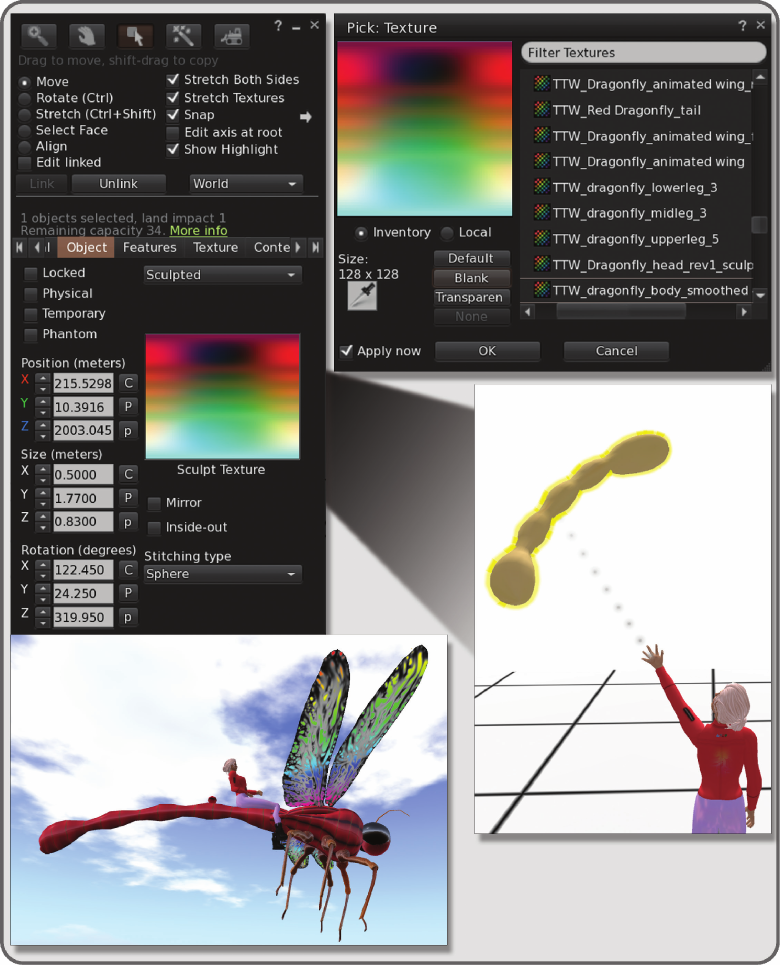
the way its form looks and where the seams appear. Figure6.12 shows the sculpty editor and the resulting
form used in a dragony vehicle, made by Annabelle Fanshaw.
As a designer, you have to make constant adjustments in your methodologies to suit the needs of your
various projects. Sculpties are still used to great extent in virtual worlds, and for making large one-prim
structures like a cloud or sequoia tree trunk, they still probably have an edge in terms of cost and ease of
use. Utilizing the inworld premade sculpts available through the Second Life Marketplace or applications
like Sculpty Paint are good ways to start building new things, especially if you are still learning how to
use a 3D modeling program.
FIGURE 6.11 Motorcycle model built by Tim Widger (Layton Destiny in OpenSim and Second Life). This complex
model was created in Blender as a series of mesh parts, imported into OpenSim and reassembled.
1113D Modeling, 2D Graphics, and Data Visualization
FIGURE 6.12 Screen grabs from Second Life showing process of making parts for a dragony vehicle. Top left and
right shows the application of a multicolored sculpty map to the object in the Sculpt Texture box. Lower right shows
the resulting organically shaped tail form of the dragony, and lower left shows the whole vehicle when assembled.
Wing outline shapes were traced from a photograph on Wikimedia Commons, http://commons.wikimedia.org/wiki/
File:Cloudwing_bangalore.jpg, Photography by L. Shyamal, Creative Commons license.
112 Virtual World Design
The downsides of this type of building—including lack of ne control over the vertex positions displaced
by the sculpt map, high rendering cost due to collisions on its default spherical physics hull, and difculty
with editing the forms inworld—have eventually paved the way for the widespread adoption of mesh use in
virtual worlds. Eventually, sculpted prims will probably become a footnote in the history of virtual world
building as mesh content replaces it.
6.6 CONCEPTS IN TEXTURE CREATION, 2D GRAPHICS
Texture creation is the other primary aspect to the design of beautiful forms. Nothing enhances a form or
embellishes it like a well colored, nicely rendered texture on the faces.
6.6.1 QualiTies of greaT TexTures
What makes a great texture? Strive for ve qualities: (1) efcient use of resolution or size of the graphic le;
(2) color harmony; (3) a sense of lighting and shadow; (4) “tile-ability”; and (5) specicity.
Efciency: The size of your texture makes a difference in the efciency with which your virtual world
can be produced on a visitor’s screen. Unless you need to make a sign with lots of text and graphics on it,
the overall sizes of your textures should not exceed 512 by 512 pixels, and if you can make it with 256 by
256 pixels, then go for it. You should note that textures always have to be made in the “power of 2” formats
(1024, 512, 256, 128, 64, and so on), thereby providing nice, easily stackable texture blocks for the computer’s
memory. Getting into the habit of using the smallest possible textures can save you loads of grief by avoiding
slow rezzing times and complaints from your visitors, who have to look at a gray model while the textures
load for them.
Color Harmony: To create color harmony in your textures, think about the environment in which they
will be. Sunset in Paris covers the buildings with a rosy blush, tropical reefs have a lovely aquamarine glow,
and wintertime in Helsinki is full of relight and snow. If you are making a full-blown model with baked
textures in Blender or 3DS Max, then the lighting in your scene could provide the color harmony as well
as shadows for your textures that will be imported with the mesh. If you are just making a single texture to
apply to an object inworld, then it would be wise to select a dominant color in the environment and put a
little of that into your graphic. Of course, all is not lost if you nd that your graphic looks out of place in the
virtual environment. A quick adjustment of the underlying material color on the object and you can blend it
all in. This phenomenon, observed in an environment that is unied in overall color, is called the Harmony
of Dominant Tint.
Lighting: All quality textures have a sense of lighting and shadow. To get the “visual texture” of a rough
or convoluted surface like a stone wall or even a brick face, built-in shadows and highlights are necessary
in your textures. You should consider the general direction of the overall lighting in the environment as you
create your textures. Will you “lock” the region into a WindLight setting and offer that le to your visitors, or
will you let them choose their own lighting? Perhaps you have a custom day cycle set up for your region. All
of these factors should be a consideration in the creation of your textures. To organize this, ask this question
rst: What is the key light (main source of light) in my environment, and how will it change? You may want
to make only subtle shadows on your built elements and let the visitors activate their own real-time shadows
for the full effect. Whatever you do, make sure that you test it under all sorts of lighting conditions and take
pictures so you have a record of how it looks as you change things.
The 3D modelers like Blender and 3DS Max allow you to apply textures to your models, light the scene,
and then “bake” the shadows onto the surface as you render the sides of the model into a at texture. These
textures can actually be unwrapped from the model and manipulated as 2D les in a graphics program
1133D Modeling, 2D Graphics, and Data Visualization
like Photoshop or GIMP (GNU Image Manipulation Program). For instance, you could add sparkling
icicles around the windows of your bakery model texture for the winter season look and not have to rebuild
anymodels.
If you are feeling adventurous and want to try some additional material features, look under the Texture
tab in the Build Editor for the options in Shininess (specular) and Bumpiness (normal). Here is a place to
add in additional textures in the form of specular maps and normal maps which you build with your 3D
modeler to enhance the surface appearance of textures inworld. There is more information about these here:
http://community.secondlife.com/t5/English-Knowledge-Base/Materials-Normal-and-Specular-Mapping/
ta-p/2034625/.
“Tile-ability:” The capacity for a texture to be repeated seamlessly across a surface, is an essential quality
in good textures. To develop a texture that looks great across a terrain and does not have a “quilted” feeling
is a ne art. About 80% of the textures you will use have to be tiled, so it pays to learn a few ways to make
them look good. Depending on the graphics program you use, there are probably some tutorials available
to show you how to match the edges with the native tools like Blur or Copy Stamp in Photoshop. There
are also various texture plug-ins for Photoshop, like Filter Forge, which are useful when you need to make
tile-able textures and are well worth the investment. When you are making textures to be tiled, make sure to
allow extra time in your building phase for the testing of the tile-able texture on a variety of forms inworld.
Sometimes, a texture that looked good on your desktop will look badly matched on the terrain or large wall
structures you are building, and you will need blur/blend the image and modify it further. You may nd that
by working along the diagonal axes of the image you can create better tiling adjustments as it will draw the
eye away from the edges.
Specicity: This denes a great texture; few of the surfaces in our real world look identical. This starts
with research. As a designer, you should get a good small pocket camera and have it with you during projects.
All around us every day are surfaces with incredible details and visual texture. Get into the habit of looking
at the environment around you and snapping a picture of any wall, oor, or surface that interests you. A good
collection of images like that, which are copyright free for you, is invaluable. As you develop as a designer,
you begin to get picky, and that is a good thing. For instance, you may learn through your research and obser-
vation that brick in Amsterdam looks different from brick in New York. The clays that were red to make
these bricks were different, and they are exposed to different climates. Eventually, you will immediately see
these differences in various textures and know that even the most subtle changes will evoke a different mood
in the visitor.
There are many good 2D programs that can help you make stunning textures. Adobe Photoshop and
Illustrator are the workhorses of the graphics industry, but if your purse is smaller, GIMP (GNU Image
Manipulation Program) [5] is an excellent freeware program for graphic production.
6.7 UTILIZING THE TEXTURE MENU IN THE BUILD EDITOR
Let us assume you have now created a fantastic texture and would like to show it off on the surface of your
prim built object. There are lots of ways you can make your textures stand out by utilizing the built-in texture
tools. Before you move to the Texture tab in the Build menu, take a few minutes to look at some of the general
options in the top section. Two of them, Select Face and Stretch Textures, are crucial to mastering texture
application on virtual objects. Farther down in Section 6.7, under mapping, you will see the impact of Stretch
Textures, but for now let us focus on Select Face. A prim can have seven faces counting those that appear
when you use the Hollow and Path Cut options on a cube. Sometimes, you may want to apply a special texture
to just one of those faces. If you are zoomed in on the object and have a clear shot at it, you can simply drag
the texture out of your inventory and onto that face. Otherwise, you can turn on the Select Face button in the
..................Content has been hidden....................
You can't read the all page of ebook, please click here login for view all page.