
Now that you have some Web Parts on the page, let’s examine how they are configured. The Site Users Web Part that you inserted in the preceding section currently shows only SharePoint permission groups. You will be changing its configuration so that it shows only individual users on this site.
There are two ways to configure the Site Users Web Part: Web Part Properties or Edit Web Part. The page from the last section is still in Edit mode.
To configure the Web Part by using Web Part Properties, perform the following:
Click the Site Users Web Part (to select it)
Click the Web Part Properties button, as demonstrated in Figure 7-16.

On the Web Part Properties sidebar that appears, there are several groupings of configurations with which you can work.
There is always a default section near the top of the item with configuration items that are specific to the Web Part that you’re editing.
For this Web Part to display users rather than groups, you need to change the Display Type section from Show People And Groups With Direct Permissions On This Site to Show People In This Site’s Member Group (see Figure 7-17). You can also choose to display only certain people on this Web Part. For this example, this is the only change that you will make to this Web Part’s configuration.
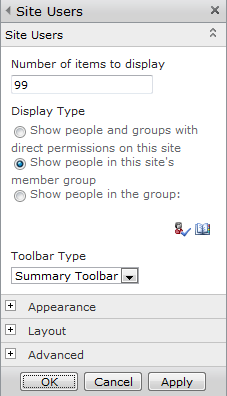
The Toolbar Type drop-down list contains two selections: Summary Toolbar and No Toolbar. Some Web Parts (including Site Users) have no Toolbar.
Don’t click the OK button just yet, there are three other sections to look at: Appearance, Layout, and Advanced.
The Appearance section (see Figure 7-18), controls the overall look of the Web Part on the page. Note that changes made to this section might not appear until the Web Part/Page is no longer in Edit Mode (change the Web Part, and then save it to see the result).

In the Title text box, type the name that you want to appear on the title bar of the Web Part.
You can use the Height and Width fields to specify the height and width of the Web Part in pixels, or to allow the Web Part to automatically scale to fit the height and width of the Web Part zone in which it resides.
Tip
INSIDE OUT Web Parts and Chrome: and no, we don’t mean the browser
Before going on to the next section, you need to know what Chrome means with respect to a Web Part. On any given Web Part, there are two major components that comprise its appearance: a title bar and a graphics box that surrounds the contents of the web part. Chrome is the name that is used to describe this appearance.
In the Chrome State section, you can specify whether the Web Part content is displayed (Normal) or not (Minimized).
Next, the Chrome Type drop-down list contains five distinct states:
The Layout section controls the location and layout of the Web Part, as shown in Figure 7-19.

Select the Hidden check box if you want to make the Web Part invisible to users. Note that this is different than closing a Web Part; the Web Part is still visible in Edit Mode.
Use the Direction drop-down list for languages that display content which reads from right to left (such as Arabic). You can choose from one of three choices:
Use the Zone drop-down list to specify in which Web Part Zone the Web Part will appear. This is used on a Web Part page, and has no effect on a wiki page.
The Zone Index indicates the order in which the item appears in the Web Part Zone. In Figure 7-19, it is the second Web Part (in order from top to bottom or left to right).
The Advanced section has several properties, which are shown in Figure 7-20.
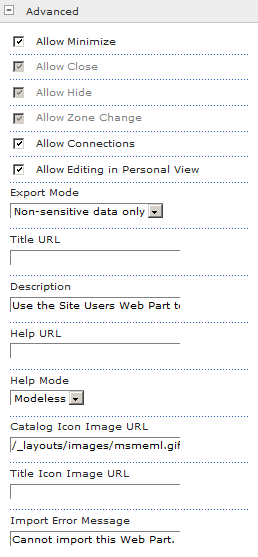
This section presents several check boxes with which you can control the following:
Whether the Web Part can be minimized
Whether the Web Part can be closed
Whether the Web Part can be Hidden
Whether the Web Part’s zone can be changed (Web Part pages only)
Whether the Web Part can be connected to another Web Part
Whether the Web Part can be edited in Personal view
Tip
INSIDE OUT What’s a Personal view?
A Web Part has two faces—one Public, and the other, Personal. The Public view is created by the site owner and shows the default view for everyone visiting the site. A Private view can be configured on a per-user basis to suit the user’s individual needs. Both Public and Personal views of a Web Part can be reset (as you will see shortly in the section about Maintenance Mode).
You use the Export Mode drop-down list to choose whether or not sensitive data can be exported along with a Web Part. Some Web Parts can be configured, downloaded, and then saved only to be uploaded onto a different page or site.
In the Title URL text box, you can enter a URL to link to a site that contains more information about the Web Part. Clicking on the Web Part title opens this link in another Web Browser window.
Use the Description text box to provide descriptive information that will appear when you hover the mouse over the Web Part’s title or icon.
With the Help URL, you can designate a help file for use when the user clicks the Help icon on the Web Part.
The Help Mode offers three choices, but only two of these modes function within SharePoint:
Modal Opens Help in a new browser window. You must close the Help window to return to the Web Part.
Modeless Opens Help in a new browser window. You can return to the Web Part without closing the Help window.
Navigate This option is available in ASP.NET Web Parts and indicates that the Help window will open in the current browser window. Although SharePoint is built on top of ASP.NET, it cannot use this mode.
In the Catalog Icon Image URL text box, you can specify a URL that links the Web Part to a 16x16-pixel icon that will appear in the Web Part listing.
Use the Title Icon Image URL text box to specify a URL that links the Web Part to a 16x16-pixel icon that will appear in the Web Part title bar.
You can enter a message into the Import Error Message text box to describe issues that might arise when importing a previously exported Web Part into your site. Usually you will have no need to change this field. If you need, you can change it from the default message, “Cannot import this Web Part”.
Tip
INSIDE OUT How about two good pieces of information within a single URL?
The article “Use the HTML Form Web Part to filter and display data in another Web Part,” on http://office.microsoft.com, gives a good primer for the HTML Form Web Part (you will see this in the Connecting Web Parts section, later in this chapter). The bonus comes near the end of the article, in the section called “Configure the Common Properties of a Web Part.” This section details all of the Web Part configuration items (including those we just covered) in an easy to print table. You can find this article at http://office.microsoft.com/en-us/sharepoint-foundation-help/use-the-html-form-web-part-to-filter-and-display-data-in-another-web-part-HA101791813.aspx.
At this point, you’re done configuring this Web Part, so click the OK button, which is located beneath the Advanced section of the Web Part configuration sidebar. The reconfigured Web Part appears on the page, as shown in Figure 7-21.

To configure the Web Part by using Edit Web Part (see Figure 7-22), perform the following:
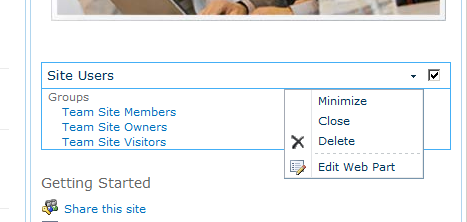
The Web Part configuration menu opens, as when you configure the Web Part by using Web Part Properties, but there are other menu items.
When you click the drop-down arrow, there are three additional menu items for a Web Part: Minimize, Close, and Delete; let’s have a look at each.
Minimize causes the Web Part to hide all but its top menu bar (which in Figure 7-23 is Site Users). Depending on the Web Part’s configuration, the user can click the drop-down menu again and then select Restore to revert the Web Part to its original appearance.

Easily the most misunderstood choice, Close causes the Web Part to be removed from view without altering its configuration. A closed Web Part does not even remain visible on the page in Edit mode; more important, the SharePoint server renders the Web Part with the page whether the user sees it or not. Web Parts that are closed on a webpage do incur a performance penalty, which depends on the complexity of items rendered in the Web Part.
In a site managed by inexperienced owners, you might find several copies of the same closed Web Part. This causes the site to load slowly as a result of each of the multiple versions being rendered by the server. If you have a page that is rendering slowly, consider looking for closed Web Parts as one of your first troubleshooting actions.
So, why have the ability to close a Web Part? Why not just delete it? Here’s why: you will want to use Close when you have a Web Part that you want to temporarily remove from the page, but you haven’t yet decided to delete it.
Once a Web Part has been closed, there are two ways to interact with it. The first is to add ?contents=1 to the end of your page’s URL; this places the page into maintenance mode, wherein you can delete the Web Part, as illustrated in Figure 7-24.

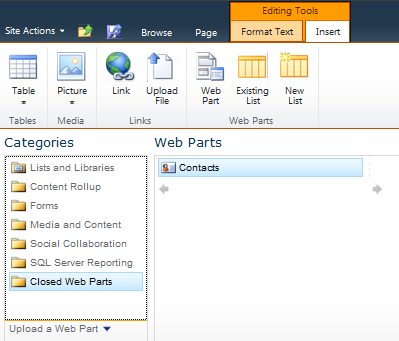
The second way to interact with a closed Web Part is to click Closed Web Parts in the Categories section of the Insert A Web Part menu, as shown in Figure 7-25.
Delete simply removes the Web Part from the page. This is a permanent action; you will have no opportunity to recover a Web Part once it has been deleted. If you have a doubt about deleting a Web Part that perhaps you have spent a good deal time configuring, consider temporarily closing it for a period of time before deleting it permanently.
It is not necessary to edit a webpage in order to begin editing a Web Part (a major improvement in efficiency from the previous version of SharePoint). In this example, however, you had placed the page in Edit mode before starting the Web Part configuration. Therefore, it is good practice to remember to save the webpage before proceeding (Figure 7-26).
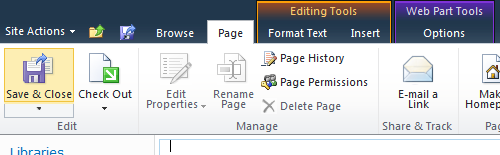
Figure 7-26. Remember to click Save & Close to ensure that you don’t lose any changes made to the webpage.
The completed page should appear in your web browser; Figure 7-27 demonstrates that it is no longer in Edit mode.
