
SharePoint Foundation 2010 provides a variety of ways to work with lists and views, all of which require little effort or programming to set up. This includes displaying attractive input forms and reports. This section explains how these features work.
After a list contains all the fields you want, team members can view it or update it by:
Clicking its link in the Quick Launch (provided, of course, that you chose to display this list on the Quick Launch when you created or later modified the list).
Clicking the All Site Content link and then, under Lists, clicking the list name.
Adding the list to a Web Part page.
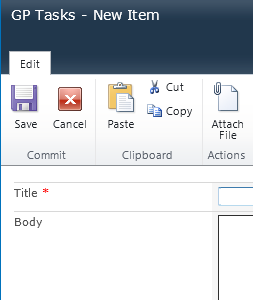
To add an item to a list, proceed as follows:
Open the list view by using any of the methods previously provided.
Click Add New Item at the bottom of the page. Or click Items under the List Tools Menu, and then click New.
When the New Item page appears (see Figure 5-25), enter data into the list.
To save the data you entered, click OK.
To enter more data into the list, click New again, as in step 2.
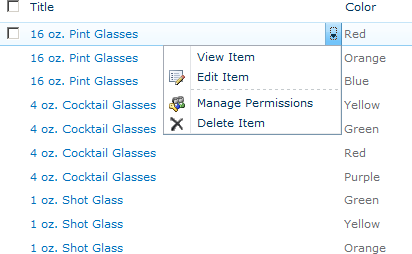
To change or delete the content of a List item, perform the following steps:
Click the item’s title (which should be a hyperlink).
When the item appears on its own page, click the Edit Item or Delete Item button. Alternatively, you can move the mouse pointer over the item’s title, click the drop-down arrow, and then choose Edit Item or Delete Item from the shortcut menu, as shown in Figure 5-26.
If you have Excel 2007 or 2010 installed, you can create, modify, and delete content by using the Datasheet view. To invoke this view, navigate to the list or library page. On the List Tools menu, click List, and then click Datasheet View. Alternatively, if you have created a Datasheet view for the list or library, you can open that view, as well.
The Datasheet view presents an editing format similar to that of Excel so that you can edit large numbers of items at once. The view can also be useful for exporting data into an external application such as Excel.
With SharePoint Foundation 2010, you can export your list or library data to an external spreadsheet. If you have data that you would like to share with a user who does not have access to your list, or possibly with a user outside of your organization, you can use this functionality to quickly export your data into a spreadsheet in the exact or very similar format.
Tip
Many users ask why all of their fields do not export properly when they click Export To Spreadsheet. This is because the user did not select a view that contains all of the columns. Remember, when you export to a spreadsheet, you are actually exporting items that are in the current view. To preclude the possibility that some items are not exported, make sure that the view you are on contains all of the fields that you want to export.
To export a list or library to a spreadsheet, perform the following steps:
Open a list or library.
On the List Tools menu, click List and then click Export To Excel.
Follow the prompts from your spreadsheet program to open and activate the file. If you are using Excel 2007 or Excel 2010, you might receive a security query asking whether you want to enable a data connection. You might also receive a query from your spreadsheet program asking how you would like to view the data.
After you have selected the criteria about the export, click OK.
Tip
INSIDE OUT Saving the Excel Query (.iqy) file
It’s possible that you follow the steps outlined above and the list still does not export to Excel. Keep in mind that SharePoint exports an OWSSVR.iqy file. If you are unable to open it directly, try saving the file to a location on your computer. You should then able to open your spreadsheet program and import the saved file.
Some of the new and improved functionality associated with SharePoint Foundation 2010 and lists will be covered in this section. Enhanced list interaction functionality in this version of SharePoint includes:
Improved integration of SharePoint Foundation 2010 with the new Outlook 2010 client allows for better management of SharePoint List items.
To connect a SharePoint list with Outlook, perform the following steps:
Open a list.
On the List Tools menu, click List, and then select Connect To Outlook.
Click Allow to permit this website to open a program on your computer.
Outlook should open on your desktop.
Click Yes to Connect This SharePoint List to Outlook.
The list is added to the appropriate heading and opens automatically for you in Outlook.
Formerly known as Microsoft Groove, SharePoint Workspace 2010 is a great new addition to the range of SharePoint functionality. Your SharePoint Sites and lists can be synchronized to make this content available offline. You can set up your workspace to synchronize automatically or do it manually.
The following list types cannot be synchronized; however, a link is available that you can use to access the information, provided that you have a connection to the network in which your SharePoint site resides:
Calendar
Phone Call Memo
Resources
Survey
Site Pages
To synchronize a SharePoint list with your SharePoint Workspace, perform the following steps:
Browse to the list that you that want to synchronize.
On the List Tools menu, click List, and then select Sync To SharePoint Workspace.
A dialog box opens, asking if you want to synchronize the list to your computer.
Click OK.
Another dialog box opens, showing the status of your synchronization.
Click Open Workspace or Close when the synchronization is complete.
Microsoft continues to improve the export functionality from SharePoint into Office 2010 products. The new and improved version offers three new commands: Export To Excel, Create A Visio Drawing, and Open Schedule (in Microsoft Project).
To perform an export of data to either Excel or Visio, complete the following steps: