
In addition to using less bandwidth to render, polygon modeling is popular because its resulting models are usually one piece of geometry with many facets. You can, therefore, deform polygon models without fear of patches coming apart, as can happen with NURBS. Polygons, however, have a finite detail limitation and can look jagged up close or when scaled up. One solution to this problem in the Maya software is the Smooth tool. Many 3D applications support only this form of modeling, so it’s a popular exchange method among platforms.
Polygons are inherently better for orthogonal models, mechanical objects, and the like. But character modeling with polygons is quite powerful when you understand the tools to edit polygons. A popular method of polygonal modeling, sometimes called box modeling, involves creating a base object, such as a simple cube, and then pulling and pushing faces to draw out angles to create more faces. Whereas NURBS typically need the creation of curves to start, complex polygons are usually created from basic-shaped polygons such as primitives.
Another method for creating poly surfaces uses the same curves that NURBS surfaces use or even converts a completed NURBS surface model to polygons. A third method is to create poly surfaces directly with the Polygon tool, which allows you to outline the shape of each face. We’ll look at these procedures in the next chapter.
Creating Polygonal Primitives
The most notable difference between the options for a NURBS primitive and a poly primitive are the options for surface detail. With a NURBS surface, sections and spans define detail. With a poly surface, detail is defined by subdivisions, which are the number of rows and columns of poly faces that run up, down, and across. The more subdivisions, the smoother the surface will be.
Choosing Create ⇒ Polygon Primitives gives you access to the poly version of most of the NURBS primitives. Opening the option box for any of them gives you access to their creation options. To see an example, choose Create ⇒ Polygon Primitives ⇒ Sphere, and open the option box.
To get started, first make sure History is turned on, or there will be no creation node; then, click Create to make the poly sphere. Open the Attribute Editor, and switch to its creation node, called polySphere1. In the creation node polySphere1, just as in the option box, you’ll find the Subdivisions Axis and Subdivisions Height sliders, which you can use to change the surface detail retroactively.
The Polygon Tool
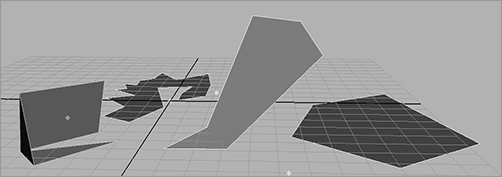
You use the Polygon tool (switch to the Polygons menu set, and then choose Mesh ⇒ Create Polygon Tool) to create a single polygon face by laying down its vertices. When you select this tool, you can draw a polygon face in any shape by clicking to place each point or vertex. Aside from creating a polygon primitive by choosing Create ⇒ Polygon Primitives, this is the simplest way to create a polygon shape. Figure 4-7 shows some simple and complex single faces you can create with the Polygon tool.
After you’ve laid down all your vertices, press Enter to create the poly face and exit the tool. For complex shapes, you may want to create more than just the single face so that you can manipulate the shape. For example, you may want to fold it.
Figure 4-7: Polygon faces created with the Polygon tool
Try This The poly shown in Figure 4-8 was created with the Polygon tool and has only one face. Therefore, adjusting or deforming the surface is impossible. To fold this object, you need more faces and the edges between them. Make your own intricate poly shape with the Polygon tool by clicking vertices down in the different views to get vertices in all three axes.
With the surface selected, choose Mesh ⇒ Triangulate. The surface has more faces and edges and is easier to edit, but it’s still simple to create because you start with a single face. If you need a uniquely shaped poly, start with this tool, and then triangulate your surface into several faces as shown in Figure 4-9.
Figure 4-8: A single-faced polygon with a complex shape
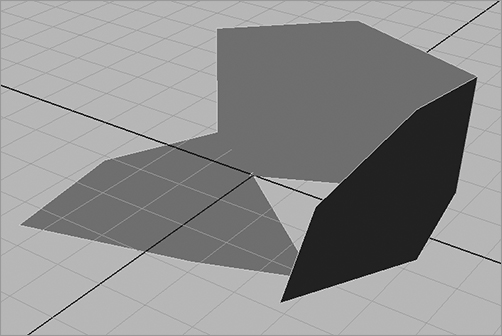
Figure 4-9: Complex shapes are better with more faces.
