The first step in making any object is to understand how it’s constructed. The best training for a CG modeler is to visualize the elements that make up an object. Dissecting the components of an object into primitive shapes will help you translate and re-create it in 3D terms. You create the elements in Maya and then join them together to form the desired object.
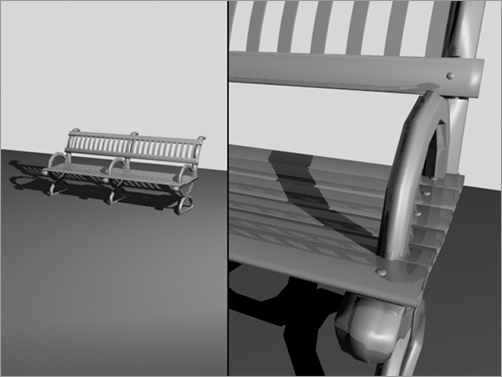
Figure 4-1: The level of detail you need to include in a model depends on how it will be seen in the animation.

Gather as much information as you can about the object you want to model. Take pictures from many angles, get sizes and dimensions, and even write down a description of the object. Try to re-create it in a different medium, such as a charcoal sketch or a simple clay or balsa-wood model. Why go through these steps before you start the model in Maya? The more perspectives from which you see your subject, the better you’ll understand and be able to interpret your model.
Maya has a rich toolset for creating models, so it’s important to choose the methodology that best matches the modeling task at hand. Be prepared with sketches, pictures, and whatever information you can gather before you sit down to realize your CG model.
How detailed should your model be? This is a crucial question, because a model that’s too complex, or a scene that has too much detail, wastes precious computing time and power, which will greatly increase render times.
Begin by deciding the purpose for your model. Then, determine the level of detail at which it will be seen in your CG scene. For example, consider the two scenes in Figure 4-1. If you need to create a park bench that is shown in a far shot (left), it will be a waste of time and effort to model all the details such as the grooves in the armrest. If, however, your park bench is shown in a close-up (right), you’ll need those details. It’s important to plan your model in accordance with the level of detail it requires.
If you aren’t certain how much detail you’ll need, it’s better to create a higher level of detail rather than skimping. You can easily pare down the detail if it becomes unnecessary in the scene.
Keep in mind that you can add detail to your model in the texturing phase of production. You would be amazed at the richness of detail a model can achieve with simple geometry and well-painted texture maps. (Chapter 7, “Maya Shading and Texturing,” covers texturing.) It’s also important to keep in mind that in the rendering phase, you can run into memory shortages if you have too many scene models or they’re overly detailed. Finding the right balance is tough, but it will come with time and experience.
As the geometry detail increases in a model, the performance demands on your PC can skyrocket. If you’re working with a slower machine or with a low-end graphics card, your models must be especially well thought out in terms of their level of detail. Equipped with this decision and a number of photos, web pictures, and sketches, your modeling experience will be more productive.
An Overview of Polygons, NURBS, and Subdivision Surfaces
A fundamental decision you’ll make in planning is choosing a modeling method. Maya can define a model in three ways: polygons, NURBS, and subdivision surfaces. (Polygons are the subject of this chapter. NURBS and subdivision surfaces are the subjects of Chapter 5, “Modeling with NURBS, Subdivisions, and Deformers.”) Although NURBS modeling is what Maya modeling is renowned for, polygons are the simplest to describe.
Polygon Modeling
Figure 4-2: A polygonal sphere and its components
Polygons are made up of faces. A single polygon face is a flat surface made when three or more points called vertices are connected. The position of each vertex defines the shape and size of the face, usually a triangle. The line that connects one vertex to another is called an edge. Some polygonal faces have four vertices instead of three, creating a square face instead of a triangular one.
Polygonal faces are attached along their polygonal edges to make up a more complex surface that constitutes your model (as shown with the polygonal sphere in Figure 4-2). A camping tent is a perfect example. The intersections of the poles are the faces’ vertices. The poles are the edges of the faces, and the cloth draped over the tent’s frame is the resultant surface.
Polygon models are the simplest for a computer to render. They’re used for gaming applications, which need to render the models as the game is running. Gaming artists create models with a small number of polygons, called low-count poly models, which a PC or game console can render in real time. Higher-resolution polygon models are frequently used in television and film work. In fact, a number of science fiction TV shows use polygonal models almost exclusively for their special effects. Because even complex polygon models can be made of a single surface, they’re useful for character animation work as well. Models in character animation bend and warp a good deal, so having a single surface that won’t separate at the seams can be advantageous. You’ll get hands-on practice with polygon modeling later in this chapter.
NURBS Modeling
NURBS is an acronym for Non-Uniform Rational B-Spline. NURBS modeling is based on mathematics that is more complicated than the mathematics for polygons. Because NURBS modeling requires more processing, this method is typically used for applications in which the rendering is done in advance, such as animation for film or television. NURBS modeling excels at creating curved shapes and lines, so it’s most often used for organic forms such as animals and people, as well as highly detailed cars and the like. These organic shapes are typically created with a quilt of NURBS surfaces, called patches. Patch modeling can be powerful for creating complex shapes such as characters.
NURBS geometry is based on Bézier curves, a math concept originally developed by the French engineer Pierre Bézier. Bézier curves are drawn between control vertices (CVs) based on equations using cubic polynomials.
In essence, Bézier curves are created with a starting and an ending CV and at least two CVs in between that provide the curvature. As each CV is laid down, the curve or spline tries to go from the previous CV to the next one in the smoothest possible manner.
As shown in Figure 4-3, CVs control the curvature. The hulls connect the CVs and are useful for selecting multiple rows of CVs at a time. The starting CV appears in Maya as a closed box. The second CV, which defines the curve’s direction, is an open box, so you can easily see the direction in which a curve has been created. The curve ends, of course, on the end-point CV. The start and end CVs are the only CVs that are always actually on the curve.
Figure 4-3: A Bézier curve and its components
Figure 4-4: NURBS surfaces are created between isoparms. You can sculpt them by moving their CVs.

Whereas CVs control the curvature of a Bézier spline, NURBS surfaces are defined by curves called isoparms, which are created with CVs. The surface is created between these isoparms to form spans that follow the surface curvature defined by the isoparms, as in Figure 4-4. The more spans, the greater the detail and control over the surface; but this added detail makes greater demands on the computer, especially during rendering.
Unlike a polygonal model, a NURBS surface deformation is based on the interpolation of curves, which must interpret a deformation of polygons as a collection of faces created from straight edges. For that reason, it’s easier to get a smooth deformation on a NURBS surface with few CVs. To get the same smooth look on a polygon would take much more surface detail.
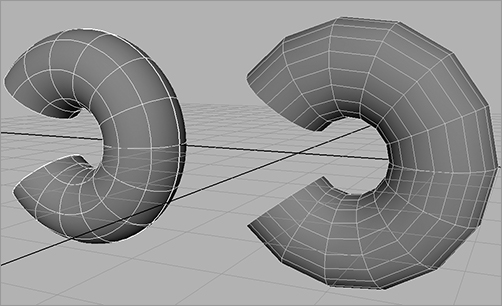
As you can see in Figure 4-5, NURBS modeling yields a smoother deformation, whereas polygons can become jagged at the edges.
If your model requires smooth curves and organic shapes, use NURBS. When in doubt, however, it’s better to begin modeling with NURBS. You can convert NURBS to polygons at any time, but converting back to NURBS can be tricky.
Figure 4-5: A NURBS cylinder (left) and a polygonal cylinder (right) bent into a C shape. The NURBS cylinder remains smooth, and the polygon cylinder shows its edges. A NURBS object retains its smoothness more easily, although it’s possible to create a smooth polygon bend with increased surface faces.
NURBS modeling is losing its popularity overall to newer and better polygonal modeling and subdivision techniques. It is, however, an excellent way to create smooth surfaces and difficult organic shapes, even though the resulting geometry is frequently converted to polygons for rigging, texturing, and rendering.
You’ll get important hands-on practice with NURBS surface modeling with NURBS patching in the next chapter.
Try This Open a new scene (choose File ⇒ New Scene). In the new scene, you’ll create a few curves on the ground plane grid in the Perspective (persp) panel. Maximize the perspective view by moving your cursor to it and pressing the spacebar. Choose Create ⇒ CV Curve Tool. Your cursor turns into a cross. Lay down a series of points to define a curved line on the grid. Notice how the actual Bézier curve is created between the points (CVs) as they’re laid down.
Subdivision Surfaces
Subdivision surfaces incorporate the best of polygons and NURBS modeling to give you the ease of polygon creation plus the smoothness and organic forms of NURBS geometry.
Subdivision surfaces usually start as polygonal surfaces. You then use NURBS math to smooth the rough polygon surfaces by subdividing them according to how the model needs to look. For example, you can easily turn a poly cube into a sphere by using subdivisions to subdivide the faces into smaller and smaller faces that are rearranged to form the sphere along smooth curves used to define this new surface.
With this technique, you can create simple poly models quickly and then overlay them with levels of detail to define the new smooth surface. You can go back to the original poly model at any time to make large-scale changes quickly and efficiently.
Furthermore, with subdivision surfaces, you have the added advantage that your surface won’t tend to crease or tear at the seams as NURBS models made of patches of surfaces are prone to do. This leads to better models with which to animate organics.
The disadvantage of subdivision surfaces is that they require even more computation than NURBS, and keeping models in subdivisions will cost you a lot of memory. It’s almost always the best practice to convert subdivisions (SubDs) back to polygons. You’ll also get hands-on practice with subdivision surface modeling in the next chapter.
Choosing a Method
Maya provides highly effective tools for all three types of modeling, so you can make a model with any technique in as much detail as necessary. The choice depends on how you prefer to model.
Polygons are a welder’s tool. Polygon modeling involves tearing and extruding from larger pieces and welding several surfaces together to form a desired whole. Orthogonal models (models with straight lines and sharp corners) are created more easily with polys.
A clay sculptor might prefer NURBS. Pushing and pulling CVs to create subtle curves on the surface is like working soft clay with your fingertips; you’re nurturing something into shape with the fine art of pressure.
Subdivision surfaces combine the best of both worlds. An artist can begin with a rough shape, chisel it out coarsely, and then switch to finely detailed sculpting by adding levels of detail to the sculpture only when and where needed. Subdivision surface modeling excels at creating organic shapes out of single surfaces.
In the end, converting everything back to polygons is almost always preferable. Why? The available rendering applications all turn everything to polygons (a process called tessellation) when they render the scene. You can save yourself some memory and time and be the master of your own models by trying to go back to polygons as often as is reasonable.
Using Primitives
Primitives are the simplest objects that you can generate in Maya (or in any 3D application). Primitives are simple geometric shapes—polygons, subdivisions, or NURBS. Typically, they’re used to sculpt models, as you saw with the Solar System project in Chapter 2, “Jumping in Headfirst, with Both Feet.”
Because you can define the level of detail of the primitive’s surface, primitives offer great sculpting versatility through vertex or CV manipulation. You can create polygonal primitives using practically any level of subdivisions to define the number of vertices and faces. NURBS primitives can be created with almost any number of sections and spans to define the number of isoparms and CVs.
Spans are isoparms that run horizontally in a NURBS surface; sections are isoparms that run vertically in the object.
Starting with primitives, a modeler can create highly complex and detailed models. You may find it helpful to analyze your modeling subjects into forms and shapes that fit in with Maya primitives to get a better sense of how to begin a modeling assignment. Figure 4-6 shows all of Maya’s primitives, NURBS, polygons, subdivisions, and volume primitives. Quite different from geometry primitives, volume primitives are used for lighting and atmosphere effects such as fog or haze and don’t play a part in modeling.
Figure 4-6: The Maya primitives