
Imagine that you can create a NURBS surface and sculpt it using your cursor the way hands are used on wet clay to mold the surface. You can do just that with a Maya module called Artisan—and without the mess!
Try This Artisan is basically a 3D painting system that allows you to paint directly onto a surface. By painting on the surface with the Sculpt Geometry tool, you move the CV points in and out, effectively molding the surface.
1. In Shaded mode (press 5), maximize the Perspective window (press the spacebar) for a nice big view. Create a NURBS sphere, and open the Attribute Editor. In the sphere’s creation node (makeNurbSphere1), set Sections to 24 and Spans to 12. The greater the surface definition, the more detailed the sculpting.
2. Select the sphere, and choose Edit NURBS ⇒ Sculpt Geometry Tool ❒. Clicking the Options box opens the tool settings. You’ll need those almost every time you paint with Artisan to change brush sizes and so forth.
Your cursor changes to the Artisan brush, as shown in Figure 5-48. The red circle around the brush cursor and the lettering displays the type of brush you’re currently using. When the red lines point outside the circle and the lettering reads Ps, you’re using the push brush that pushes in the surface as you paint it. The black arrow pointing toward the sphere’s center is a measurement of the Max Displacement slider in the tool settings. This sets how far each stroke pushes in the surface. The lower the number, the less the brush affects the surface.
Figure 5-48: The Sculpt Geometry tool lets you mold your surface by painting on it. Here the brush is set to push in the surface of the sphere as you paint.

3. Click and drag the cursor across the surface of the sphere to get a feel for how the surface deforms under your tool. Use the Max Displacement slider to control the force of the brush, and use Radius (U) and Radius (L) to set the size of the brush.
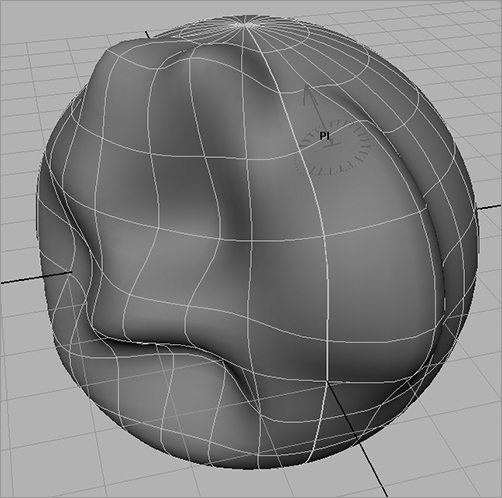
4. Switch your brush type to pull. Your cursor changes to read Pl, and the red lines appear on the inside of the circle (see Figure 5-49). You can then pull out the surface.
The Opacity slider also controls the force of the brush, but it’s subtler than Max Displacement to give you greater control. Because this is after all a 3D painting tool, Opacity controls how much value you paint onto the surface. The value in this case isn’t a color, but how far the surface is deformed. You’ll see how Artisan comes into play in other aspects of Maya later in the book.
5. Smooth blends the pushed in and pulled out areas of the surface to yield a smoother result. Erase simply erases the deformations on the surface, setting it back to the way it was before.
Figure 5-49: With a pull brush, your cursor changes to read Pl.
If you plan to sculpt a more detailed surface, be sure to create the surface with plenty of surface spans and sections. If you only want to paint a specific area of a NURBS surface, choose Edit NURBS ⇒ Insert Isoparms to add extra detail to that area before you begin painting, although you can add isoparms after you paint. When you begin to sculpt this way, going back into the surface’s creation node to increase its sections and spans will ruin your results.
Autodesk Mudbox and Pixologic ZBrush for Sculpting
Although sculpting a surface in Maya with Artisan is convenient, the tool can take you only so far with your sculpture. For intricate sculpting and modeling, artists frequently use Autodesk’s Mudbox or Pixologic’s ZBrush programs. Both interface with Maya easily and give you very intricate control while sculpting your model. The workflow can start with a basic model shaped out in Maya, transferred to the sculpting package, and then detailed. It’s then exported from that package and reimported into Maya to be integrated back into the scene as needed.