
In CG, you must fake certain traits of light in the real world. Using certain methods, you can create smoky light beams, glowing lights, and lens flares. Although some of these effects fall under the domain of rendering and shader tricks, they’re best explored in the context of lighting, because they’re created by light in the real world.
Volumetric Lighting
How do you create an effect such as a flashlight beam shining through fog? This lighting effect is called volumetric lighting, and you can use it to create some stunning results that can sometimes be time consuming to render.
You can’t apply volumetric effects to Ambient and Directional light types. To add a volumetric effect to any of the other types of lights, select the light and, in the Attribute Editor under the Light Effects section, click the checkered Map button to the right of the Light Fog attribute. This creates a new render node that appears in the Hypershade window. After you click the Map button, the Attribute Editor takes you to the lightFog node.
Maya handles volumetric lights by attaching a lightFog node to the light. The Color and Density attributes under this node control the brightness, thickness, and color of the fog attached to that light. Furthermore, in the light’s Attribute Editor, you can control the fog with the Fog Spread and Fog Intensity settings. Fog Intensity increases the brightness of the fog, and Fog Spread controls how well the fog is defined within its confines. For example, a Spot light with a fog shows the fog in its cone. Figure 10-52 shows how Fog Spread affects the conical fog shape.
Figure 10-52: Fog Spread affects how the fog dissipates to the edges of the cone.

To remove a fog effect, right-click the Light Fog label in the light’s Attribute Editor, and choose Break Connection from the shortcut menu.
If you want the light fog-cast shadows to make rays of light within the fog, check Use Depth Map Shadows for the light. You’ll have to increase the depth-map Resolution for a higher-quality image.
Lens Flare
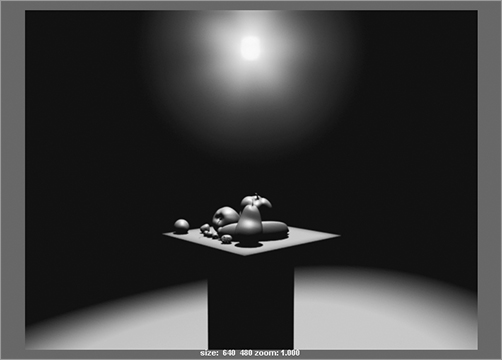
Lens flare and light glow, as illustrated in Figure 10-53, mimic the real-world effect created when light strikes a lens or when the light source is visible in the frame. The flare is created when the light hits the lens at a particular angle and causes a reflection of itself in the optics of the lens.
Figure 10-53: Light glow and lens flare turned on for the back light
To enable a light glow, under the Light Effects section in the light’s Attribute Editor, click the checkered Map button next to the Light Glow attribute to create an OpticalFX node that appears in the Hypershade. The Attribute Editor shifts focus to that new node, which controls the behavior of the light glow and lens flare. The OpticalFX node contains the following attributes and settings:
Glow Type Setting this attribute specifies the kind of glow: Linear, Exponential, Ball, Lens Flare, and Rim Halo. These define the size and shape of the glow from the light.
Figure 10-54: Glow Radial Noise attribute

Halo Type Specifying a halo creates a foggy halo around the light in addition to the glow. You can find controls for the halo under the Halo section in the Attribute Editor.
Star Points Setting this attribute specifies the number of star points the glow generates.
Rotation Setting this attribute rotates the orientation of the star points.
Radial Frequency Used in conjunction with the Glow Radial Noise attribute (see the next item) in the Glow section, this attribute defines the smoothness of any added glow noise.
Glow Radial Noise Setting this attribute adds noise to the glow effect, creating light and dark patches within the glow for a more random look, as shown in Figure 10-54.
Glow Color Setting this attribute specifies the color of the glow.
Glow Intensity and Spread Setting these attributes specifies the brightness and thickness of the glow and how well it fades away.
To turn on a lens flare along with the light glow, click the Lens Flare check box at upper right in the Attribute Editor for OpticalFX. The attributes under the Lens Flare section control the look of the flare.
Light glows and flares can be highly effective in scenes, adding credibility to the lighting; but they’re often misused or, worse, overused in CG. Used sparingly and with subtlety, lens flares can go a long way toward adding a nice touch to your scene.
Shader Glow Effects
To create a glowing effect, it’s sometimes better to place a glow on a geometry’s shader instead of the light itself. Because a light must be seen in the shot and pointed at the camera to see any light glow and flare, a shader glow is sometimes more desirable. This process will composite a glow on the object assigned the Glow shader to simulate a volumetric light, such as a street lamp on a foggy night. Shader glows have far less render cost than true volumetric lights.
Try This To light a still-life scene, follow these steps:
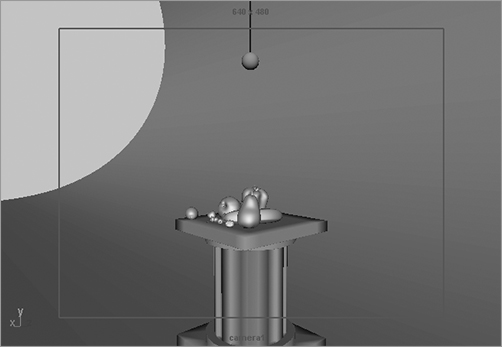
1. Open the still_life_v03.mb file in the Lighting project on the CD. Create a Spot light, place it over the still life, and aim it directly down onto the fruit, as shown in Figure 10-55. Turn on Use Depth Map Shadows for the light, and set Resolution to 1024. Set Penumbra Angle to 10 and Intensity to 1.5. Press 7 for Lighted mode in the Camera1 view panel to see how the light is being cast.
2. The Spot light provides the practical light in the scene. You’ll place a bare bulb on a wire directly above the fruit. Create a NURBS sphere, and position it right over the fruit but in the frame for camera1 to see. In the Render Stats section of the Attribute Editor for the sphere, turn off Casts Shadows.
3. Create a long, thin cylinder for the light bulb’s wire, and position it as if the bulb were hanging from it, as shown in Figure 10-56. Turn off Casts Shadows for the cylinder as well.
Figure 10-55: Aim a Spot light down toward the fruit.

Figure 10-56: Place a bulb on a wire over the fruit pedestal.
4. Create a black Phong E shader to assign to the cylinder.
5. Create a Phong shader for the bulb, and assign it to the NURBS sphere. Set its Color to a pale, light yellow, and make it about 50 percent transparent.
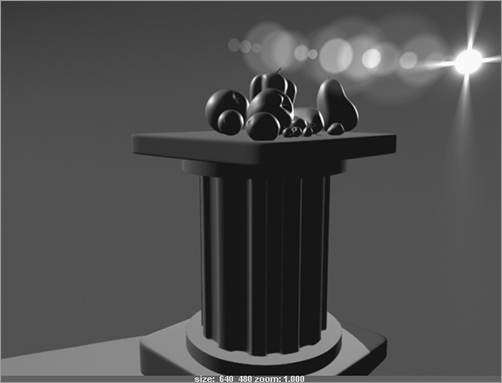
Figure 10-57: The bare light bulb over the still life is created with a shader glow.
6. Select the Spot light, and set its Color to the same yellow. You can do this easily through the Color Chooser. With the shader for the bulb selected, open the Color Chooser by clicking the pale yellow color you just made. Click the right arrow to place the yellow color in the swatches to the right of the main color swatch, or right-click any of the swatches.
7. Pick the Spot light, and click its Color attribute to set the Color Chooser to that color. Click the yellow swatch you created to get the same color on the light. For detail’s sake, make the light’s color less saturated. Click Accept to close the Color Chooser window.
8. To make the shader glow for the bulb, open the Hypershade and select the bulb’s Phong material. In the Attribute Editor’s Special Effects section, drag the Glow Intensity slider from 0 to 1.0. If you render the frame, you see that the glow isn’t quite enough to make a convincing light bulb. In the Hypershade, select the shaderGlow1 node; this node controls all the glows in the scene.
9. Set Quality to 0.1. In the Glow Attributes section, set Glow Intensity to 6.0, set Glow Spread to 0.5, and set Glow Radial Noise to 0.2.
The scene file still_life_v04.mb on the CD contains the full scene for your reference. See Figure 10-57 for the final result.