
mental ray Physical Sun and Sky
Figure 10-39: Enable mental ray rendering in Render Settings.

An impressive function in mental ray for Maya has been the implementation of a Physical Sun and Sky lighting methodology. In this method, mental ray for Maya creates nodes in your scene to simulate an open-air sunlight effect for your scene lighting. It’s a quick way to create a nice-looking render. You’ll place the textured red wagon into an open scene and apply a Physical Sun and Sky (PSAS) in the following exercise.
You can use your own scene with the textured red wagon from Chapter 6, or set your project to the RedWagon project and then load WagonSunlight_v01.ma from the Lighting project on the CD to follow along. Keep in mind that if you use your own scene, your camera angles and look won’t be an exact match to the figures in the book. Follow these steps:
1. The camera for this scene is already set up for a somewhat interesting angle of the wagon in the persp panel. Switch to mental ray rendering in the Render Using pull-down menu at the top of the Render Settings window, as shown in Figure 10-39.
2. Open the Render Settings, and click the Indirect Lighting tab. In the Environment heading, click the Create button next to Physical Sun and Sky. The Attribute Editor opens for the mia_physicalsky1 node you just created, as shown in Figure 10-40.
Figure 10-40: The physicalsky1 node.

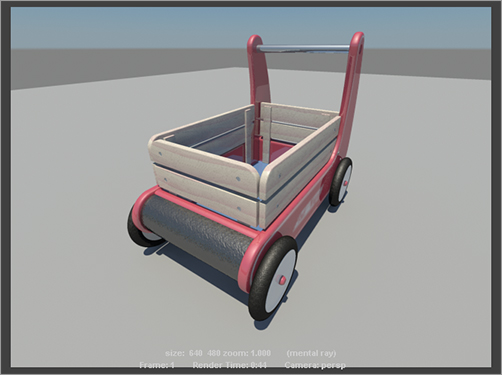
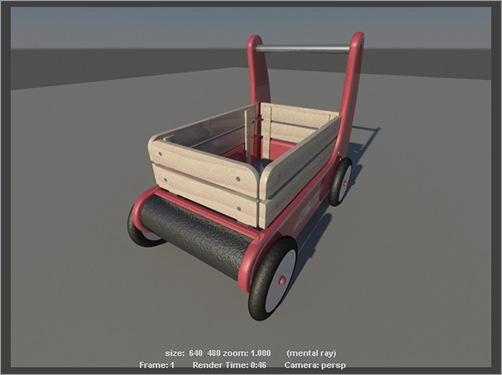
3. Render a frame in the Perspective window, and compare to Figure 10-41. It’s a bit bright, but there’s something very nice about this render. Notice that the metal handlebar takes on a good look right off the bat.
4. The render is too bright, and the wood slats for the railings shouldn’t be reflective. Your render should also show that the fire-engine red of the wagon is a bit washed out.
Let’s first address the wood railings. Open the Hypershade, and double-click the first Wood shader. Set Reflectivity down to 0.1 from 0.5. Repeat for the second Wood shader.
5. In the Render View window, click and drag a box region around the wood railings, as shown in Figure 10-42. Click the Render Region button (![]() ) to render that part of the frame only.
) to render that part of the frame only.
Figure 10-41: The first PSAS render doesn’t look too shabby.

Figure 10-42: Render this region to check the reflection in the wood railings.

6. The wood looks much better now, so let’s move on to the brightness of the scene. Open the Render Settings window, and go into the Indirect Lighting tab. Click the Input arrow next to the Physical Sun and Sky attribute’s button (Figure 10-43). Doing so opens the Attribute Editor for the Physical Sun and Sky.
7. Set Multiplier to 0.5 from 1.0, and re-render the frame. The brightness comes down nicely, and the wagon is less blown out than your previous renders. See Figure 10-44.
Figure 10-43: Click to open the attributes for the daylight system.
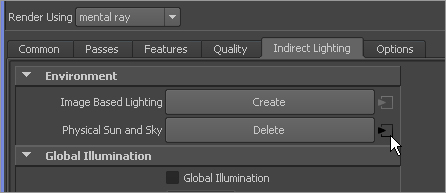
Figure 10-44: Bringing down the brightness of the Sun
8. Let’s play with the direction of the Sun. Look in your persp panel, and you see a Directional light sitting smack in the middle of the scene. Maya uses this light to set the direction of the sunlight, and it doesn’t contribute to the lighting of the scene in any other way. Only its rotation is important to PSAS. Its intensity, color, and other attributes are irrelevant. In this scene, the Directional light is called sunDirection and is in the wagon behind the third texture placement node, as you can see in Figure 10-45. The light is currently pointing sunlight almost straight down, as if the Sun is high in the sky. It seems as if it’s about noon. RotateY for the sunDirection light is -75.
Figure 10-45: The sunDirection light adjusts only the direction of the sunlight in the scene.
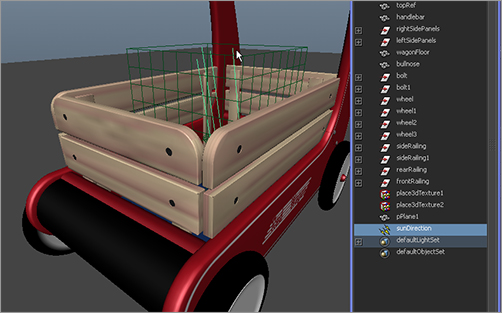
Figure 10-46: Angle the Sun further away from the camera.
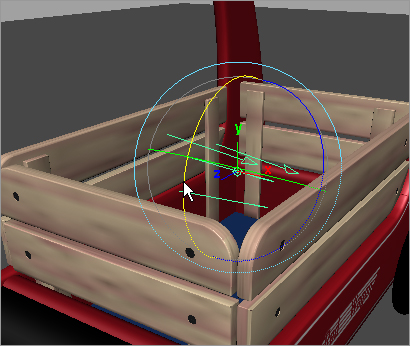
9. That third texture placement node is getting in the way. To turn off its display easily, in the persp panel, click Show ⇒ Textures to uncheck it. The green box disappears in this view until you turn it back on through the Show menu. Now that you can see the Directional light better, you see that the Sun is pointed slightly toward the back of the wagon. Rotate the light so that it’s angled away from the camera even more, as shown in Figure 10-46. The sunDirection’s RotateY should be about -25.
Figure 10-47: Now it’s late afternoon.
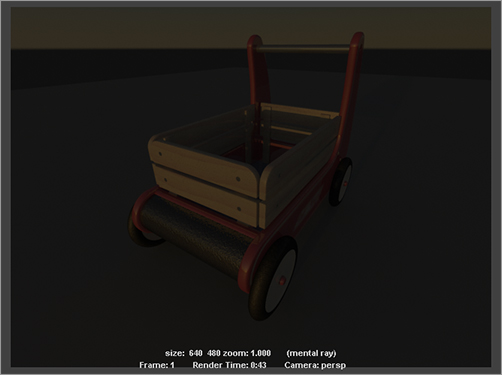
10. Render the frame, and you’ll see quite a difference in the scene. Maya automatically adjusts PSAS settings to make the render appear as if the Sun is about to set. This is because of the new angle. The scene (shown in Figure 10-47) not only shows a new lighting direction (the shadows fall toward the back and are longer) but also is a darker and warmer light, as if it were mid-to-late afternoon.
11. Angle the sunDirection light even more (so RotateY is at about -2.5), almost parallel with the ground plane, and render a frame. Now the Sun has all but set, and it’s dark dusk, just before night falls on the scene. See Figure 10-48.
Figure 10-48: It’s getting late; you should get home before nightfall.
12. Rotate the sunDirection even more so that it’s at a RotateY of about 15. It’s now dark, and you can barely make out the wagon. See Figure 10-49. Time to go home before your mom gets mad. Remember, you can adjust the overall brightness of the scene by adjusting the mia_physicalsky1 node attributes, as you did in steps 6 and 7.
You can add lights to the scene as well; you aren’t limited to the system’s results. For example, Figure 10-50 shows a render of the wagon with the Sun beginning to rise behind it, making the foreground a bit dark. Figure 10-51 shows the same render, but with an added Directional light (with an Intensity of just 0.25) pointing toward the front of the wagon. This helps define the front of the wagon, hinting that there is another light source, perhaps a porch light behind the camera.
Figure 10-49: Ooh, it’s dark—Mom’s gonna be mad.
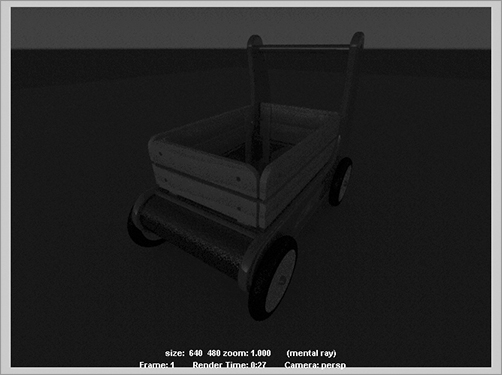
Figure 10-50: The sun also rises!

Figure 10-51: Adding a light to illuminate the front of the wagon in this sunrise scene from Figure 10-50

The PSAS system is pretty slick. It can get you some fairly nice results quickly. Keep experimenting with different sunDirection angles as well as the attributes for the system to see what results you can get for your scene. Add lights to create areas of detail in your model.
Unbeknownst to you, when you invoked the PSAS system, Maya turned on Final Gather in the mental ray settings. This enabled indirect lighting to work in the scene. We’ll explore Final Gather in the next chapter.
We’ll also explore conventionally lighting the wagon scene and bringing out its details for rendering starting at the end of this chapter and continuing into the next chapter. There, we’ll introduce HDRI and image-based lighting for a fairly photoreal rendering of the wagon.
This is the perfect time for a break, so save your work (as if I have to tell you that at this point!) and go grab some iced tea and rest your eyes for a bit. In the next section, we’ll go over various special lighting effects before returning to the wagon.