
You can either map or raytrace reflections. As you saw in Chapter 7, creating a reflection map for an object is pretty simple. Simply assign a Phong, Phong E, Blinn, or Anisotropic material to your object, and make sure the Reflectivity attribute is greater than zero. Then, click the Reflected Color map button to add a texture or a file as a map to create the reflection. (See the axe project in Chapter 7 for more on reflection maps and shaders.)
To generate true reflections, however, you’ll need to enable raytracing in either Maya Software or mental ray for Maya. Mapping textures to the reflected color isn’t necessary when raytracing is enabled, because Maya reflects any objects in the scene that fall in the proper line of sight.
Raytracing with mental ray
Enabling raytracing in mental ray is as simple as checking the Raytracing box in the Render Settings window in the Features tab.
Raytraced Reflections
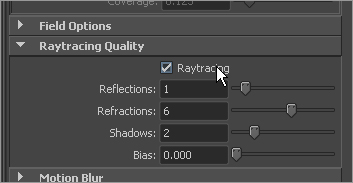
To enable raytraced reflections, use a material with a Reflections attribute, such as a Phong, and open the Render Settings window. Choose Maya Software, and in the Maya Software tab, click the Raytracing check box in the Raytracing Quality section. (See Figure 11-11.)
Figure 11-11: Enabling raytracing in Maya Software rendering
The sliders control the quality of the render by specifying how many times to reflect or refract for any given object. Setting Reflections to 2, for example, enables an object’s reflection in a second object to appear as part of its reflection in a third object.
The first image in Figure 11-12 shows the still life reflecting onto the surface of its table. In this case, Reflections is set to 1. If you increase Reflections to 2, however, you see the reflections of the pieces of fruit in each other also reflecting in the surface of the table.
Figure 11-12: (left) Reflections set to 1; (right) Reflections set to 2

Notice the difference in the reflections of the fruit in the table between the two renders. Raytraced reflections can consume valuable render resources and time, so it’s a good idea to make your scene efficient. You don’t want to reflect more than necessary.
You can control the number of reflections on a per-object basis as opposed to setting limits on the entire scene through the Render Settings window. To access a shader’s reflection limits, select the shader in the Hypershade, and open the Attribute Editor. In the Raytrace Options section, drag the Reflection Limit slider to set the maximum number of reflections for that shader. The lower value (either this value or the Reflections value in the Render Settings window) dictates how many reflections are rendered for every object attached to that shader. The default shader reflection limit is 1, so make sure you change the Reflections value as well as each shader’s value if you want more than one level of reflection.
Furthermore, you may not want some objects to cast reflections in a scene with raytraced reflections. To specify that an object doesn’t cast reflections, select the object in a Maya panel, and open the Attribute Editor. In the Render Stats section, clear the Visible in Reflections check box.
Rendering Refractions
Refractions are also a raytraced-only ability. Refractions require that an object be semitransparent so that you can see through it to the object (or objects) behind it that is being refracted. To control refractions, use the shader.
To enable refractions, select the appropriate shader in the Hypershade, and open the Attribute Editor. In the Raytrace Options section, click the Refractions check box. Now you need to set a refractive index for the shader and a refraction limit, similar to the reflection limit.
The refractive index must be greater or less than 1 to cause a refraction. Typically, a number within 0.2 of 1 is perfect for most refraction effects. The first image in Figure 11-13 is raytraced with a refractive index of 1.2 on the wine bottle and glasses; the second image has a refractive index of 0.8 on both bottle and glasses.
You can specify whether an object is visible in a refracting object by clicking or clearing the Visible in Refractions check box in the Render Stats section of the object’s Attribute Editor.
Figure 11-13: (left) Refractive index of 1.2; (right) Refractive index of 0.8
